
Tiramisu Cheesecake Food Photography Tricks
Lighting
Natural gentle is essential for food images, particularly when shooting something as delicate and visually interesting as tiramisu cheesecake.
The best time to shoot is during the golden hour, the hour after dawn and the hour before sunset. This delicate, diffused gentle creates a heat, inviting environment good for showcasing the creamy texture and rich colours of the dessert.
Avoid harsh midday sun. Its robust, direct rays solid unflattering shadows and can wash out the small print of your cheesecake.
Window light is a fantastic source of natural light. Position your cheesecake close to a window, but avoid inserting it directly in the solar’s path. Experiment with completely different positions to search out one of the best steadiness of sunshine and shadow.
Use a diffuser to melt the sunshine even further. A sheer curtain or a bit of white cloth hung in front of the window can work wonders.
Reflectors are invaluable tools for bouncing light back into the shadows and highlighting textures. A white foam board or maybe a piece of white cardboard can be used as a simple reflector.
Pay attention to the direction of the light. Side lighting can emphasize the layers and texture of the cheesecake, whereas entrance lighting supplies a more even illumination.
Consider utilizing a light tent for a extra controlled surroundings, significantly when you’re taking pictures in a dimly lit house. A light tent will diffuse gentle evenly across the cheesecake.
White balance is crucial for accurate color reproduction. Ensure your camera’s white balance is set correctly to keep away from color casts.
Shoot in RAW format in case your digicam allows it. This will give you higher flexibility in post-processing to regulate the publicity, white stability, and different settings.
Experiment with different angles and perspectives. A high angle shot can showcase the entire cheesecake, while a close-up shot can spotlight the texture and particulars.
Use natural props corresponding to contemporary berries, coffee beans, or cocoa powder to boost the visible appeal of your image and complement the tiramisu cheesecake.
Remember that composition is key. Use the rule of thirds to create a visually interesting association and information the viewer’s eye to the focal point – the scrumptious tiramisu cheesecake.
Don’t be afraid to experiment with totally different lighting setups and angles. The greatest way to be taught is by making an attempt totally different techniques and observing the results.
Cleanliness is essential. Ensure your cheesecake is freed from crumbs and imperfections before taking pictures.
Finally, patience is essential in meals images. It might take a quantity of makes an attempt to seize the perfect shot. Don’t get discouraged – keep working towards and experimenting!
Consider the overall mood you want to convey. A heat, inviting ambiance may suit a cozy café setting, whereas a more modern and modern really feel may work higher for a high-end restaurant.
The interaction of light and shadow will dramatically affect the mood and texture of the final image. Master this and you will be properly on your way to creating stunning meals photography.
Backgrounds ought to complement, not compete with the cheesecake. A easy, neutral background is usually your best option.
Depth of field is essential to manage. A shallow depth of field can blur the background and draw consideration to the cheesecake; a deeper depth of subject will hold everything sharp.
For tiramisu cheesecake meals photography, lighting is paramount to achieving a mouthwatering image.
Natural gentle, if obtainable, is commonly most well-liked for its delicate, subtle quality.
However, synthetic light offers more management, especially in studio settings or when shooting at evening.
Softboxes are excellent tools for softening harsh artificial light, minimizing shadows and making a more even illumination across the cheesecake.
Using a quantity of softboxes allows for shaping and sculpting light to highlight particular textures, such because the creamy layers of the dessert.
A gentle reflector can be utilized to bounce mild back into shadowed areas, additional enhancing detail and minimizing distinction.
Consider the color temperature of your mild supply. Daylight-balanced mild (around 5500K) is often finest for correct colour rendition, ensuring the tiramisu’s rich browns and creamy whites are faithfully represented.
Tungsten mild (around 3200K) will produce hotter, more amber tones, which can be creatively used for a cozy or vintage feel, depending on the specified aesthetic.
Experiment with completely different gentle positions. Side lighting can dramatically highlight the texture of the cheesecake, showcasing the layers and the dusting of cocoa powder.
Backlighting can create a wonderful rim mild, separating the cheesecake from the background and enhancing its three-dimensionality.
Overhead lighting may be useful for basic illumination however may flatten the image, so it’s best used along side other lighting strategies.
For knowledgeable look, consider using continuous lighting, corresponding to LED panels, which permit you to see the lighting effects in real-time and make adjustments as needed.
Alternatively, strobe lighting can freeze motion, helpful when you’re incorporating parts like pouring espresso or sprinkling cocoa.
The background lighting ought to be rigorously considered to prevent distracting components and guarantee the cheesecake stays the point of interest.
A darker background will emphasize the cheesecake’s colors and particulars, making it pop visually.
Using a gradient background also can add depth and visual curiosity with out detracting from the topic.
Remember to keep away from harsh shadows and reflections, which may detract from the overall aesthetic.
Careful lighting placement and manipulation could make all of the distinction in capturing the irresistible enchantment of the tiramisu cheesecake.
Post-processing can further enhance the image, allowing for subtle changes to brightness, contrast, and colour stability, but good lighting in the first place will lay the foundation for a surprising photograph.
Don’t be afraid to experiment! The finest approach will rely in your specific setup, digicam, and desired aesthetic.
Ultimately, the goal is to create a photograph that evokes the deliciousness and texture of the tiramisu cheesecake, making viewers crave a chunk.
For mouthwatering tiramisu cheesecake photographs, lighting is paramount. Natural light is your greatest good friend; delicate, diffused gentle avoids harsh shadows and brings out the creamy texture.
Position your cheesecake close to a window, ideally on an overcast day or through the golden hour (sunrise/sunset) for probably the most even illumination. Avoid direct daylight, which creates harsh contrasts and washes out colour.
If pure gentle is inadequate, think about using synthetic mild sources. A softbox or diffuser will soften the light from a flash or steady light, preventing harsh shadows.
Experiment with different mild angles. Side lighting accentuates texture and highlights the layers of the cheesecake, whereas entrance lighting offers even illumination, showcasing the general enchantment.
Backlighting can create a dramatic silhouette, however it may obscure element. Use it sparingly, maybe to highlight a particular element like dusting of cocoa powder.
Balancing gentle and shadow is essential. Shadows add depth and dimension, making the image more attention-grabbing. However, too much shadow can obscure details and make the cheesecake look unappetizing.
To management shadows, use reflectors to bounce mild back into shadowed areas. White foam board or perhaps a piece of white paper can work nicely. Alternatively, you can use black boards to absorb excess gentle and deepen shadows strategically.
Consider the background. A neutral backdrop like a light-colored floor will stop distractions and allow the cheesecake to take center stage. However, a barely textured background can add visual curiosity without overpowering the topic.
Pay consideration to the highlights. These are the brightest parts of the picture and may showcase the creamy, decadent texture of the cheesecake. Avoid overexposing highlights, which is able to wash out element and make the picture look flat.
Use a lightweight meter or your digicam’s histogram to ensure proper publicity and keep away from underexposing or overexposing the image. A slightly underexposed picture can often seem richer and more appetizing.
Practice and experimentation are key. Take a quantity of photographs from various angles and with completely different lighting setups to find what works finest in your cheesecake. Remember, the goal is to showcase its deliciousness.
Post-processing can enhance your pictures. Subtle adjustments to brightness, contrast, and saturation can make a giant distinction. But bear in mind to maintain it pure and avoid over-editing.
Here’s a checklist that will assist you:
- Use delicate, subtle pure gentle.
- Control shadows with reflectors or black boards.
- Choose a neutral or subtly textured background.
- Properly expose your shot, aiming for barely underexposed.
- Experiment with different lighting angles (side, entrance, back).
- Use a light-weight meter or histogram for accurate publicity.
- Post-process subtly to enhance the image, however keep natural look.
By mastering these lighting techniques and listening to the interaction of light and shadow, you probably can create beautiful meals images that will make your tiramisu cheesecake irresistible.
Background and Props
Choosing the proper background in your tiramisu cheesecake meals photography is crucial for showcasing its deliciousness and texture. A poorly chosen background can distract from the star of the present – your decadent dessert.
Consider the general temper and elegance you want to convey. A rustic, picket background would possibly emphasize the do-it-yourself quality of the cheesecake, while a modern, marble surface could spotlight its magnificence and sophistication.
Natural mild is your greatest pal. Shoot close to a window for soft, subtle gentle, which minimizes harsh shadows and enhances the creamy texture of the tiramisu cheesecake.
Avoid busy or cluttered backgrounds. Keep it simple and clean. A plain, neutral background allows the cheesecake to be the focus, stopping visible distractions.
The colour of your background can be essential. Complementary colors can enhance the looks of the food. For instance, a heat, earthy tone might work nicely with the brown hues of the tiramisu, whereas a cool, gentle blue or gray may provide a hanging distinction.
Think about textures. A easy, polished floor will contrast beautifully with the creamy texture of the cheesecake. Alternatively, a slightly textured surface like linen or wooden can add visual curiosity without overpowering the dessert.
Here are some background concepts for your tiramisu cheesecake photoshoot:
Wooden cutting board: Rustic and basic, perfect for a homely feel.
Marble slab: Elegant and complex, perfect for a more luxurious aesthetic.
Light-colored linen tablecloth: Provides a clean and simple backdrop.
Neutral-colored ceramic plate or platter: A timeless and versatile choice.
Dark background: Creates a dramatic and moody atmosphere.
Experiment with different backgrounds to search out what best enhances your tiramisu cheesecake and desired visual fashion. Remember to suppose about the general composition of your shot, guaranteeing that the background doesn’t compete with the dessert.
Props can add visual interest and assist inform a narrative. However, avoid overwhelming the picture with too many props. Keep it simple and related.
Here are some prop ideas to consider:
Coffee beans: A basic pairing with tiramisu.
Spoon or cake server: Suggests the act of enjoying the dessert.
A small glass of espresso or espresso: Complements the tiramisu fantastically.
Ladyfingers: A key ingredient in tiramisu, subtly reminding the viewer of its elements.
Fresh mint sprig: Adds a touch of freshness and visible interest.
Cocoa powder dusting: Emphasizes the texture and richness of the tiramisu.
Remember to maintain consistency in your fashion and keep the concentrate on the tiramisu cheesecake. The props ought to enhance the image, not distract from it. Place props strategically, ensuring they do not hinder the view of the cheesecake.
Consider the size and proportion of your props in relation to the cheesecake. Avoid utilizing overly giant or small props that can throw off the stability of the image.
Before your shoot, arrange your background and props to create a cohesive and visually appealing setup. Experiment with completely different arrangements until you find the proper composition that showcases your tiramisu cheesecake in the very best mild.
Ultimately, the most effective background and props will rely on your personal fashion and the particular message you need to convey. Don’t be afraid to experiment and have enjoyable with it!
For a mouthwatering tiramisu cheesecake food photograph, the background is essential. Avoid busy or distracting patterns; select one thing that complements the dessert’s creamy, earthy tones.
A easy, neutral backdrop like a lightweight gray or beige linen tablecloth works wonders. Alternatively, a country wood floor, perhaps barely distressed, can evoke a heat, homely feeling.
Consider a textured background. A subtly patterned fabric, a worn wood board, or perhaps a marble slab can add visible interest without overpowering the cheesecake.
Natural mild is king. Shoot near a window for gentle, diffused illumination that avoids harsh shadows. A reflector can further improve the highlights and forestall darkish areas.
Regarding props, less is commonly extra. Overcrowding the shot can detract from the cheesecake’s magnificence.
A few strategically positioned props can elevate the image. Consider a small spoon resting on the slice, subtly hinting at its creamy texture.
A dusting of cocoa powder close by, maybe on a small plate or even lightly sprinkled on the cheesecake itself, can add a touch of visible curiosity.
A demitasse spoon or a small, elegant fork can be included to emphasise the dimensions and delicateness of the dessert.
For a touch of authenticity, embody a few of the ingredients used in the making of the cheesecake. A small bowl of espresso beans or a sprinkle of ladyfingers close by can add a sense of story and context.
A sprig of contemporary mint or a few coffee beans can present a pop of shade and texture, creating visual distinction in opposition to the creamy cheesecake.
Think about incorporating elements that evoke the dessert’s flavors. A small cup of espresso or a glass of marsala wine (if used within the recipe) positioned artfully within the background can enhance the general narrative.
Pay consideration to color coordination. Choose props in colours that either complement or distinction with the cheesecake’s colours without clashing.
The use of natural elements like wooden, linen, or maybe a few rigorously positioned leaves can add a contact of rustic allure or sophistication, relying on the desired aesthetic.
Avoid props which might be too shiny or reflective, as they’ll distract from the principle subject and create unwanted glare.
Consider the overall composition. Use the rule of thirds to position the cheesecake and props in a visually interesting means.
Experiment with completely different angles and perspectives to seek out probably the most flattering shot. A slightly elevated angle can usually create a extra appealing visual.
Remember that the aim is to showcase the deliciousness of the tiramisu cheesecake. The props should improve that, not overshadow it.
Before the shoot, fastidiously clean and arrange all of your props. Make positive everything is well-lit and positioned to greatest advantage for optimum visuals.
Finally, contemplate the general mood you need to convey. Do you want a rustic, homely feel or one thing extra sophisticated and elegant? The alternative of background and props will assist set this tone.
For a Tiramisu cheesecake meals pictures shoot, background choices should complement the dessert’s wealthy, earthy tones. Consider utilizing neutral colours like warm browns, creams, or even a deep, muted gray.
Avoid busy or distracting backgrounds. A simple linen tablecloth, a picket board, or a clean marble surface works well.
Props can enhance the image with out overwhelming the subject. A few espresso beans scattered artfully, a dusting of cocoa powder close by, or a small spoon resting elegantly on the cheesecake can add visual interest.
Think about textures. The smooth, creamy cheesecake contrasts beautifully with the roughness of a linen material or the grain of wooden.
Incorporate parts that trace at the tiramisu flavor profile. A small espresso cup, a sprig of recent mint (if used within the recipe), or a fragile biscuit can subtly evoke the dessert’s style and components.
Avoid overly brilliant or clashing colors in your props. The focus should remain on the cheesecake itself.
Keep the prop choice minimal. Too many parts will distract from the primary subject.
Consider the lighting. A darkish background can make the cheesecake pop, highlighting its texture and shade. Conversely, a lighter background may create a softer, more inviting really feel.
Natural light is often finest, however delicate, diffused synthetic lighting can also work well.
Styling the cheesecake itself is crucial. Ensure it’s neatly introduced, with easy edges and a visually appealing high layer. A slight dusting of cocoa powder can add an extra contact of class.
Consider using shallow depth of area to blur the background and draw attention to the cheesecake.
For a more rustic feel, use a picket slicing board or a slightly distressed surface. For a modern look, go for clean lines and minimalist props.
Experiment with different angles. A top-down shot can showcase the texture and layering, while a slightly angled shot can highlight the cheesecake’s top and creamy consistency.
Maintain consistency in style. If you’re going for a rustic look, all props and background components should complement that aesthetic.
Pre-visualizing your shot earlier than the shoot can help you choose the most effective background and props. Consider mood boards or reference images.
Don’t be afraid to experiment. Try completely different mixtures of backgrounds and props to find what works greatest on your specific fashion and the look you’re aiming for.
Remember, much less is commonly extra. A simple, well-executed shot will be far more effective than a cluttered and distracting one.
Cleanliness is paramount. Ensure your props are clean and free of smudges or crumbs. A clear background is equally essential.
Pay consideration to element. Small imperfections can simply be seen in close-up meals images, so careful consideration to element is important.
Ultimately, the objective is to create a visually appealing picture that precisely represents the deliciousness of the tiramisu cheesecake.
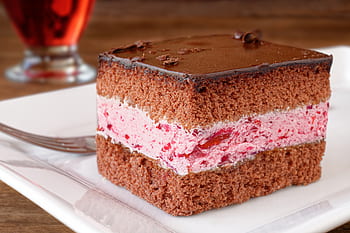
Styling the Cheesecake
For a truly stunning tiramisu cheesecake photograph, texture and depth are key. Don’t just give consideration to the overall look; highlight the contrasting elements.
Begin with the cheesecake’s crust. If it is a traditional graham cracker crust, consider using a shallow dish to level out its layered texture. A slightly crumbly edge provides visible interest. Lightly dust it with cocoa powder for a delicate contrast.
The cheesecake itself must showcase its creamy, smooth texture. A mild swirl of the filling throughout or after baking will create subtle variations in gentle and shadow, adding depth. Avoid over-mixing; gentle peaks are desirable.
Focus on the coffee-soaked ladyfingers. They should look moist and barely darkened by the coffee, but not soggy. Arrange them artfully; barely overlapping layers create visible rhythm and dimension. Consider utilizing a wide range of angles to showcase their texture.
The mascarpone cream is another essential element. Its fluffy texture must be evident. A barely uneven high or a fragile peak adds to its appeal. Consider utilizing a piping bag for knowledgeable contact, creating subtle peaks or swirls.
Cocoa powder is your friend. Instead of a heavy dusting, use a fine-mesh sieve to create a delicate, nearly ethereal layer. This adds a visible depth and complements the other layers. The distinction between the darkish cocoa and the light cream is stunning.
Lighting is paramount. Natural mild, ideally gentle and diffused, is right. Avoid harsh shadows that can flatten the image. Experiment with angles and reflectors to focus on textures and curves.
Props can enhance the picture. A easy background, perhaps a linen tablecloth or a picket board, will prevent the cheesecake from being visually lost. A small spoon or coffee beans can add context and visible curiosity, however avoid cluttering the scene.
Styling details matter. Consider these choices:
- Garnish with a couple of shaved chocolate curls.
- Place a small sprig of recent mint or a dusting of cinnamon.
- Use a coffee cup and saucer nearby to convey a sense of indulgence.
Depth of field is crucial. A shallow depth of area will blur the background and draw focus to the cheesecake’s texture and details. This impact is usually achieved through a large aperture in your digital camera.
Color grading plays a vital role. Enhance the creamy tones of the cheesecake and the rich brown of the cocoa without making the colors appear unnatural or overly saturated.
Consider different compositions. A close-up shot highlighting the feel of the mascarpone is putting. A wider shot showcasing the complete cake supplies a sense of scale and context. Experiment with various angles — chook’s-eye view, barely elevated, or a low angle for drama.
Finally, editing is crucial. Enhance the small print with out over-processing. Subtly regulate contrast, brightness, and sharpness to create a refined and visually fascinating image. Remember to maintain the cheesecake’s pure look while optimizing the primary points.
For a truly fascinating Tiramisu cheesecake food photograph, styling goes beyond merely plating. Consider the overall mood you need to evoke – rustic charm or elegant sophistication?
A dusting of cocoa powder is crucial, but the utility matters. Avoid a heavy, uneven coating. Instead, use a fine-mesh sieve held several inches above the cheesecake to create a delicate, nearly ethereal layer. A small spoon can be utilized for more managed dusting on specific areas.
Vary the cocoa powder’s intensity. Create depth by utilizing darker cocoa powder in some areas and lighter in others, adding refined shadows and highlights.
Consider adding texture to the cocoa dusting. Lightly drag a toothpick or small knife through the cocoa powder to create delicate traces or patterns, adding visual curiosity.
Drizzling is one other key element. A simple coffee liqueur drizzle adds both shade and taste to the visual narrative. For a extra dramatic effect, use a contrasting color like melted white chocolate, creating a wonderful contrast against the darkish cocoa powder.
Control the drizzle’s circulate. Don’t just pour it haphazardly. Use a spoon or a squeeze bottle to create controlled drips and streams that fall naturally over the cheesecake’s edges and sides.
Vary the thickness of the drizzle. Thicker drizzles create sturdy visible accents, while thinner ones add a more refined contact.
Consider layering your drizzles. A layer of espresso liqueur followed by a thin line of melted white chocolate can create a visually gorgeous impact. Think of it like making a design.
Garnish strategically. A few strategically positioned espresso beans or ladyfingers add visual appeal and reinforce the Tiramisu theme. Don’t overcrowd the picture; less is more.
Use contrasting colors and textures in your garnishes. A sprinkle of finely grated darkish chocolate can add another layer of texture and visible interest.
Think concerning the background and props. A rustic wooden board or a easy white plate can elevate the overall aesthetic. Consider adding elements that complement the Tiramisu theme, similar to a small cup of coffee or a spoon.
Lighting is essential. Natural mild is at all times most popular, but a softbox or diffused mild can mimic this effect. Avoid harsh shadows which can detract from the general image.
Consider the angle. Shoot from barely above to showcase the cheesecake’s layers and the intricate element of your styling.
Experiment with different views. A close-up shot emphasizes texture and element, while a wider shot showcases the complete cheesecake and its environment.
Post-processing can improve your photographs, however goal for a naturally appealing photograph first. Subtle adjustments to brightness, distinction, and saturation can additional elevate your ultimate product.
Remember that the objective is to showcase the cheesecake’s deliciousness visually. The styling should enhance the meals, not overpower it.
- Use a fine-mesh sieve for even cocoa dusting.
- Experiment with different cocoa powder intensities.
- Create patterns with a toothpick or knife.
- Control the move of your drizzles.
- Layer drizzles for visible depth.
- Garnish strategically and sparingly.
- Choose an appropriate background and tiramisu cheesecake props.
- Utilize appropriate lighting.
- Experiment with totally different camera angles.
- Enhance your images subtly in post-processing.
For a truly gorgeous Tiramisu cheesecake, contemplate a garnish that evokes the traditional Italian dessert.
Dusting the cheesecake with cocoa powder is a basic and simple method. Use a fine-mesh sieve for a fair, elegant coating.
Consider using a cocoa powder stencil to create a design, perhaps a refined sample or even the word “Tiramisu”.
Grated darkish chocolate adds texture and visible curiosity. Use a microplane for fine shavings, or a vegetable peeler for larger curls.
Espresso-soaked ladyfingers, arranged artistically across the base or on prime, visually link the cheesecake to its inspiration.
A dusting of cinnamon, subtly complementing the cocoa, can add a heat to the visible attraction.
Fresh mint sprigs, strategically positioned, introduce a pop of vibrant green to contrast the rich browns and lotions.
A scattering of espresso beans adds a rustic, artisanal touch. Choose beans which are visually interesting, maybe with a darker roast.
For a extra luxurious look, consider using gold leaf flakes. A small quantity provides extravagance and sophistication.
Use a piping bag with a decorative tip to create a border of whipped cream around the base or top.
Incorporate crumbled amaretti cookies for added texture and a distinctly Italian flavor profile.
For a dramatic effect, consider making a small chocolate sauce drizzle across the floor. Use a skinny piping bag for exact management.
A few strategically positioned coffee-caramel candies would add a complicated touch and a complementary taste element.
If using recent berries, go for darker hues like blackberries or raspberries to distinction with the creamy base. Avoid brilliant red or yellow that may conflict.
Consider a chocolate ganache, fastidiously drizzled or swirled, to add depth and richness.
For a sublime presentation, place the cheesecake on a beautiful cake stand or serving platter. Use a contrasting color, such as dark wooden or slate, to make the cheesecake stand out.
Use pure gentle for images. Place the cheesecake near a window, and make the most of a reflector board to fill in shadows and enhance highlights.
Pay consideration to background details. A easy, clean background in a impartial colour will prevent distractions and make the cheesecake the star.
Use a shallow depth of subject to blur the background and draw focus to the cheesecake and its garnishes.
Experiment with totally different angles and views. A close-up shot can highlight the texture and particulars, while a wider shot shows the entire dessert in context.
Edit your photographs fastidiously utilizing photograph enhancing software. Adjust brightness, distinction, and saturation to enhance the colors and details.
- Consider the overall aesthetic: rustic, elegant, fashionable, and so forth.
- Less is usually more. Avoid overcrowding the cheesecake with too many garnishes.
- Choose garnishes that complement both the flavour and visible attraction of the cheesecake.
- Think about texture and contrast. Mix smooth and tough components for visible curiosity.
- Maintain consistency in your garnishing for a elegant look.
Composition
To photograph tiramisu cheesecake compellingly, mastering composition is vital.
The Rule of Thirds is a fantastic place to begin. Instead of centering the cheesecake, think about your image divided into 9 equal parts by two equally-spaced horizontal and two equally-spaced vertical traces.
Position key elements—like the height of the whipped cream, a dusting of cocoa powder, or a strategically positioned spoon—along these strains or at their intersections. This creates a extra visually appealing and dynamic picture than simple centering.
Consider the negative space around the cheesecake. Don’t overcrowd the frame. Allow for respiratory room. A clean background, perhaps a subtly textured linen tablecloth or a easy picket board, can improve the cheesecake’s prominence.
Play with leading lines. Perhaps a path of cocoa powder, the edge of the plate, or perhaps a strategically placed napkin can guide the viewer’s eye towards the cheesecake, building anticipation and focus.
Think about the shape and form of the cheesecake. Its curves and textures are visually attention-grabbing. Highlight these by using lighting to accentuate the highlights and shadows, creating depth and dimension.
Experiment with different angles. A high-angle shot can emphasize the general form and texture, whereas a low-angle shot might make the cheesecake look more decadent and luxurious.
Consider using a shallow depth of field (a blurry background) to isolate the cheesecake and draw attention to its details. This could be achieved with a wide aperture setting in your digicam.
Don’t forget about lighting. Natural, gentle gentle is commonly ideal, however you can also experiment with synthetic lighting to create dramatic effects. Avoid harsh shadows that might obscure the cheesecake’s delicious details.
Think about color and contrast. The warm browns of the cocoa powder contrast beautifully with the creamy white of the cheesecake. Use this distinction to your advantage in your composition.
Pay consideration to texture. The creamy smoothness of the cheesecake, the marginally grainy texture of the cocoa, and the perhaps the roughness of a wooden board all add visual interest. Capture these nuances in your pictures.
Finally, practice. Experiment with completely different compositions, angles, and lighting until you find what works best for showcasing your tiramisu cheesecake. Review your photographs and be taught from every attempt. The more you shoot, the higher you’ll turn into at composing compelling food pictures.
Remember, the goal is to create a photograph that not solely showcases the deliciousness of the tiramisu cheesecake but in addition evokes a sense and tells a story. A well-composed picture will do just that.
Using the rule of thirds and different compositional methods, you probably can create incredibly appealing photographs that make viewers crave a bite of your delectable creation.
For compelling Tiramisu cheesecake meals pictures, composition is key. Think concerning the rule of thirds; don’t middle the cheesecake perfectly. Place it off-center, perhaps at one of many intersecting factors of the imaginary grid that divides your frame into thirds both horizontally and vertically.
Utilize negative space successfully. Don’t overcrowd the frame. Leave respiration room across the cheesecake to let it’s the star. A simple, clean background can significantly improve the image’s impression.
Consider the shape and form of the cheesecake. Its roundness, the layering of the tiramisu, the dusting of cocoa powder – all contribute to its visible enchantment. Highlight these components via strategic positioning and angles.
Leading lines are a powerful compositional device. Think about how you can subtly guide the viewer’s eye in the direction of the cheesecake. Perhaps a wooden desk edge, a slightly blurred background factor, and even the strains created by the layers of the dessert itself may serve as efficient main lines.
A strategically positioned spoon can act as a leading line, directing the gaze in the course of the creamy texture of the cheesecake, inviting the viewer to think about the taste and experience.
Experiment with different perspectives. A barely elevated angle can make the cheesecake look extra engaging, showcasing its height and layers. A close-up shot can highlight the texture and element. A wider shot can show the context, such as a beautiful setting or accompanying drinks.
The lighting is crucial. Soft, natural light is commonly preferred for meals pictures, however consider backlighting for a dramatic effect, highlighting the texture and the layering of the dessert. Avoid harsh shadows that may obscure particulars.
Pay close consideration to color harmony. The heat browns of the cocoa powder, the creamy beige of the cheesecake, the refined colors of the ladyfingers – these colours ought to complement each other. The background should improve these colors, not conflict with them.
Depth of field is necessary. A shallow depth of field (using a large aperture) can blur the background, focusing attention solely on the cheesecake. Conversely, a deep depth of area (using a slender aperture) can maintain sharpness all through the picture, revealing the complete setting.
Don’t be afraid to experiment with props. A cup of coffee, a napkin, or a few strategically placed espresso beans can add visible interest and context with out distracting from the primary topic – the delectable Tiramisu cheesecake.
Finally, remember that post-processing can improve your picture, but do not over-edit. Subtle adjustments to brightness, distinction, and saturation could make a world of distinction, but goal for a natural, appetizing look.
By mastering these compositional methods and understanding the ability of leading lines, you’ll have the ability to create meals images that are not solely visually stunning but in addition capable of making the viewer crave a slice of your scrumptious Tiramisu cheesecake.
To achieve a fascinating image of Tiramisu cheesecake, composition is vital. Consider the rule of thirds, inserting the cheesecake off-center to create a more dynamic and visually appealing shot.
Leading strains, such as a spoon or a dusting of cocoa powder, can guide the viewer’s eye in the path of the cheesecake, enhancing the general composition.
Framing is another efficient approach. Use elements like coffee beans, ladyfingers, or even the sides of a plate to create a pure border across the cheesecake, drawing focus to the topic.
Consider the viewpoint. A barely elevated angle can showcase the layered texture of the cheesecake, while a close-up shot can highlight its creamy, decadent surface.
The use of unfavorable area is crucial in food pictures. Don’t overcrowd the body. Allow for ample house across the cheesecake, preventing a cluttered look and permitting the viewer’s eye to rest.
Strategic negative house can even improve the feeling of luxurious and indulgence associated with the dessert. A minimalist background with a clean, uncluttered space across the cheesecake will elevate its visual influence.
The background itself is a element of negative house. Neutral backgrounds similar to white or light beige will complement the wealthy tones of the tiramisu cheesecake, permitting the dessert to take center stage.
Consider the texture and colour distinction. The smoothness of the cheesecake cream contrasts superbly with the tough texture of cocoa powder or ladyfingers, making for an engaging visual expertise.
Lighting is essential. Natural gentle is most well-liked, but when utilizing artificial mild, guarantee even illumination throughout the cheesecake to avoid harsh shadows or darkish areas.
For added impact, use props sparingly. A single elegant fork, a espresso cup, or a small sprig of mint can improve the overall aesthetic with out overwhelming the picture.
Think about the general story you may be telling. Is it about the indulgence, the process of creating it, or the enjoyment of consuming it? Let the composition mirror that story.
Experiment with completely different angles and views. Shooting from above provides a transparent view of the layers, whereas a barely angled shot can showcase its texture and kind extra dynamically.
Post-processing can enhance the image additional. Careful adjustments to brightness, contrast, and saturation can convey out one of the best within the cheesecake’s colors and textures.
Remember, the objective is to make the cheesecake look scrumptious and attractive, evoking a need within the viewer to savor its flavors.
Here are some key elements to assume about in the composition of your Tiramisu cheesecake meals photography:
- Rule of thirds
- Leading lines
- Framing
- Viewpoint
- Negative space
- Background
- Props
- Lighting
- Color and texture contrast
- Storytelling
By carefully contemplating these components, you probably can create really stunning food images that can go away viewers craving a slice of your delectable tiramisu cheesecake.
Post-Processing
Post-processing is crucial for elevating meals pictures, especially when taking pictures a decadent dessert like tiramisu cheesecake.
Color correction is a key facet of this, aiming to attain accurate and appealing colours that replicate the dessert’s wealthy textures and components.
Start by assessing your RAW image. RAW files offer higher flexibility for adjustments than JPEGs.
The first step usually includes white balance correction. Ensure your whites are really white, and your colours aren’t overly warm or cool. The ambient gentle throughout your shoot significantly impacts this.
For a tiramisu cheesecake, you’ll want to preserve the good and cozy, inviting tones associated with espresso and cream. Subtle changes are usually best.
Adjust the publicity to ensure the picture is neither too shiny nor too darkish. The purpose is to reveal the small print in both the highlights (the creamy peaks) and the shadows (within the coffee-soaked ladyfingers).
Contrast is one other vital element. Enhance it subtly to make the textures of the cheesecake, the crispness of the ladyfingers, and the richness of the cocoa powder pop.
Consider using selective changes, such as utilizing radial or graduated filters to brighten particular areas while darkening others.
This permits you to spotlight essentially the most appealing elements of the dessert, such as the dusting of cocoa powder or the swirl of creamy filling.
Vibrance and saturation changes can amplify the colours without making them look unnatural. A contact of vibrance could make the coffee tones more intense, whereas subtly boosting saturation enhances the cream’s richness.
However, avoid over-saturation, as this could result in an unrealistic and synthetic look.
Pay shut attention to skin tones if arms are current in the image. These should remain natural and never be affected by the overall shade grading.
Use curves changes for fine-tuning particular person color channels (red, green, blue). This supplies precise control over particular color ranges.
For occasion, you may subtly lift the shadows in the pink channel to boost the heat of the coffee flavor.
Consider utilizing cut up firming to introduce a refined tint to the shadows and highlights. This can add depth and mood to the picture.
For instance, a slight heat tone in the highlights could enhance the creamy texture, whereas cooler shadows add a touch of elegance.
Finally, sharpening is crucial for enhancing the detail and texture of the cheesecake. Use a sharpening tool rigorously to keep away from halo effects round edges.
Remember, the objective is to enhance the inherent fantastic factor about the tiramisu cheesecake, not to create an unrealistic or synthetic rendition.
Regularly evaluation your progress, tiramisu cheesecake zooming in to check for element and color accuracy.
Experiment with totally different shade correction strategies and settings to discover what finest enhances your unique type and the particular traits of the photograph.
Calibration of your monitor is essential for accurate color representation all through the post-processing workflow.
By mastering these methods, you’ll find a way to rework your food photographs into visually beautiful representations that completely capture the attract of a scrumptious tiramisu cheesecake.
Post-processing is essential for attaining the creamy, luscious look desired in tiramisu cheesecake photography. Sharpening, particularly, performs a key role in bringing out the feel of the cheesecake and the delicate particulars of the coffee dusting or cocoa powder.
Avoid over-sharpening, which can lead to a harsh, unnatural look. Instead, goal for subtle enhancement that emphasizes the textures without introducing artifacts or halos round edges.
Different sharpening strategies exist; understanding each is crucial for achieving the specified end result. Unsharp Mask (USM) is a widely used technique. It allows for management over the amount of sharpening, radius (the space affected by sharpening), and threshold (how much distinction is needed earlier than sharpening is applied).
For a tiramisu cheesecake, you might use a relatively small radius to focus on fantastic particulars like the cocoa powder’s texture and the delicate variations in the cheesecake’s surface. A lower quantity prevents over-sharpening and preserves a pure look.
The threshold setting is particularly helpful in preventing noise or grain from being amplified. A greater threshold will ignore areas with low distinction, preserving the smoothness of the cheesecake whereas enhancing the major points of the toppings.
Another approach is using frequency separation, which separates the picture into high-frequency (details) and low-frequency (tones) layers. This allows for selective sharpening of the high-frequency layer without affecting the overall tone and colour of the picture, resulting in a more refined outcome. This is excellent for managing the fantastic textures throughout the cheesecake.
Consider using a smart sharpening tool found in many editing packages. These instruments typically analyze the picture and automatically apply sharpening the place it’s most needed, decreasing the chance of over-sharpening and preserving the smoothness of the cream.
Before sharpening, guarantee your picture is correctly exposed and has minimal noise. Sharpening amplifies imperfections; therefore, cleaning up the image beforehand improves the ultimate outcome. Noise discount must be applied judiciously to avoid blurring details.
Local adjustments can be used to selectively sharpen certain areas. For example, you may sharpen the cocoa powder extra aggressively than the creamy cheesecake layers, maintaining the visual distinction and texture.
Layer masking allows for exact control over where sharpening is utilized, enabling you to protect areas that should stay soft and easy, corresponding to highlights reflecting off the cheesecake’s floor.
Always view your work at 100 percent zoom to rigorously assess the influence of sharpening. Check for halos, artifacts, or unnatural enhancement. A subtle, natural look is preferable to an aggressively sharpened picture that appears artificial.
Experiment with completely different sharpening strategies and settings to search out what works best for your particular image. Factors like the lighting, the digicam used, and the general style of your images will affect your optimum sharpening approach.
The aim is to enhance the visual enchantment of the tiramisu cheesecake, highlighting its texture and deliciousness without compromising its natural beauty. Remember, much less is often more when it comes to sharpening in food photography.
Finally, calibrate your monitor for correct shade illustration to make sure the sharpening is applied correctly and constantly throughout different gadgets. A well-calibrated monitor is crucial for accurate visible assessment.
Post-processing and retouching are essential for elevating meals images, especially with a visually interesting dessert like tiramisu cheesecake. The goal isn’t to create a faux picture, however to boost the present qualities and create a more polished ultimate product.
Initial Adjustments: Begin by correcting the overall exposure, distinction, and white stability. A slightly warmer white steadiness typically complements the creamy tones of the cheesecake and coffee flavors. Adjusting the highlights and shadows can convey out details in both the light and darkish areas, preventing a flat or washed-out look. This is often dealt with in Lightroom or Camera Raw.
Color Grading: Subtle colour grading can additional improve the mood. Consider subtly boosting the yellows and creams to emphasise the cheesecake’s richness, or including a contact of blue to the shadows to create depth. Avoid over-saturation, which can look synthetic.
Sharpening and Noise Reduction: High-resolution photographs often benefit from refined sharpening to reinforce details like the texture of the ladyfingers or the dusting of cocoa powder. Noise discount can be helpful when you shot at a high ISO, reducing any graininess without shedding essential detail.
Spot Healing and Cloning: Minor imperfections, such as dust spots or small blemishes on the cheesecake, may be simply removed utilizing the spot healing or cloning instruments in Photoshop or related software. Use these tools sparingly to keep up a pure look.
Dodging and Burning: This basic approach includes selectively lightening (dodging) and darkening (burning) areas of the picture to guide the viewer’s eye and create contrast. You would possibly dodge highlights on the top of the cheesecake to emphasize its creamy texture and burn shadows in the crevices to enhance depth.
Liquify Tool (Use Sparingly): The Liquify tool can subtly modify shapes and proportions. For occasion, you may barely easy out any uneven edges of the cheesecake or straighten a barely tilted slice. However, overuse can make the image look unnatural.
Texture Enhancement: To enhance the mouthwatering quality, you would possibly subtly enhance the feel of the cheesecake, especially in areas like the highest layer or the perimeters where the textures are distinguished. This can be done through selective sharpening or using particular textures in overlay layers.
Specific Tiramisu Cheesecake Considerations:
- Cocoa Powder: Ensure the cocoa powder dusting appears natural and not overly thick or blotchy. Use the healing brush or cloning device to subtly even out the application.
- Ladyfingers: Enhance the texture and definition of the ladyfingers by selectively sharpening and adjusting contrast. You may additionally subtly lighten the areas where they’re seen to make them pop.
- Coffee Glaze (if applicable): If your cheesecake has a coffee glaze, guarantee it looks glossy and smooth. Use the dodge device to spotlight its shine and the blur device to take away any harsh edges.
- Cream Cheese Texture: Emphasize the creamy texture of the cheesecake by subtly rising contrast and sharpening in particular areas. This would possibly involve careful use of frequency separation techniques for precise control.
Workflow: A typical workflow would possibly involve preliminary changes in Lightroom, followed by more detailed retouching in Photoshop. Always work on a duplicate of your original image to keep away from any irreversible modifications. Save your file in a high-resolution format (e.g., TIFF or PSD) for optimum quality.
Final Considerations: Remember that the objective is to reinforce, to not create a fantasy. Subtlety is essential; over-retouching could make your picture look synthetic and less appealing. Always strive for a natural and practical result that highlights the deliciousness of the tiramisu cheesecake.
Exporting: Finally, export your picture in a format suitable for your supposed use (e.g., JPEG for net, TIFF for print). Optimize the file measurement for the platform without sacrificing an extreme amount of quality.
Camera Settings
For luscious Tiramisu cheesecake images, mastering aperture is essential to controlling depth of field and highlighting textures.
A extensive aperture (low f-number, like f/1.4, f/2, or f/2.8) will blur the background, isolating the cheesecake and making it pop in opposition to a softly diffused backdrop. This is good for showcasing the creamy layers and delicate textures of the dessert. The blurred background helps draw the viewer’s eye directly to the cheesecake.
Consider your specific shot composition. If you want to emphasize the complete cheesecake in sharp focus, together with details of the crumb crust and the dusted cocoa powder, you may need a smaller aperture (higher f-number, like f/8, f/11, or f/16).
However, with a larger aperture, you might must be mindful of focusing precisely on the point you need sharpest. Using a shallow depth of field with a wide aperture means only a small portion of the scene will be in sharp focus; the rest will gradually fade into a satisfying bokeh (the aesthetic quality of the out-of-focus blur).
Experiment with totally different apertures to see how the depth of area changes the general image. Start with a few check shots at completely different f-stops to search out the candy spot that greatest represents the cheesecake’s textures and details.
Remember that the lens you may be utilizing will affect your minimum and most aperture settings. A prime lens (a lens with a fixed focal length) typically presents wider most apertures than zoom lenses, allowing for extra dramatic background blurring.
For close-up shots focusing on a single slice or a element just like the coffee-soaked ladyfingers, a large aperture will fantastically emphasize the creamy texture and distinction it with a blurred background.
For a shot showcasing the complete cheesecake on a platter, a slightly narrower aperture may be most popular to maintain extra of the scene in focus. This could help to show the dimensions of the dessert and its presentation on the plate.
Don’t overlook that aperture is only one side of publicity. Adjust your shutter pace and ISO accordingly to hold up a well-balanced and correctly exposed image. A tripod is extremely recommended, especially when using smaller apertures or lower ISO settings for sharper images.
Lighting is crucial. Soft, subtle light is ideal for meals pictures, minimizing harsh shadows and highlighting the textures and colors of the cheesecake. Consider using a diffuser or reflector to control the light and create an even illumination.
Here’s a abstract of aperture settings for different effects:
- Wide Aperture (f/1.four – f/2.8): Shallow depth of subject, blurred background, emphasizes the cheesecake’s texture and creamy layers, best for close-ups.
- Medium Aperture (f/4 – f/5.6): Moderate depth of field, some background blur, balances focus between the cheesecake and its environment.
- Narrow Aperture (f/8 – f/16): Large depth of field, most of the scene in focus, good for exhibiting the entire cheesecake and its presentation.
Remember to shoot in RAW format if potential, this will provide you with extra flexibility to adjust your settings later in post-processing.
Ultimately, the best aperture in your Tiramisu cheesecake images will rely upon the particular shot, your required aesthetic, and the overall composition of your picture. Experiment and have fun exploring completely different choices to seek out what works best for you!
For meals images, particularly of a visually wealthy dessert like tiramisu cheesecake, mastering ISO is essential for capturing detail and avoiding noise.
ISO measures the sensitivity of your camera’s sensor to mild. A decrease ISO (e.g., ISO a hundred, ISO 200) means lower sensitivity, leading to cleaner pictures with less noise (grain) however requiring extra gentle.
Higher ISO settings (e.g., ISO 1600, ISO 3200) improve sensitivity, allowing you to shoot in low-light circumstances but introducing extra noise into the image. This noise can detract from the fragile textures and colors of the cheesecake.
For a tiramisu cheesecake shoot, you’ll ideally need to use the lowest ISO potential whereas still reaching a correctly uncovered picture. This prioritizes picture high quality and sharpness.
Consider your lighting setup. If you’re utilizing pure mild near a window, you can probably use a low ISO like a hundred or 200. The delicate, diffused light will minimize the necessity for a excessive ISO setting.
However, if you’re taking pictures in a darker environment or using synthetic lighting, you may want to increase your ISO. Start with a lower ISO and steadily improve it only if essential, fastidiously observing the noise stage in your preview or in your camera’s LCD screen.
The acceptable level of noise is dependent upon your required aesthetic and post-processing capabilities. Some photographers embrace a slightly grainy look for a specific fashion, whereas others choose crystal-clear photographs with minimal noise.
Shooting in RAW format is extremely really helpful for meals images. RAW files contain extra image data than JPEGs, offering greater flexibility in post-processing. This allows for simpler noise reduction without significant loss of detail throughout editing.
During post-processing, you should use noise discount software or instruments within your modifying program (like Lightroom or Photoshop) to additional decrease noise should you needed to shoot at a higher ISO.
Experimentation is vital. Take take a look at photographs at completely different ISO settings underneath your specific lighting conditions. Compare the outcomes to find out the optimal ISO for your tiramisu cheesecake pictures project. Note the trade-off between image noise and the quantity of obtainable light.
Remember to think about different settings along side ISO. Aperture and shutter velocity additionally play significant roles in publicity and depth of area. A wider aperture (smaller f-number) will let in additional mild, permitting for a decrease ISO. A quicker shutter velocity will freeze any movement blur, which is helpful when shooting meals.
For a truly beautiful image of tiramisu cheesecake, rigorously handle your ISO to balance sharpness, element, and the absence of distracting noise. The goal is to capture the delectable textures and creamy richness of the dessert, allowing its visual enchantment to shine through.
Keep in mind that the precise best ISO will differ depending on the digicam, lens, lighting situations, and your private preferences. The suggestions above are tips that will help you begin your experimentation course of.
Don’t be afraid to strive completely different settings and see what works best for you. The most essential factor is to know the relationship between ISO and picture high quality so as to make knowledgeable decisions when shooting your tiramisu cheesecake.
Shutter velocity is paramount in meals images, particularly when capturing the luscious textures of a Tiramisu cheesecake.
For sharp, detailed photographs of the delicate layers and creamy topping, you will need a fast shutter velocity. A speed of 1/250th of a second or quicker will usually freeze any motion, stopping blur from digital camera shake and even slight actions of the cheesecake itself.
However, the ideal shutter pace isn’t always the quickest potential.
If you are aiming for a barely extra dreamy or atmospheric picture, you might choose a slower shutter pace, maybe round 1/60th of a second. This can introduce a refined blur, which can add a touch of inventive aptitude, particularly if you’re using a tripod to keep away from digital camera shake.
Consider the ambient lighting. If you’re capturing in a brightly lit space, a sooner shutter velocity will probably be wanted to prevent overexposure.
Conversely, in dimly lit settings, you may need a slower shutter velocity, which would require a tripod to avoid blur from camera shake.
Here’s a breakdown of shutter pace concerns within the context of Tiramisu cheesecake images:
Sharpness and Detail: 1/250th of a second or faster. This freezes any movement and supplies crisp detail within the cheesecake’s layers and textures. Excellent for showcasing the person parts.
Slightly Blurred, Dreamy Effect: 1/60th to 1/125th of a second. Introduces a refined movement blur, which can create a more inventive and fewer scientific feel. This works greatest with a tripod to stop digital camera shake.
Low Light Situations: Slower shutter speeds shall be essential, but a tripod is absolutely essential to keep away from blurry images. Consider utilizing a better ISO setting to compensate for the lack of light.
Aperture and ISO Interaction: Remember that shutter pace works at the aspect of aperture and ISO. If you’re utilizing a large aperture (low f-stop number) to blur the background and highlight the cheesecake, you would possibly be able to use a quicker shutter speed even in low mild. If you need a slower shutter speed, you’ll be able to enhance the ISO, however this would possibly introduce noise into your picture.
Experimentation: The greatest shutter pace will rely on your specific lighting conditions, desired aesthetic, and the digicam equipment you are using. Don’t be afraid to experiment and shoot at varied shutter speeds to see what works greatest in your particular scene and vision.
Remember to all the time shoot in RAW format if potential. This will give you much larger flexibility in post-processing to adjust exposure and recuperate detail in both highlights and shadows.
By fastidiously considering your shutter pace, you probably can capture really gorgeous photographs of your Tiramisu cheesecake, showcasing its textures, colors, and overall deliciousness.
Pay shut attention to the interaction between your shutter speed, aperture, and ISO to realize the right steadiness of sharpness, exposure, and creative effect.
Consider utilizing a distant shutter release or the digicam’s self-timer to remove digital camera shake entirely, especially when utilizing slower shutter speeds.
Mastering shutter speed is essential to achieving professional-looking meals images.
Equipment
For taking pictures a decadent tiramisu cheesecake, you may need a camera capable of capturing both the creamy texture and the rich colours. A full-frame digicam will supply superior image quality and dynamic range, allowing for larger element in each the highlights and shadows.
However, a great APS-C sensor digital camera can even produce glorious results, especially if you’re shooting in controlled lighting conditions.
Consider lenses that may capture both macro and wider pictures. A macro lens might be essential for showcasing the detailed textures of the cheesecake, highlighting the layers and the delicate dusting of cocoa powder.
A 50mm or 85mm lens is right for capturing the overall look of the cheesecake, creating a satisfying composition.
Consider using a wide-aperture lens (f/1.4, f/1.8, or f/2.8) for a shallow depth of area, which can blur the background and draw focus to the cheesecake itself, making it seem more interesting and luxurious.
Tripods are important for sharp, detailed images, particularly when capturing with a wider aperture.
A remote shutter release will assist decrease digicam shake, further enhancing image sharpness.
For lighting, natural light close to a window is often most well-liked, offering gentle and subtle illumination.
However, you may need supplemental lighting like softboxes or diffusers to control shadows and spotlight the textures effectively.
A reflector may help bounce gentle back onto the cheesecake, filling in shadows and including highlights.
Consider the background fastidiously. A simple, clean backdrop—like a white or neutral-colored surface—will keep the focus on the cheesecake.
A darker background can create a more dramatic and moody feel.
You can even use props like spoons, coffee beans, or ladyfingers to add context and improve the general visual attraction.
Post-processing is key to finalizing the image. Software like Adobe Lightroom or Capture One will allow for changes to white stability, exposure, distinction, and sharpness.
Pay close attention to color grading to enhance the rich browns and creamy tones of the tiramisu cheesecake.
Consider utilizing spot healing and clone stamp tools to take away any minor imperfections.
Finally, think about your overall composition. Use the rule of thirds or different compositional pointers to create a visually interesting image that draws the viewer’s eye to the cheesecake.
Remember to shoot from varied angles—straight-on shots, barely elevated angles, and even close-up shots of particular person layers—to capture the cheesecake’s beauty from completely different perspectives.
- Essential Equipment Summary:
- Full-frame or APS-C camera
- Macro lens and a 50mm or 85mm lens
- Tripod
- Remote shutter release
- Lighting tools (softboxes, diffusers, reflector)
- Simple backdrop
- Props (optional)
For taking pictures a decadent tiramisu cheesecake, you’ll want equipment that can seize the creamy textures and wealthy colours precisely.
A DSLR or mirrorless digital camera with good low-light efficiency is essential, as you will doubtless be taking pictures in softer, subtle lighting to avoid harsh shadows.
Consider a full-frame sensor for superior picture high quality and shallower depth of subject, which might help isolate the cheesecake and blur the background.
A tripod is important for sharp photographs, especially when you’re shooting with a slower shutter velocity to seize more gentle.
A distant shutter launch prevents digicam shake from pressing the shutter button manually.
Reflective surfaces, similar to white foam board or a large sheet of white paper, can help bounce light into the shadows and create more even illumination.
Diffusers, like softboxes or umbrellas, soften harsh light from your strobes or speed lights, producing a more pure and flattering look.
Several lenses can work splendidly, relying on the specified impact:
Macro lens: Excellent for extreme close-ups, showcasing the feel of the cheesecake and the element of the cocoa powder dusting.
50mm lens: A versatile focal length, perfect for creating a balanced composition showing the complete slice or a close-up of a particular factor.
85mm or 100mm lens: These portrait lenses produce an attractive bokeh (background blur), making a dreamy look and drawing attention to the cheesecake.
Wide-angle lens: Useful for capturing the cheesecake alongside different parts in a styled scene, corresponding to espresso, spoons, or other desserts.
The aperture you select will significantly impression the look of your picture.
A wide aperture (f/2.eight or lower) will blur the background and create a shallow depth of subject, focusing attention on the cheesecake. This works well for isolating the subject and making it pop.
A narrower aperture (f/8 or tiramisu cheesecake higher) will hold the complete cheesecake in focus, helpful for displaying detail and texture throughout the whole floor.
Experiment with totally different apertures to see which achieves your required result.
Lighting is essential to capturing the creamy texture and rich color of the tiramisu cheesecake.
Soft, subtle lighting will prevent harsh shadows and highlight the scrumptious textures.
Consider utilizing natural mild from a window, subtle with a sheer curtain.
Alternatively, use artificial lighting corresponding to strobes or speed lights modified with softboxes or umbrellas for larger management over the light.
Experiment with varied lighting angles to seek out probably the most flattering mild.
Side lighting can add depth and dimension, while backlighting can spotlight the feel and create a dramatic effect.
Remember to additionally consider the background. A clean, uncluttered background will help the cheesecake stand out.
Use props corresponding to napkins, coffee cups, or silverware to create a visually interesting and cohesive scene, however keep away from overwhelming the image.
Post-processing is essential for enhancing your photographs.
Adjust the publicity, contrast, and saturation to achieve the desired look. Consider using selective changes to highlight specific areas of the cheesecake, such because the creamy filling or the chocolate shavings.
Experiment with totally different editing methods to search out what works finest on your fashion.
Remember, the secret’s to showcase the luscious texture and creamy appeal of the tiramisu cheesecake.
For achieving those drool-worthy Tiramisu cheesecake photographs, a sturdy tripod is crucial. Forget shaky, blurry pictures; a tripod provides the steadiness wanted for sharp, professional-looking photographs.
Consider the burden capacity of your tripod. A heavier tripod will typically be more steady, particularly when you’re using extra gear like lighting.
The top adjustability is crucial. You’ll need the pliability to shoot from various angles, from excessive above to get the whole cake in body, to low angles for a extra dramatic perspective.
Leg sections matter. More leg sections enable for extra exact top changes, essential for fine-tuning your composition.
Look for a tripod with a fluid head. This kind of head allows for easy, managed panning and tilting movements, good for these gradual, deliberate camera actions that add a touch of cinematic quality.
A ball head tripod is a more affordable different offering flexibility, although it would require extra apply for smooth transitions.
Consider the tripod’s materials. Aluminum tripods are lightweight and fairly priced, while carbon fiber tripods are lighter and stronger however dearer.
Don’t underestimate the significance of the tripod’s feet. Spiked toes are wonderful for outdoor shoots on uneven terrain, whereas rubber ft are perfect for indoor use.
For food images, especially with one thing delicate like a Tiramisu cheesecake, it’s your decision a smaller, extra compact tripod that is easily portable and doesn’t take up an extreme quantity of space in your kitchen or studio.
Leveling your tripod is important. Uneven floor can result in tilted pictures. Some tripods include built-in bubble ranges for easy leveling.
Once you’ve got arrange your tripod, all the time take a check shot earlier than starting your photoshoot to ensure everything is in focus and accurately positioned. Adjust your settings as needed.
Remember to consider the overall setup. The tripod is just one piece of the puzzle. You’ll also need adequate lighting, an appropriate background, and probably props to create the right Tiramisu cheesecake photography setup.
Investing in a high quality tripod is an funding within the quality of your food images. It’s a tool that can serve you properly for years to come back, serving to you capture those stunning photographs that may make your audience crave a slice.
Ultimately, one of the best tripod will depend in your particular person needs and price range. Research totally different models and read reviews earlier than making a purchase.
Don’t neglect to wash your tripod frequently to take care of its functionality and longevity. Dust and particles can intrude with its easy operation.
Consider a remote shutter launch for additional stability. This will get rid of any camera shake caused by pressing the shutter button.
- Stability: The most essential characteristic for sharp photographs.
- Height Adjustability: Flexibility for different angles and compositions.
- Head Type: Fluid or ball head, relying on your capturing style.
- Material: Aluminum or carbon fiber, balancing weight and power.
- Feet: Spiked or rubber, primarily based in your capturing location.
- Portability: Especially necessary for kitchen shoots.