

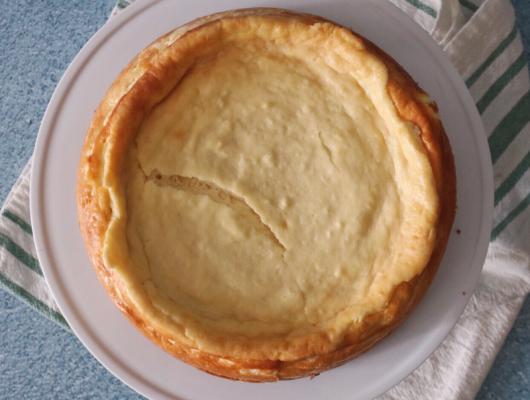
Tips For Making A Keto-friendly Cheesecake Filling Extra Creamy
Using Full-Fat Ingredients
For a very decadent and creamy keto cheesecake, full-fat components are paramount. Don’t skimp!
Start with full-fat cream cheese. This is the inspiration of your cheesecake, and its richness will immediately impact the final texture.
Avoid reduced-fat or mild cream cheese choices; they contain more water and less fat, leading to a thinner, much less luscious filling.
The fat content material is essential for both the texture and the flavour. Full-fat cream cheese provides that luxurious mouthfeel that defines a fantastic cheesecake.
When choosing your cream cheese, pay close consideration to the model and its ingredients.
Some manufacturers would possibly contain added stabilizers or fillers that may have an result on the final consistency of your cheesecake. Look for a cream cheese with a easy ingredient list.
Ideally, it should only comprise cream, milk, and maybe a touch of salt.
Bring your cream cheese to room temperature earlier than using it. This is essential for attaining a easy and creamy filling.
Cold cream cheese will be tough to beat smoothly, resulting in lumps and a less-than-ideal texture.
Allowing it to melt ensures easy blending and a wonderfully clean base for your cheesecake.
Consider the sort of cream cheese. While commonplace cream cheese works well, some bakers choose to use a specific kind like Philadelphia cream cheese for its renowned consistency.
Experiment to see which model best fits your preferences and your keto-friendly recipe.
Beyond cream cheese, the other elements play a significant role in reaching creaminess.
Use full-fat bitter cream or heavy cream for additional richness and a velvety texture. Again, avoid low-fat alternatives.
Full-fat coconut milk can also add a pleasant richness and delicate coconut taste, complementing the cream cheese fantastically.
Ensure your eggs are at room temperature as well. This aids in correct emulsification and contributes to a smoother batter.
Don’t overmix the batter. Overmixing can incorporate an excessive amount of air, resulting in a much less dense and probably cracked cheesecake.
Mix till simply combined, guaranteeing all ingredients are thoroughly included however without excessive whipping.
Finally, bake your cheesecake slowly and at a lower temperature. This ensures even cooking and prevents cracking. A water bathtub is beneficial for additional stability.
Following these steps will information you in the direction of creating a keto-friendly cheesecake that’s not only scrumptious but additionally extremely creamy and decadent.
Here’s a summary of key points:
- Use full-fat cream cheese
- Bring cream cheese to room temperature
- Choose a brand with easy ingredients
- Use full-fat sour cream or heavy cream
- Don’t overmix the batter
- Bake slowly and use a water tub (optional)
Heavy cream is your secret weapon for achieving an ultra-creamy keto cheesecake filling.
Its high fat content material contributes considerably to the wealthy, luxurious texture that defines a very distinctive cheesecake.
Don’t skimp – use full-fat, preferably natural, heavy cream for the most effective outcomes.
The larger fats content interprets on to a smoother, more decadent mouthfeel.
Consider utilizing a mix of heavy cream and cream cheese for the final word stability of creaminess and tang.
The cream cheese offers construction and tang, while the heavy cream adds unparalleled richness and smoothness.
When incorporating the heavy cream, do so gently, folding it into the other elements somewhat than vigorously mixing.
This prevents over-mixing, which may incorporate air and lead to a much less dense, less creamy filling.
Ensure your heavy cream is thoroughly chilled earlier than incorporating it into the batter.
Cold cream whips up better and creates a extra stable, much less likely-to-separate filling.
For a good creamier texture, contemplate including a contact of full-fat Greek yogurt.
The yogurt adds a delicate tang and contributes to the general creaminess with out considerably impacting the keto-friendliness.
Be conscious of the sweetness degree; heavy cream itself has a slightly sweet taste that can enhance the overall taste profile.
Adjust your sweetener accordingly to forestall a very sweet cheesecake.
Experiment with different varieties of sweeteners, corresponding to erythritol or monk fruit, to seek out the proper stability on your palate.
Avoid utilizing low-fat or skim milk alternate options, as they will not present the necessary richness and texture.
The fats content material in heavy cream is essential for achieving that signature cheesecake creaminess.
Proper chilling can also be key; allow the cheesecake to chill thoroughly within the fridge earlier than serving.
This allows the flavors to meld and the filling to set utterly, resulting in a firmer, creamier texture.
Consider using a meals processor to attain a super-smooth filling, eliminating any lumps from the cream cheese or other ingredients.
A clean base will lead to an unbelievably creamy ultimate product.
Don’t be afraid to experiment with different ratios of heavy cream to cream cheese to attain your perfect degree of creaminess.
Start with a recipe as a guide and modify to your liking.
Remember, persistence is essential; allow ample time for chilling to allow the filling to succeed in its peak creaminess.
A slow, gradual chill helps the fat properly solidify, resulting in a denser, richer last product.
Using quality ingredients, together with top-notch heavy cream, makes all the difference in creating a truly exceptional keto cheesecake.
The funding in high-quality elements is mirrored in the last product’s unmatched creaminess and deliciousness.
Enjoy the method and savor the creamy results of your keto-friendly culinary creation!
Coconut cream, the thick, solidified portion of full-fat coconut milk, is a keto baker’s greatest friend when it comes to reaching an ultra-creamy cheesecake filling.
Its high fat content contributes significantly to the rich, luxurious texture desired in a cheesecake, mimicking the creaminess offered by conventional, higher-carb dairy cream cheese.
To maximize its creamy potential, make sure you’re utilizing full-fat coconut milk from a can, not the lighter versions present in cartons.
Before using, refrigerate the can of coconut milk overnight. This allows the cream to separate and solidify, making it easier to scoop out.
Carefully scoop out solely the thick, solidified cream from the highest, leaving the watery liquid (coconut water) behind. Discarding the watery liquid is essential for attaining the desired consistency.
The quantity of coconut cream you’ll need will rely in your recipe; however, substituting a portion or all of the cream cheese with coconut cream is a typical and effective strategy.
Incorporating the coconut cream steadily into the cheesecake batter is vital to stopping curdling. Start by beating the cream cheese till clean and fluffy earlier than slowly adding the coconut cream.
A stand mixer is really helpful for this course of, however a hand mixer may additionally be used if handled gently and steadily.
Consider utilizing a combination of cream cheese and coconut cream for essentially the most luxurious texture. A ratio of 1:1 or 2:1 (cream cheese to coconut cream) typically yields glorious results, relying on your desired degree of coconut taste.
To improve the creaminess further, guarantee your cream cheese is at room temperature. This permits it to mix seamlessly with the coconut cream and other elements, creating a homogenous and smooth batter.
Don’t overmix the batter as soon as all components are included. Overmixing can incorporate an excessive quantity of air, potentially leading to a much less dense and creamy final product.
For an even richer flavour and texture, consider adding a contact of full-fat Greek yogurt or heavy cream alongside the coconut cream. These additions enhance the richness and complement the coconut flavor fantastically.
Finally, keep in thoughts that the quality of your components instantly impacts the final product’s texture. Choose high-quality full-fat coconut milk and cream cheese for optimal outcomes.
Experiment with completely different ratios of coconut cream to cream cheese to search out your preferred steadiness of flavor and texture. The beauty of baking is within the customization!
Using full-fat elements all through your keto cheesecake recipe, including coconut cream, contributes to a decadent, satisfying, and really keto-friendly dessert.
Remember to always taste check and adjust your recipe primarily based on private choice. Happy baking!
Mastering the Mixing Technique
Achieving an exceptionally creamy keto cheesecake filling hinges on mastering mixing methods, specifically understanding the fragile balance between mild folding and vigorous mixing.
Vigorous mixing introduces air, which may lead to a much less dense, potentially grainy texture in your cheesecake. This is especially problematic in keto cheesecakes, where the absence of flour depends on a clean, creamy texture to compensate.
The initial stages of combining elements, significantly the cream cheese and sweetener, ought to be approached with a gentle hand. Using a spatula or a low-speed mixer, incorporate the sweetener progressively, making certain no lumps remain. Scrape down the edges of the bowl frequently to stop any dry patches from forming.
Over-mixing at this point results in over-aeration, resulting in a much less dense, potentially crumbly filling. The aim here is to create a homogenous combination without incorporating extreme air.
Once the cream cheese and sweetener are absolutely combined, you’ll be able to add other components similar to eggs, bitter cream, and extracts. The method here shifts slightly. While still avoiding a high-speed beat, you should ensure these parts are thoroughly included. This step requires a bit more mixing than the initial cream cheese and sweetener mixture. However, the emphasis ought to stay on thorough incorporation, not creating air bubbles.
The introduction of heavier components, like melted keto-friendly butter or cream cheese, requires a gentle folding method. This entails utilizing a spatula to softly raise portions of the batter from the bottom and fold them excessive, rotating the bowl as you go. This approach minimizes air incorporation whereas making certain even distribution of the ingredient.
For any additions that would simply clump, like cocoa powder or vanilla bean paste, you need to use a whisking movement to include them smoothly. The whisking motion helps prevent clumping whereas keeping the overall mixing comparatively light.
If you’re utilizing a stand mixer, all the time choose the bottom velocity attainable for all stages. Gradually enhance the velocity only if completely necessary to combine elements, but always preserve a velocity that avoids creating excessive foam or bubbles.
The ultimate consistency must be clean and creamy, with a slight sheen but no visible air bubbles. If the batter is simply too thick, a really small quantity of heavy cream may be added, folding it in gently till you obtain the specified consistency. This is a degree where you have to be exact, as an extreme amount of cream will make the cheesecake too free.
Patience and a cautious hand are paramount. Rushing the method is the most common mistake leading to a less-than-creamy keto cheesecake. Gentle folding and conscious mixing are essential for attaining the luxurious texture you need.
Remember to all the time taste-test the mixture earlier than pouring it into the crust to ensure the sweetness and taste profile are excellent before baking.
By fastidiously balancing light folding and the suitable amount of mixing, you will grasp the artwork of creating a keto cheesecake filling that’s irresistibly clean, creamy, and wealthy.
Achieving a luxuriously creamy keto cheesecake filling requires mastering a few key techniques, and crucially, avoiding over-mixing.
Cream cheese is the inspiration; use full-fat, high-quality cream cheese for the richest texture. Let it soften to room temperature – that is very important. Cold cream cheese shall be troublesome to incorporate easily, leading to a lumpy end result.
Begin by beating the cream cheese with a stand mixer or a strong hand mixer till it’s completely easy and fluffy. This crucial step aerates the cream cheese, contributing considerably to the final creaminess.
Add the sweetener steadily, beating on low speed to stop it from clumping. Don’t rush this process; thoroughly incorporate the sweetener before including extra.
Eggs are next. Add them one at a time, again mixing on low velocity and ensuring every egg is fully integrated before adding the next. Over-mixing at this stage will incorporate an extreme amount of air, potentially resulting in cracks in your baked cheesecake.
The similar principle applies to any other moist elements like sour cream or heavy cream. Add them incrementally, mixing gently until simply combined. Resist the urge to over-mix; you’re aiming for a smooth batter, not a whipped meringue.
The secret to avoiding over-mixing lies in understanding when to cease. Once the elements are just mixed and the batter is smooth, you are done. Over-mixing develops the gluten in any flour substitutes you might be utilizing (if any), creating a tough and fewer creamy texture. It also incorporates excessive air, which might lead to cracks during baking and a less dense, less wealthy ultimate product.
Use a rubber spatula to scrape down the edges of the bowl periodically to make sure everything is absolutely included. This is a extra light approach than continuously utilizing the mixer.
Consider the type of sweetener. Some sweeteners dissolve extra readily than others, impacting the feel of your filling. Experiment to seek out the perfect stability of sweetness and creaminess on your most well-liked sweetener.
Finally, guarantee your oven temperature is correct. Baking at too excessive a temperature could cause the cheesecake to curdle or turn out to be dry, counteracting your efforts to create a creamy texture. A water tub can also be beneficial in maintaining a consistent, even bake, preventing cracking and promoting a easy interior.
By following these steps and paying close attention to the consistency of your batter, you presumably can obtain a luxuriously creamy keto cheesecake filling that will impress even the most discerning palate. Remember, the secret’s gentle mixing and figuring out when to stop.
Using high-quality ingredients is also key. The fats content within the cream cheese and any added cream considerably influences the final texture. Don’t skimp on high quality here for the best results.
Lastly, enable your cheesecake to cool fully in the fridge before serving. This permits the flavors to meld and the filling to set properly, resulting within the ultimate creamy keto cheesecake expertise.
Achieving a luxuriously easy and lump-free keto cheesecake filling requires meticulous consideration to element all through the method. The key lies in correctly incorporating ingredients and preventing curdling.
Begin with high-quality elements. Use full-fat cream cheese, ensuring it is at room temperature. Cold cream cheese might be tough to incorporate easily, leading to lumps. Let it sit out for a minimal of an hour, and even longer depending on the climate.
Similarly, guarantee your eggs are also at room temperature. Cold eggs can cause the combination to grab up, resulting in a grainy texture. Allowing them to come to room temperature prevents this.
Use a stand mixer or a hand mixer – a whisk alone isn’t adequate for this stage of smoothness. The higher power and constant beating will emulsify the components better.
Beat the cream cheese till utterly smooth and creamy before including another components. Scrape down the edges of the bowl regularly to ensure every little thing is properly included and there are not any cussed lumps of cream cheese remaining.
Add the eggs separately, beating thoroughly after every addition. Don’t rush this step; the slow and steady incorporation of the eggs is crucial to prevent curdling.
Sweeteners must be added steadily. Whether utilizing erythritol, stevia, or monk fruit, slowly incorporating them will help stop clumping. If utilizing powdered sweeteners, sift them to eliminate any lumps earlier than including to the batter.
Incorporate any flavorings, similar to vanilla extract or lemon zest, gently after the sweetener. Over-mixing at this stage can result in a less-than-smooth texture.
For further creaminess, think about adding a tablespoon or two of heavy cream or full-fat coconut milk. This will enhance the richness and improve the texture, making it even silkier.
Strain the batter through a fine-mesh sieve before pouring it into the crust. This removes any small lumps that will have survived the blending course of, guaranteeing an exceptionally clean ultimate product.
Use a double boiler technique or a bain-marie to bake the cheesecake. This light cooking methodology helps to keep away from cracks and ensures even cooking, stopping a grainy or lumpy texture within the ultimate product.
Once baked, allow the cheesecake to chill utterly earlier than refrigerating. Rapid cooling can cause cracking and uneven texture. Slow and steady cooling is essential to a perfectly easy keto cheesecake.
Finally, bear in mind to use an excellent high quality keto-friendly crust. The base should complement the creamy filling, and a high-quality base will help create a finished product that’s harmonious in texture.
- Use Room Temperature Ingredients: Cream cheese and eggs are crucial.
- Powerful Mixer: A stand or hand mixer is essential for correct emulsification.
- Gradual Addition: Add eggs and sweeteners one by one, mixing totally.
- Strain the Batter: This eliminates any remaining tiny lumps.
- Gentle Baking: Use a bain-marie for even cooking.
- Slow Cooling: Prevent cracking and texture points.
By following these steps, you’ll be able to grasp the art of creating a wonderfully clean and lump-free keto cheesecake filling, delighting yourself and others with an expensive and scrumptious dessert.
Temperature Control
Chilling ingredients, particularly the cream cheese, is paramount to attaining a luxuriously creamy keto cheesecake filling. The colder the cream cheese, the less probably it’s to separate or become grainy through the mixing process.
Ideally, cream cheese ought to be taken immediately from the refrigerator and allowed to take a seat at room temperature for less than a very Quick Keto Cheesecake No Bake period—no more than 10-15 minutes—to soften barely. This prevents it from being too hard to beat, yet maintains its chilly temperature which helps prevent over-whipping.
Similarly, chilling the eggs before incorporating them into the batter is essential. Cold eggs emulsify more readily and contribute to a smoother, more steady ultimate product. They are less prone to curdle and create a less desirable texture in the cheesecake.
Consider chilling other key elements of your keto cheesecake filling as properly. If using heavy cream, a crucial component for attaining that wealthy and creamy texture, chilling it helps to create a stiffer, more stable combination. This contributes to a more aerated and lighter filling. Letting it get too warm will lessen its capability to incorporate air.
For any further liquids included in the recipe, corresponding to keto-friendly sweeteners or extracts, pre-chilling these ingredients is not strictly needed however can subtly enhance the ultimate end result. Cold liquids assist to maintain the overall batter temperature down, making it easier to handle and stopping it from changing into too soft or warm through the mixing section.
The temperature of your mixing bowl additionally plays a small but significant position. A chilled bowl may help preserve the low temperature of the elements, slowing down the melting of the cream cheese and contributing to a smoother, creamier mixture. For optimal outcomes, think about chilling your bowl and beaters previous to beginning the blending course of.
Proper chilling techniques not solely improve the creaminess of your keto cheesecake filling, but additionally contribute to a extra stable and constant structure, minimizing the risk of cracks or uneven setting throughout baking and cooling. The time spent chilling your elements is time nicely spent when aiming for an ideal cheesecake.
Pay shut attention to the particular recipe you’re following, as some could have variations in ingredient chilling recommendations. However, the general precept of chilling the cream cheese, eggs, and heavy cream stays constant across most keto cheesecake recipes designed for reaching an exceptionally creamy texture.
Remember that “chilled” does not imply frozen. Avoid freezing any of your ingredients, as this will doubtless lead to a lumpy and uneven consistency that is troublesome to include into a smooth filling. A properly chilled ingredient is cool to the contact, but nonetheless pliable.
Finally, do not rush the chilling course of. Allow ample time for each ingredient to succeed in a constantly low temperature earlier than beginning the mixing course of. Patience pays off within the creamy perfection of your keto cheesecake filling.
Achieving a supremely creamy texture in a keto cheesecake filling hinges considerably on properly warming the cream cheese.
Rushing this process can result in lumps, a grainy consistency, and ultimately, a less-than-perfect dessert.
The objective is not to soften the cream cheese completely, however to gently convey it to a workable consistency the place it’s smooth and easily incorporates other components.
Begin by removing the cream cheese from the fridge properly prematurely, allowing it to come back to room temperature gradually.
This can take anywhere from half-hour to an hour or even longer, depending on the surrounding temperature and the size of the block.
Once softened, but nonetheless cool to the contact, you can begin the gentle warming course of.
A double boiler is ideal for this task. Fill a saucepan with a few inches of water, deliver it to a simmer, then place a heatproof bowl on high, guaranteeing the underside of the bowl would not touch the water.
Place the softened cream cheese into the bowl. The steam from the simmering water will gradually heat the cheese.
Stir frequently with a spatula, scraping the bottom and sides to stop scorching and ensure even warming.
The cream cheese should soften considerably, becoming more pliable and less stiff. You’ll discover it changing into smoother and easily spreading.
Avoid high heat; low and slow is the key right here. The aim is to create a smooth, homogenous combination, to not cook dinner the cream cheese.
If you do not have a double boiler, you possibly can achieve an analogous end result utilizing a microwave in brief bursts of 10-15 seconds, stirring completely after each interval.
Pay close attention to forestall overheating; even in the microwave, the cream cheese can simply separate or turn out to be grainy if heated too rapidly.
An different method entails utilizing a stand mixer with a whisk attachment. Beat the softened cream cheese on low velocity till it is clean and fluffy.
The friction from the whisk will generate a slight amount of heat, serving to to further soften the cream cheese with out direct heat utility.
Regardless of your chosen technique, the essential element is patience and delicate dealing with. By progressively warming the cream cheese, you’ll achieve a luxuriously creamy cheesecake filling that’s both easy and scrumptious.
Remember to all the time monitor the temperature and consistency intently to keep away from over-warming.
Once the cream cheese is perfectly softened and smooth, you can then proceed to include the remaining ingredients of your keto cheesecake filling, corresponding to sweeteners, eggs, and flavorings.
The smoother your beginning cream cheese, the smoother and extra luxurious your last cheesecake will be.
This careful consideration to element will elevate your keto cheesecake from good to exceptional.
Achieving a supremely creamy keto cheesecake filling hinges significantly on exact temperature management throughout the entire course of.
Firstly, making certain your cream cheese is at the excellent temperature is paramount. Ideally, it should be softened to room temperature, however not melted. This allows for seamless blending without lumps and promotes a smoother, creamier texture. Cold cream cheese will be troublesome to include evenly, resulting in a grainy ultimate product.
Secondly, the temperature of your eggs is essential. Room temperature eggs emulsify better with the opposite components, contributing to a extra secure and splendid texture. Cold eggs can result in curdling and a much less smooth filling.
Thirdly, the baking course of itself calls for cautious temperature administration. A water bath (bain-marie) is often beneficial for keto cheesecakes. This creates a moist setting that stops cracking and promotes even baking, contributing to a creamy inside. The oven temperature needs to be precisely monitored to ensure it remains constant all through the baking time. Fluctuations can lead to uneven cooking and probably a dry or cracked cheesecake.
Careful attention should even be paid to the cooling course of. Allowing the cheesecake to chill steadily in the oven, with the oven door slightly ajar, helps forestall sudden temperature adjustments that might result in cracking or a dense texture. A slow cooling process in the oven promotes even setting and a creamy end result. Once removed from the oven, complete cooling should be carried out slowly at room temperature, before refrigeration.
Using a thermometer is very really helpful throughout each step. A digital instant-read thermometer allows precise monitoring of cream cheese and egg temperatures, whereas an oven thermometer ensures the oven is maintaining the set temperature. Checking the cheesecake’s inner temperature with a thermometer during baking ensures it reaches the protected inner temperature whereas avoiding over-baking.
Here’s a summarized guidelines:
Soften cream cheese to room temperature (but not melted).
Use room temperature eggs.
Employ a water bath (bain-marie) for even baking.
Monitor oven temperature persistently.
Cool slowly within the oven, then at room temperature earlier than refrigeration.
Use thermometers for correct temperature monitoring.
By meticulously controlling the temperature at each stage—from ingredient preparation to cooling—you will significantly improve your probabilities of achieving an exceptionally creamy and scrumptious keto-friendly cheesecake filling.
Remember, consistency is key. Minor temperature variations can have a considerable influence on the final texture. Pay close attention to details, and the reward shall be a supremely easy and creamy cheesecake.
Adding Flavor Boosters
Nut butters, significantly almond butter and cashew butter, are fantastic additions for attaining an incredibly creamy keto cheesecake filling.
Their naturally wealthy fat content contributes considerably to a clean, luxurious texture, bypassing the necessity for excessive amounts of cream cheese which might typically make the filling too dense.
Start by utilizing a high-quality nut butter; the higher the quality, the richer the flavour profile will be in your ultimate product.
Avoid nut butters with added sugars or oils, as these will compromise the keto-friendliness and probably alter the desired flavor.
Generally, a ratio of about 1/4 cup to 1/2 cup of nut butter per eight ounces of cream cheese is a good starting point.
However, you’ll find a way to regulate this based mostly on your personal desire and the precise nut butter used.
Almond butter tends to lend a slightly nutty and slightly bitter undertone, whereas cashew butter provides a creamier, sweeter flavor.
Experiment with mixing totally different nut butters to search out your good stability of taste and texture.
For instance, combining almond butter with a small amount of cashew butter can create a deliciously nuanced taste profile whereas sustaining a clean consistency.
To ensure a seamless integration of the nut butter into the cream cheese combination, heat the nut butter gently in a microwave or double boiler.
This reduces the viscosity of the butter, making it simpler to mix smoothly with the cream cheese with out creating lumps.
Be sure to beat the cream cheese till it is rather soft and fluffy earlier than including the warmed nut butter.
This prevents the nut butter from clumping together throughout the cream cheese combination.
You may contemplate including a pinch of salt to boost the creaminess and convey out the flavor of the nut butter.
A touch of vanilla extract also can elevate the general style, complementing the richness of the nut butter superbly.
Don’t be afraid to experiment; the refined differences in taste and texture between totally different nut butters create opportunities for distinctive cheesecake variations.
Remember to totally combine the nut butter and cream cheese till you achieve a perfectly smooth, homogenous combination.
This ensures the cheesecake will have a consistent creamy texture throughout.
Adding nut butter is a straightforward but efficient technique that provides each creaminess and a delicious depth of flavor to a keto-friendly cheesecake filling.
Enjoy the method of experimentation to search out your perfect creamy cheesecake recipe.
Remember, the secret’s to make use of high-quality elements and mix them collectively thoroughly for the best outcomes.
The outcome will be a wealthy, creamy, and undeniably delicious keto cheesecake.
Achieving a luxuriously creamy texture in a keto-friendly cheesecake filling requires careful ingredient choice and technique. While cream cheese types the base, enhancing its richness and mouthfeel is vital.
Avocado is a stunning yet powerful ally on this quest. Its naturally creamy texture and excessive fat content material seamlessly integrate into the cheesecake batter, adding a velvety smoothness without compromising the ketogenic principles.
The greatest avocados for this objective are ripe but firm, ensuring a clean puree without extreme water content material that would compromise the feel of the ultimate product. Overripe avocados can result in a barely grainy or watery filling.
To incorporate avocado, first, fastidiously remove the pit and scoop out the flesh. Then, blend it till utterly clean. A food processor works best to eliminate any lingering fibers.
The quantity of avocado you add will rely on your desired stage of richness and the overall quantity of your cheesecake filling. Start by including a small quantity (about ¼ of a medium avocado for a standard recipe) and taste-testing as you go.
Adding an extreme amount of avocado can outcome in a barely green tint and an overwhelmingly subtle avocado flavor, though many find the refined flavor nice, so experiment and discover what you take pleasure in best.
To counteract the potential for a slightly muted taste from the avocado, consider supplementing with a touch of vanilla extract or lemon zest. These additions improve the overall flavor profile and complement the richness of the avocado.
For a good bolder flavor, contemplate including a pinch of sea salt to your avocado puree. The salt will assist to deliver out the creaminess of the avocado and balance the sweetness of the cheesecake filling.
Remember to incorporate the avocado puree gradually into your cream cheese combination. Gentle folding is crucial to maintain the airiness of the batter and stop a dense cheesecake.
Beyond avocado, different flavor boosters can contribute to a more decadent cheesecake experience. A dollop of heavy cream or full-fat coconut milk adds additional richness, whereas a touch of mascarpone cheese delivers an expensive tang.
Careful consideration of your sweeteners can be essential. Opt for keto-friendly options like erythritol or monk fruit to take care of the low-carb integrity of the cheesecake. The sweetness should complement the richness provided by the avocado and other ingredients.
Ultimately, the key to a supremely creamy keto cheesecake is stability. By strategically using avocado alongside different high-fat components and flavor enhancers, you can craft a dessert that is both scrumptious and consistent together with your dietary goals.
Don’t hesitate to experiment with totally different ratios of avocado to different elements to find your good combination. Taste-testing as you go is essential to attaining the desired stage of creaminess and flavor.
With somewhat experimentation, you’ll discover the joy of a truly luscious, keto-friendly cheesecake that showcases the surprising versatility of avocado as a creamy, flavorful addition.
For a truly decadent and creamy keto cheesecake filling, full-fat Greek yogurt is your secret weapon.
It adds a luxurious tang and unimaginable creaminess that surpasses even the richest bitter cream.
The excessive fat content material contributes considerably to the richness, while the protein offers structure, stopping a grainy texture.
Start by ensuring your Greek yogurt is really full-fat; lower-fat varieties will not provide the same luscious mouthfeel.
Aim for a Greek yogurt with no less than 10% milkfat for optimal outcomes. Higher is even better!
Incorporate the Greek yogurt progressively into your cheesecake batter. Don’t just dump it in all at once!
Gentle folding is vital to sustaining the airiness of the batter and stopping curdling.
Begin with about 1/4 to 1/3 cup of Greek yogurt per cup of cream cheese in your recipe. Adjust to your desire.
Taste as you go; you might discover you like a bolder yogurt taste and want to increase the quantity.
Consider utilizing a higher-protein Greek yogurt for a good denser, extra satisfying texture.
To complement the tang of the Greek yogurt, incorporate a contact of sweetener, like erythritol or monk fruit, to stability the flavors.
A pinch of vanilla extract enhances the overall taste profile, adding warmth and depth.
For an extra layer of creamy richness, whisk a small amount of the Greek yogurt with the sweetener before adding it to the main batter.
This helps to make sure the sweetener is evenly distributed and prevents any grainy texture.
Don’t be afraid to experiment! Different brands of Greek yogurt have various levels of tang and thickness.
The finest method to find your perfect ratio is to taste-test as you go, adjusting the quantity of Greek yogurt to match your palate.
Remember, the secret is to incorporate it gradually and gently to ensure a smooth, velvety filling.
Finally, guarantee your cheesecake is correctly chilled for at least four hours, or ideally overnight, to allow the flavors to meld and the filling to set fully.
This chilling process enhances the creaminess and intensifies the flavour profile of your keto-friendly cheesecake masterpiece.
With slightly experimentation, you’ll be able to unlock the full potential of full-fat Greek yogurt to create an irresistibly creamy and flavorful keto cheesecake.
Stabilizing the Filling
Achieving a luxuriously creamy texture in a keto cheesecake filling requires cautious consideration to the stability of fat and moisture, and generally, slightly help from stabilizers.
Xanthan gum and guar gum are excellent hydrocolloids that may considerably enhance the steadiness and creaminess of keto cheesecake fillings. These gums act as thickening and stabilizing brokers, stopping syneresis (weeping) and guaranteeing a easy, constant texture throughout the cheesecake.
The quantity of gum required is decided by the recipe and the precise type of gum used. Generally, a small amount goes a long way – typically between 1/4 and 1 teaspoon per 8-ounce package of cream cheese. Start with the lower finish of the range and add extra incrementally, tasting and adjusting as you go. Too much gum can lead to a gummy or barely unpleasant texture.
When incorporating xanthan or guar gum into your keto cheesecake filling, it’s crucial to whisk it completely with the dry ingredients before including the moist components. This prevents clumping and ensures even distribution throughout the combination. Don’t simply dump it in; light, continuous whisking is vital.
The method of incorporating the gum additionally matters. Adding it directly to the cream cheese combination can end result in lumps. Instead, try whisking it into the powdered sweeteners (erythritol, monk fruit, and so forth.) first. This ensures full dispersion and prevents the gum from forming clumps which are troublesome to get rid of.
Xanthan gum is understood for its ability to create a really smooth, virtually shiny finish. It’s extra powerful than guar gum, requiring a barely smaller amount for the same impact. Guar gum, however, tends to supply a slightly less glossy, however nonetheless very creamy, texture. It’s usually preferred by those who find the feel imparted by xanthan gum a bit too slick.
Both gums work greatest when included into a chilly or room-temperature cream cheese mixture. Adding them to a extremely popular mixture could cause them to lose their thickening power and end in a less secure filling.
To further improve the creaminess and stability of your keto cheesecake filling, think about using full-fat cream cheese, incorporating sour cream or heavy cream, and making certain your ingredients are at the correct temperature before mixing.
Once the gum is included and the filling is smooth, let it rest for no much less than half-hour in the refrigerator. This allows the gum to totally hydrate and the filling to thicken correctly. This resting period is essential for a easy, stable cheesecake.
Remember that the success of utilizing xanthan or guar gum hinges on correct incorporation and the correct amount. Experimenting with small adjustments will help you discover the right stability in your desired creaminess and texture.
While these gums are beneficial for stability, they don’t substitute the need for proper baking methods. Ensure your cheesecake bakes evenly to stop cracks and obtain a constant texture. A water bathtub is highly recommended for preventing cracks and guaranteeing a smooth, creamy interior.
Finally, taste your filling earlier than including the gum to ensure the sweetness and tanginess are to your liking. Adjust sweetener as necessary earlier than incorporating the gum.
By following the following pointers and thoroughly incorporating xanthan or guar gum, you’ll find a way to elevate your keto cheesecake filling to a new degree of creamy deliciousness.
Achieving a luxuriously creamy keto cheesecake filling requires careful consideration to several factors, and incorporating gelatin could be a game-changer.
Gelatin, a protein derived from collagen, acts as a pure stabilizer, preventing the dreaded separation that may plague keto cheesecakes. This separation occurs due to the upper fat content in keto recipes, which can cause the cream cheese and other ingredients to separate over time.
The quantity of gelatin you utilize is crucial. Too little won’t supply a lot stabilization, whereas an extreme quantity of can result in a gummy or overly agency texture. A good starting point is about 1-2 teaspoons of powdered gelatin per 16 ounces (about 450g) of cream cheese. Always comply with the package deal directions for blooming the gelatin – this usually includes sprinkling the gelatin over cold water and letting it sit for a few minutes to melt.
The blooming course of is crucial. It permits the gelatin to correctly absorb the liquid, making certain it dissolves fully and evenly into the mixture without forming lumps. Lumps of unhydrated gelatin will create ugly streaks or pockets in your completed cheesecake.
After blooming, the gelatin must be dissolved completely. This is finest achieved by gently heating it, both in a double boiler or in brief bursts within the microwave, stirring continually to prevent scorching. The mixture must be warm, however not boiling.
Once the gelatin is totally dissolved and lukewarm, incorporate it into your cheesecake batter very slowly and gently. Vigorous mixing can introduce air bubbles, leading to a much less easy and creamy texture. Use a spatula or whisk and fold the gelatin mixture into the cream cheese base in a gradual, upward motion.
The addition of gelatin also contributes to a richer, more intensely flavored cheesecake. It acts as a binding agent, enhancing the overall mouthfeel and preventing the filling from changing into grainy or crumbly. This is particularly useful for keto cheesecakes which regularly depend on heavy cream and cream cheese for their creamy consistency.
Beyond gelatin, other methods improve the creaminess. Using full-fat cream cheese is paramount. Look for cream cheese with the next fats proportion for a smoother, richer end result. Additionally, guaranteeing all ingredients are at room temperature earlier than mixing helps create a more homogenous batter.
Consider using a food processor to make sure the cream cheese is completely clean before including the opposite elements. This eliminates any lumps that could interfere with the general texture. Overmixing could be detrimental, so blend until just smooth. Then, proceed to softly fold in the remaining parts.
Finally, baking your keto cheesecake at a lower temperature for a longer time is essential. This prevents cracking and ensures even cooking. It additionally permits the gelatin to completely set and contribute to the steadiness of the filling.
By rigorously managing the gelatin addition and using different techniques to reinforce creaminess, you presumably can craft a keto cheesecake that isn’t only delicious but also boasts a flawlessly smooth and secure filling, showcasing the right steadiness of richness and texture.
Achieving a supremely creamy, secure keto cheesecake filling hinges on meticulous chilling, a step typically underestimated in its importance.
The chilling process permits the fat molecules in the keto-friendly components, particularly the heavy cream and cream cheese, to solidify and correctly interlock. This creates a agency, much less susceptible to separation or weeping.
Insufficient chilling results in a unfastened, unstable filling that may separate into watery and fatty layers, creating an disagreeable texture and probably a runny cheesecake.
The best chilling temperature is persistently crucial. Fluctuations in temperature can disrupt the solidification process.
A fridge’s temperature ought to be maintained round 35-38°F (2-3°C) for optimal chilling.
Consider these chilling strategies for optimum stability:
Initial Chill: After totally mixing the filling, cover the bowl tightly with plastic wrap, pressing it directly onto the surface of the mixture to prevent a pores and skin from forming. Chill for a minimum of 4 hours, ideally overnight.
Gradual Chill: Avoid placing a warm filling immediately into a chilly refrigerator. This temperature shock can cause cracks or uneven setting. Let the filling cool barely to room temperature earlier than refrigeration.
Consistent Temperature: Avoid opening the refrigerator frequently throughout chilling to take care of a relentless, chilly surroundings.
Ice Bath (Optional): For sooner initial chilling, especially during hotter weather, you can place the bowl in an ice bathtub for the primary hour or two. Ensure the bowl is watertight to prevent contamination.
The quantity of chilling time required depends on a quantity of elements including the particular recipe, the type of cream cheese used (full-fat is important for stability), and the ambient temperature.
While a minimum of four hours is usually recommended, overnight chilling is right for the most secure, creamy filling. This extended interval permits the fats molecules to fully solidify and creates a more cohesive texture.
Proper chilling does not just stop separation; it also intensifies the flavors. The low temperature permits the flavors to meld and develop extra totally.
Beyond the preliminary chill, consider the chilling time after the cheesecake is baked. A longer post-baking chill helps to additional firm the entire cheesecake and improve its creamy texture.
Don’t rush the process. Patience in the course of the chilling section is rewarded with a luxuriously clean and secure keto cheesecake filling— a key factor within the total success of this delicate dessert.
Remember to all the time refer to your particular recipe’s instructions, as chilling instances would possibly differ slightly relying on the ingredients and desired consistency.
Improper chilling can simply undo all the trouble put into creating a perfect keto-friendly cheesecake recipe, resulting in a disappointing end result. Prioritizing acceptable chilling techniques ensures a creamy, delicious, and secure final product.
Creative Flavor Combinations
Achieving an ultra-creamy keto cheesecake filling requires cautious consideration to fats content material and technique. Lemon and poppy seed supply a surprisingly delightful flavor profile that complements this richness superbly.
To begin, prioritize full-fat cream cheese. The larger fat content interprets directly to a smoother, more luxurious texture. Make sure it is softened to room temperature for optimum mixing.
Don’t skimp on the butter! Unsalted butter, additionally softened, adds another layer of richness and helps create a creamy mouthfeel. Consider utilizing European-style butter for a deeper taste.
Greek yogurt, particularly full-fat, is a secret weapon for achieving that extra creamy texture with out compromising the keto aspect. Its tanginess subtly balances the sweetness.
Sweeteners for a keto cheesecake need cautious consideration. Erythritol and monk fruit are in style selections for their minimal impact on blood sugar, but you might want to adjust the portions primarily based on your desire.
For the lemon component, use freshly squeezed lemon juice. Bottled juice usually accommodates components that may influence the overall style and texture. Start with a moderate amount and modify based on your style.
Lemon zest adds a shiny, aromatic note, intensifying the lemon flavor without including extra liquid. Finely grate the zest to keep away from any bitter pith.
Poppy seeds present a novel textural factor and a refined nutty flavor that enhances the lemon. Toasting the poppy seeds earlier than including them enhances their taste and aroma.
Avoid over-mixing the filling. Over-mixing can incorporate air, leading to a much less dense and doubtlessly grainy texture. Mix till simply combined.
Strain the filling by way of a fine-mesh sieve for an exceptionally clean and opulent texture. This step is elective but highly really helpful.
Chill the cheesecake for a minimum of four hours, ideally in a single day, to permit the flavors to meld and the filling to correctly set.
Consider including a touch of vanilla extract to spherical out the flavors and add depth. A tiny pinch of salt can also enhance the opposite flavors.
Experiment with completely different ratios of lemon juice and zest to attain your ideal balance of tartness and brightness. Some would possibly choose a more pronounced lemon taste, while others would possibly choose a subtler trace.
For a very decadent expertise, contemplate incorporating a lemon curd swirl into the cheesecake filling. This will add one other layer of creamy texture and intense lemon flavor.
When using poppy seeds, be conscious of their tendency to clump. Whisk them completely into the filling to make sure even distribution.
Before baking the crust (assuming you are utilizing one), ensure it’s thoroughly chilled to prevent it from turning into soggy.
To stop cracking, use a water tub throughout baking. This helps to create a more even temperature and prevents speedy temperature changes that may lead to cracks.
- Use high-quality components for the most effective taste and texture.
- Don’t be afraid to experiment with totally different ratios of elements to find your good steadiness.
- Chill thoroughly earlier than serving for optimal consistency and flavor.
While the immediate requests creative taste combos of chocolate and raspberry, the context shifts to keto-friendly cheesecake filling. Therefore, this response will handle both, focusing on how chocolate and raspberry can improve a creamy keto cheesecake.
To obtain further creaminess in a keto cheesecake filling, full-fat cream cheese is paramount. Avoid low-fat choices; their larger water content will lead to a much less dense, less luxurious texture.
Incorporating chocolate and raspberry, we will construct multiple layers of taste and texture. For the chocolate, opt for high-quality dark chocolate (70% cacao or higher) for its intense taste and decrease sugar content.
Melt the darkish chocolate gently, perhaps utilizing a double boiler, ensuring it does not burn. This melted chocolate can then be stirred into the cream cheese base, enriching each flavor and texture. For a richer chocolate experience, think about including a tablespoon or two of unsweetened cocoa powder to the cream cheese before incorporating the melted chocolate.
The raspberries introduce a vibrant tartness that cuts by way of the richness of the chocolate. Fresh raspberries could be folded into the cheesecake batter for bursts of juicy flavor and colour, although their high water content might slightly have an result on the texture. A more controlled strategy can be to use raspberry puree or a high-quality raspberry jam, guaranteeing it’s keto-friendly (low sugar or sugar-free).
Consider a layered method: a backside layer of plain keto cheesecake, a middle layer infused with melted darkish chocolate, and a high layer swirled with raspberry puree or studded with recent raspberries. This creates visible appeal and a dynamic flavor profile.
To enhance creaminess additional, incorporate full-fat coconut milk. The fat content material provides richness and a refined coconut nuance that complements each chocolate and raspberry. Be aware of the brand, as some coconut milks have added sugars.
A contact of vanilla extract is another key factor. It balances the sweetness and tartness, creating a harmonious flavor profile. Avoid utilizing artificial sweeteners that can leave an unpleasant aftertaste.
The key to a super-creamy cheesecake lies in proper chilling. After baking (if you’re utilizing a baked base), allow the cheesecake to cool completely earlier than chilling for at least 4-6 hours, or preferably overnight. This permits the flavors to meld and the fats to solidify, resulting in a supremely clean and creamy texture.
To add a sophisticated contact, consider using raspberry liqueur (a keto-friendly choice is crucial here) to boost the raspberry taste with out compromising the keto diet.
Experiment with different ratios of chocolate and raspberry to search out your perfect stability. You would possibly choose a more chocolate-forward flavor, or a more assertive raspberry note. The beauty of this mixture is its adaptability.
For a really decadent expertise, consider a chocolate-dipped raspberry garnish on high of the completed cheesecake. This provides a visual and textural element, contrasting the smooth creaminess of the filling with the crispness of the chocolate.
Remember to make use of a keto-friendly sweetener (erythritol, monk fruit, or stevia) sparingly, as the rich chocolate and raspberries will provide ample taste even with minimal added sweetness. The focus should all the time be on creating a creamy, balanced flavor profile that highlights the pure qualities of the elements.
Achieving an ultra-creamy texture in a keto cheesecake filling requires cautious consideration of elements and methods. One incredible taste direction is salted caramel, a decadent selection that surprisingly lends itself nicely to low-carb baking.
The key to a creamy keto cheesecake lies in utilizing full-fat cream cheese. Don’t skimp right here – the higher the fat content, the richer and creamier your filling shall be. Opt for a brick-style cream cheese, as it tends to be much less watery than the spreadable sort.
For the salted caramel element, start with a high-quality sweetener. Erythritol or monk fruit are wonderful low-carb options that gained’t drastically alter the flavor profile. Avoid overly processed sweeteners as they will create an undesirable aftertaste.
To infuse your cheesecake with true salted caramel richness, think about making a selfmade keto-friendly caramel sauce. This lets you control the sweetness and salt balance completely. The course of involves slowly heating the sweetener with heavy cream and butter till it reaches the specified caramel consistency. A pinch of sea salt on the end is essential for enhancing the flavor. Don’t rush the cooking process; low and gradual is essential to preventing burning and making certain a clean, luxurious caramel.
Once you may have your caramel sauce, gently incorporate it into the cream cheese mixture. Be positive to completely beat the cream cheese till it’s light and fluffy earlier than adding the caramel to ensure a clean and homogenous texture. Avoid overmixing, as this will incorporate an extreme amount of air, resulting in a barely less dense end result.
Adding a contact of heavy cream or full-fat coconut milk can further enhance the creaminess of your cheesecake filling. Just a number of tablespoons can make a noticeable distinction. These additions additionally assist to create a richer, more decadent mouthfeel.
To guarantee a really salted caramel experience, think about incorporating a touch of sea salt immediately into the cream cheese mixture, along with the salt already present within the caramel sauce. This layered approach intensifies the salty-sweet contrast and elevates the overall flavor.
Finally, to stop cracks in your cheesecake, allow it to cool slowly. Avoid excessive temperature adjustments. A gradual cooling process promotes a smoother, extra constant texture. This prevents the abrupt shrinking of the filling, which frequently leads to cracks on the floor.
Beyond the bottom cream cheese, heavy cream and salted caramel, you could also experiment with other additions for further taste and texture. A touch of vanilla extract, a swirl of keto-friendly chocolate, or even some finely chopped nuts could elevate this already decadent dessert.
Remember, the vital thing to a perfect keto cheesecake with salted caramel filling is persistence and precision. By utilizing high-quality components and using careful strategies, you possibly can create an incredibly creamy and flavorful dessert that satisfies each your sweet tooth and your dietary needs.