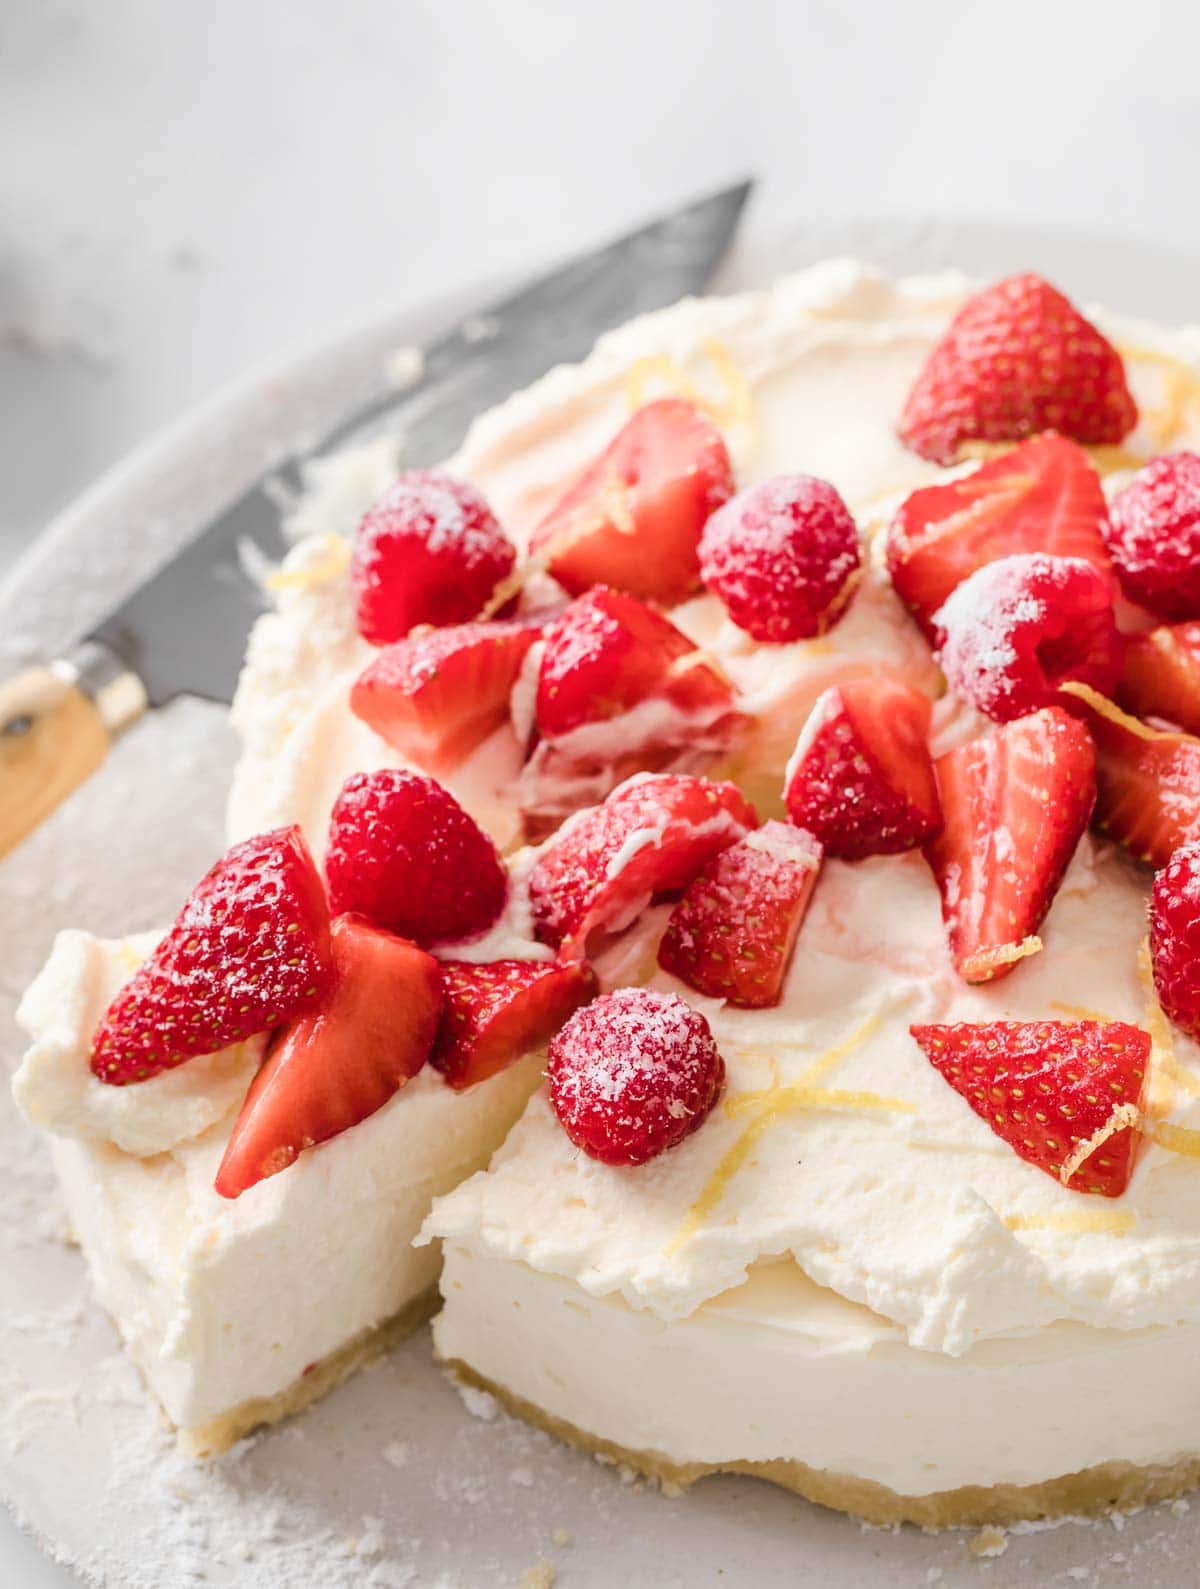
The Importance Of Chilling Time In No-bake Keto Cheesecake
Understanding the Science Behind Chilling
Chilling a no-bake keto cheesecake is essential for several scientific reasons, primarily revolving across the influence of temperature on the setting and stability of the components.
The primary setting mechanism in a no-bake keto cheesecake depends on the solidification of fat, primarily from the cream cheese and coconut oil or other fats sources used within the recipe.
These fat exist as a liquid at room temperature but transition to a solid state upon cooling. This transition is governed by their melting points; decrease temperatures drive the fat molecules to slow down and turn out to be more ordered, forming a solid structure.
The fee of cooling significantly influences the ultimate texture. Rapid cooling can lead to a much less easy, probably grainy texture as a outcome of uneven fat crystallization. Slower, more controlled cooling allows for a more uniform association of fat molecules, resulting in a creamy, smooth consistency.
Cream cheese, a key component, incorporates a posh combination of saturated and unsaturated fats. These fats have different melting points, and cooling allows them to solidify at their respective temperatures, contributing to the general structure.
The use of stabilizers, typically implicitly present in the recipe through elements like cream cheese itself, performs a significant function in the setting course of. These stabilizers interact with the fat molecules and water present in the combination, creating a community that traps the fats crystals and helps to maintain the construction of the cheesecake during and after chilling.
Sweeteners utilized in keto recipes, typically sugar alcohols like erythritol or allulose, contribute minimal impact on the setting process compared to the fat. While their solubility adjustments with temperature, their contribution to the cheesecake’s solidity is secondary to the fat solidification.
Temperature also influences the viscosity of the mixture earlier than chilling. A warmer combination might be more fluid, potentially resulting in a much less stable structure in the course of the initial setting levels in the refrigerator. A barely cooler mixture (but nonetheless pourable) will help to create a extra even distribution of the components, contributing to a extra homogenous final product.
Insufficient chilling time leads to a soft, unstable cheesecake susceptible to collapsing or excessive melting at room temperature. The fats crystals haven’t fully solidified, leaving a unfastened construction.
Conversely, extreme chilling could end in a slightly overly agency cheesecake, potentially dropping a few of its creamy texture. The fat crystals turn into highly ordered and tightly packed.
Therefore, discovering the optimal chilling time is decided by several components, together with the particular recipe, the ingredients used (particularly the kind and amount of fats), the fridge temperature, and even the dimensions and shape of the pan used. Experimentation and remark are key to figuring out the ideal chilling interval for achieving the specified texture and consistency.
The science behind chilling a no-bake keto cheesecake is a delicate stability between fat crystallization, stabilizer interplay, and temperature management. A thorough understanding of those principles is crucial for producing a constantly delicious and satisfying dessert.
Beyond the primary setting mechanisms, chilling also performs a crucial position in enhancing the overall taste profile. The cooling course of permits flavors to meld and intensify, creating a more harmonious and balanced style experience.
Finally, acceptable chilling helps forestall bacterial progress, making certain the protection and longevity of the cheesecake. A colder setting inhibits the expansion of microorganisms, rising the shelf lifetime of the product.
Chilling a no-bake keto cheesecake is crucial for attaining the specified texture and stability. It’s not merely about cooling; it is about present process a series of bodily and chemical modifications.
The gelatin or cream cheese, key elements in most no-bake cheesecakes, play very important roles on this course of. Gelatin, a protein derived from collagen, acts as a gelling agent. In its dry type, it’s basically a protracted chain of amino acids. When combined with a liquid (typically cream or milk), the gelatin molecules begin to unravel (a process called hydration).
As the mixture cools, these unraveled chains intertwine, forming a three-dimensional network that traps the liquid inside its structure. This network is the premise of the cheesecake’s set. The longer the chilling period, the extra time the gelatin has to type this intricate network, leading to a firmer, extra stable cheesecake.
Cream cheese, then again, contributes each to the flavour and texture. It’s a dairy product with a high fats content material, primarily within the type of saturated fat. These fat solidify because the temperature drops, additional contributing to the general firmness of the cheesecake.
The fat molecules in cream cheese undergo a phase transition as they cool. Above a certain temperature, they are in a liquid state, contributing to the creamy consistency of the combination. As the temperature decreases, they transition to a extra solid state, resulting in increased viscosity and structure. This solidification course of enhances the gelatin’s gelling action, strengthening the general construction of the cheesecake.
The chilling process also includes the reduction of kinetic energy within the mixture. At higher temperatures, the molecules are shifting rapidly, giving the mixture a fluid consistency. As the cheesecake chills, the molecules lose power, and their movement slows down. This slower movement permits the gelatin and fat molecules to work together extra effectively and type a stronger structure.
Insufficient chilling time can lead to a variety of undesirable results. The cheesecake could be too soft, runny, or unstable, potentially collapsing or separating. The flavor profile may also be affected, as the insufficient setting could impact the even distribution of flavor throughout the cheesecake.
Therefore, the beneficial chilling time, usually several hours or even in a single day, just isn’t arbitrary. It’s primarily based on the basic rules of gelatin gelling, fats solidification, and the reduction of molecular kinetic power. Adhering to the specified chilling time ensures a easy, creamy, secure, and scrumptious no-bake keto cheesecake.
Furthermore, the temperature of the refrigerator also influences chilling time. A colder refrigerator will generally end in sooner setting. Conversely, a warmer fridge will necessitate a longer chilling interval.
Finally, components like the precise kind of gelatin used (bloom strength), the amount of cream cheese integrated, and the general recipe composition can even barely modify the perfect chilling time. It’s all the time advisable to follow the recipe directions carefully for optimum results.
Chilling a no-bake keto cheesecake is essential for several causes, all stemming from the science of emulsion stabilization, protein denaturation, and fats crystallization.
Firstly, the cheesecake relies on a creamy, secure emulsion. Emulsions are mixtures of two immiscible liquids, like oil and water, the place one is dispersed as droplets inside the different. In this case, the fat (from cream cheese, butter, etc.) is dispersed in the aqueous phase (from cream cheese whey, liquid sweeteners). Without enough chilling, the emulsion stays unstable, leading to separation: the fats rises to the top, leading to an unappealing, oily texture.
The chilling process permits the fats molecules to solidify and form a more stable network, decreasing the kinetic vitality of the fats globules and inhibiting their tendency to coalesce and separate. This is a process greatly influenced by temperature and time.
Secondly, the setting agents (if any) and the proteins within the cream cheese require time to properly solidify and bind the combination. Proteins denature (unfold and aggregate) at decrease temperatures, forming a gel-like structure that contributes significantly to the cheesecake’s texture. Adequate chilling time promotes this protein network formation, resulting in a firmer, less watery cheesecake.
Thirdly, proper chilling influences the feel by allowing the fats to crystallize properly. Fat crystallization impacts both the mouthfeel and the general structure of the cheesecake. Rapid cooling can lead to small, unstable fats crystals that lead to a grainy or gritty texture. Slow, managed chilling permits for the formation of bigger, extra steady crystals, contributing to a smoother, creamier consistency.
The ideal chilling time depends on a quantity of components, together with the specific recipe, the ambient temperature, and the scale and form of the cheesecake. However, a number of finest practices ensure optimal results:
Consistent Cold Temperature: Maintain a consistent, low temperature all through the chilling process. Fluctuations can disrupt crystallization and emulsion stability.
Adequate Time: Allow no less than four hours, ideally in a single day, for the cheesecake to chill completely. This ensures full fat crystallization and protein network formation.
Use of a Deep Pan: A deeper pan supplies more even cooling, preventing fast temperature changes on the floor.
Avoid Temperature Shocks: Avoid putting the cheesecake directly from room temperature into a very chilly fridge. Allow it to return to room temperature before placing it in the refrigerator to prevent cracking.
Proper Wrapping: Covering the cheesecake with plastic wrap or a lid helps stop it from drying out and absorbing odors from different meals within the refrigerator.
Ignoring the chilling process may end up in a big selection of undesirable outcomes including: significant separation of elements (oil floating to the surface), a runny, unstable filling, and a grainy or gritty texture. In abstract, sufficient chilling is non-negotiable for a well-textured, creamy and scrumptious keto cheesecake.
By understanding the science behind chilling, you can higher management the final texture and forestall separation, ultimately resulting in a superior no-bake keto cheesecake that’s both interesting and delicious.
Optimizing Chilling Time
Optimizing chilling time for a no-bake keto cheesecake is crucial for attaining the desired texture and preventing a runny or unstable final product.
The main aim is to allow the cheesecake to completely set, which involves the fats in the filling solidifying.
Several components influence the mandatory chilling time, and understanding these allows for higher management and extra constant results.
Firstly, the kind and quantity of fats within the filling significantly impacts setting time.
Cream cheese, being the primary fats source, contributes to the creaminess and firmness. Higher-fat cream cheese (e.g., 40% fat) will usually set faster than lower-fat varieties.
The addition of different fat like coconut cream or heavy cream additionally impacts setting time; coconut cream, with its larger saturated fat content, tends to solidify faster.
The ratio of those fats throughout the recipe plays a critical role; a higher proportion of cream cheese leads to a firmer, faster-setting cheesecake.
Secondly, the temperature of the ingredients earlier than mixing significantly influences chilling time.
Using very chilly ingredients (e.g., chilled cream cheese) can slow down the setting process as the mixture wants more time to reach a temperature suitable for solidification.
Conversely, using slightly hotter components can speed up the initial setting however might not fully solidify until adequate chilling time is allowed.
Thirdly, the ambient temperature of the fridge tremendously impacts chilling time.
A consistently cold refrigerator (around 35-38°F or 2-3°C) is crucial for optimum setting. Fluctuations in temperature can significantly extend the chilling process.
The size and shape of the cheesecake pan additionally matter; a larger, shallower pan will typically set faster than a smaller, deeper one, because of better heat dissipation.
The presence of any added ingredients can impression the setting time. For occasion, giant amounts of liquid (even keto-friendly sweeteners) can slow down the method.
Finally, the specified consistency performs an important function; a firmer cheesecake requires extra chilling time. For those who choose a slightly softer texture, much less chilling time is needed.
Therefore, figuring out the ideal chilling time isn’t a couple of mounted number of hours, but somewhat a mix of careful recipe formulation, consideration to ingredient temperatures, consistent refrigeration, and the specified last texture.
Monitoring the cheesecake’s consistency is significant. Gently shaking the pan; a totally set cheesecake will not wobble. The edges must be agency, whereas the middle should still have a slight jiggle if a softer texture is desired.
It is often advisable to start out with the minimal chilling time advised within the recipe after which verify the consistency before extending the chilling period if necessary.
Over-chilling can result in an overly firm, dry texture, so it is crucial to strike a stability between enough setting and stopping extreme firmness.
Experimentation and careful observation are key to mastering the chilling time for an ideal no-bake keto cheesecake, guaranteeing a smooth, creamy, and satisfying dessert.
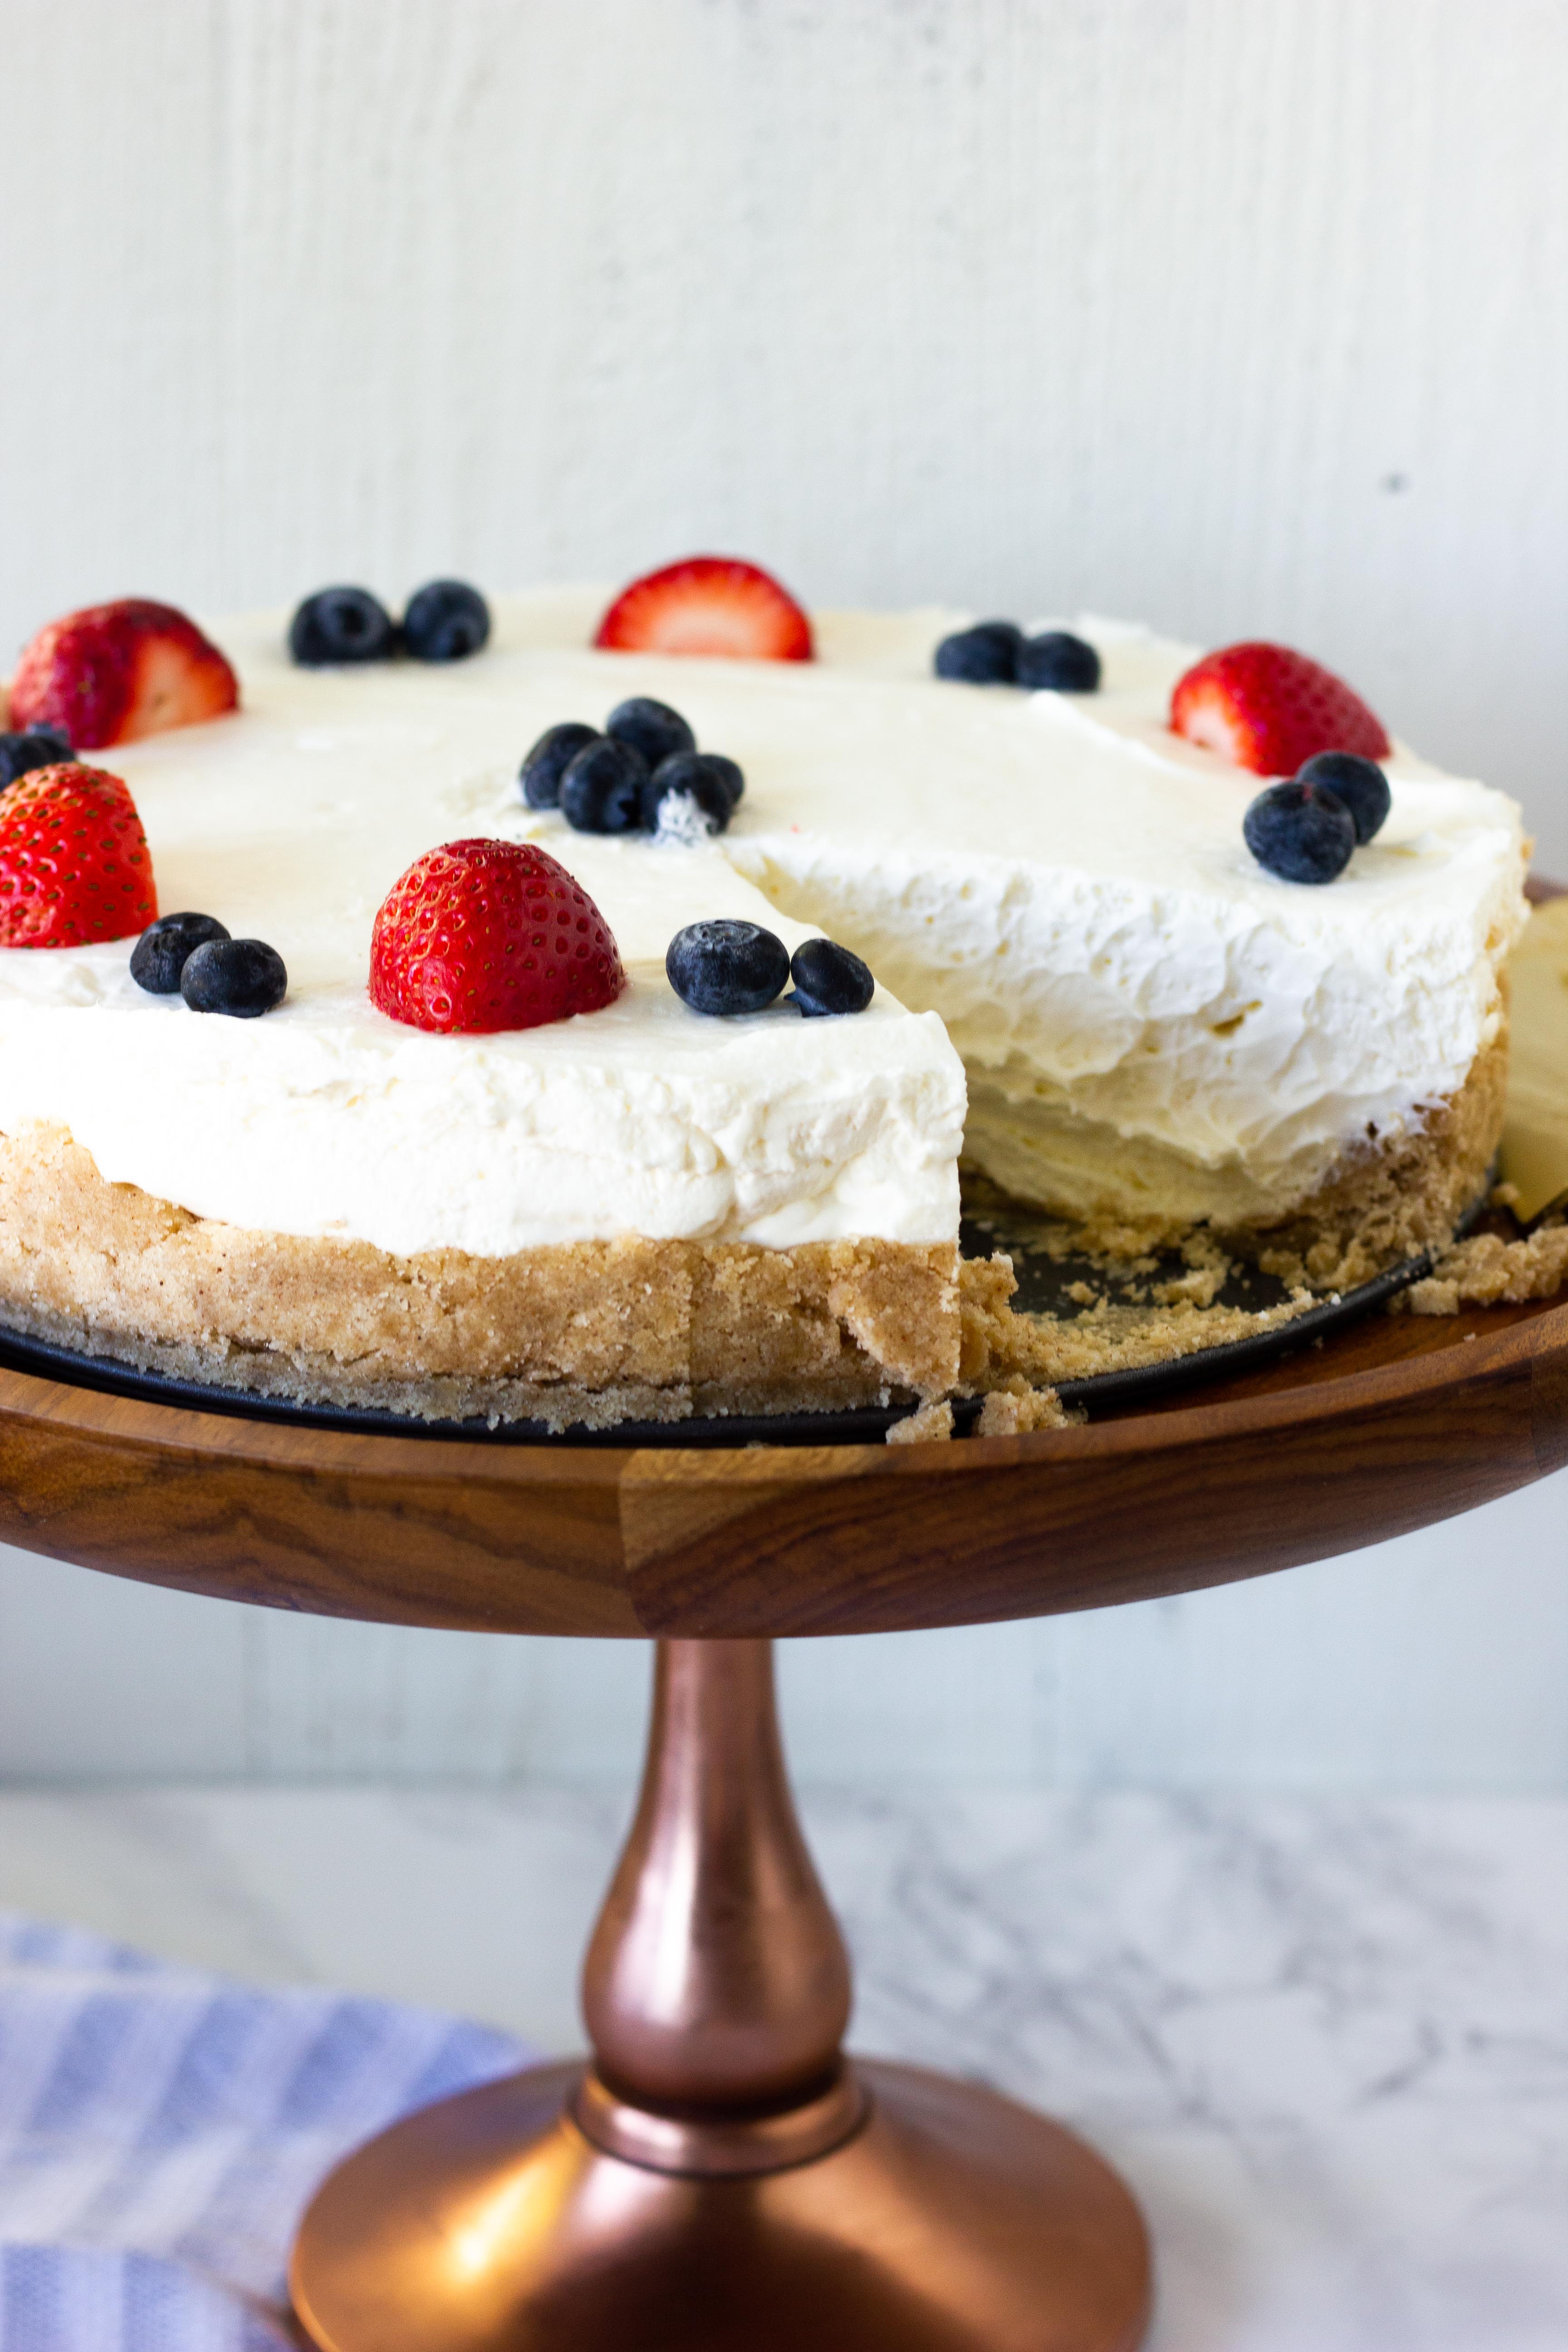
Proper chilling is paramount to a successful no-bake keto cheesecake; it is the essential step that transforms a creamy combination right into a agency, sliceable dessert.
Insufficient chilling ends in a wobbly, messy cheesecake that is tough to serve and aesthetically unappealing.
Over-chilling, while less common an issue, can result in a dense, overly firm texture that lacks the specified creamy mouthfeel.
The ideal chilling time depends on several components: the scale of the cheesecake, the kind of fridge, and the specific recipe.
As a general guideline, plan for at least 4 hours of chilling, but ideally, 6-8 hours is preferable for a perfectly set cheesecake.
For bigger cheesecakes, prolong the chilling time proportionally; a larger quantity requires extra time to chill thoroughly.
Consider your fridge’s temperature consistency; some fridges would possibly run cooler or hotter than others, affecting chilling time.
Recipe variations, significantly those with greater fat content or different thickeners, can affect the required chilling time. Experimentation might be needed for optimal results with specific recipes.
Always make positive the cheesecake is totally chilled earlier than making an attempt to remove it from the pan or serve it.
A properly chilled keto cheesecake will exhibit a quantity of key indicators:
Firm Texture: The cheesecake should maintain its form with out wobbling significantly when the pan is gently moved.
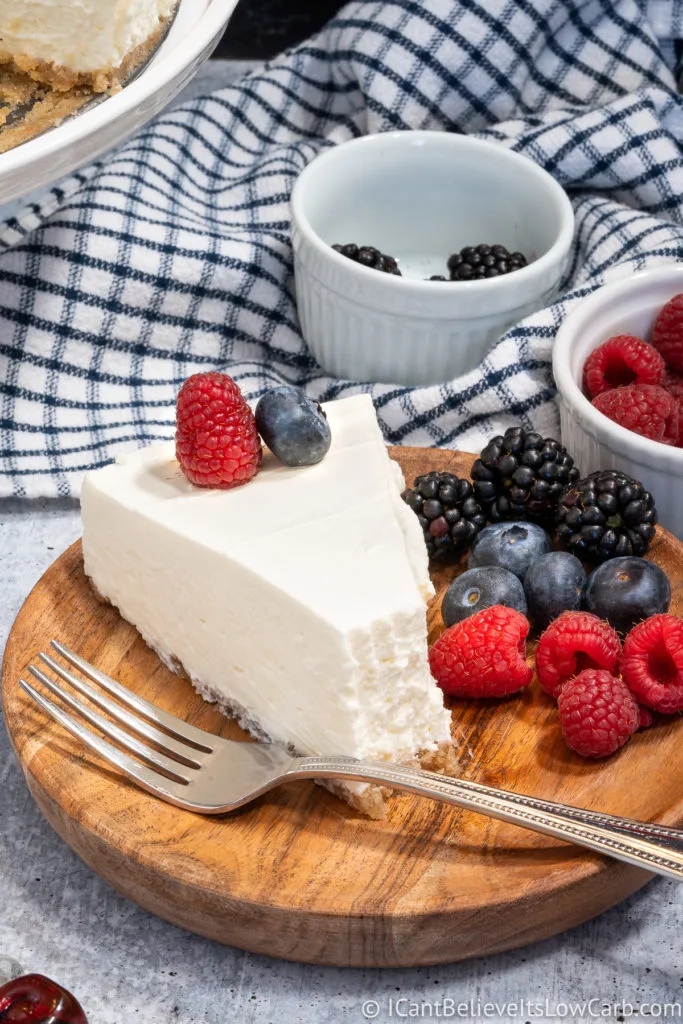
Clean Cut: A sharp knife should slice cleanly through the cheesecake with out tearing or crumbling.
No Liquid Separation: There ought to be no seen separation of liquids or curdling on the floor or inside the cheesecake itself.
Consistent Color: The cheesecake should have a uniform shade all through, indicating that it has set evenly.
Cool Temperature: The cheesecake ought to be noticeably chilly to the contact.
If you discover any signs of instability, such as extreme wobbling or a soft center, return the cheesecake to the refrigerator for additional chilling time.
Avoid over-chilling by monitoring the cheesecake’s firmness. Once it meets the criteria described above, it is prepared.
For even chilling, consider using a springform pan that facilitates simple elimination from the pan after chilling.
If your recipe features a crust, make sure the crust is sufficiently chilled before adding the filling, to forestall it from becoming soggy through the chilling course of.
Patience is key; rushing the chilling process will compromise the final result. Allow ample time for the cheesecake to properly set.
By paying shut consideration to chilling time and observing the indicators of correct chilling, you’ll constantly obtain a flawless, delicious no-bake keto cheesecake.
Proper chilling is paramount for a profitable no-bake keto cheesecake; it allows the filling to set correctly, stopping a runny or unstable dessert.
Insufficient chilling time ends in a soft, wobbly cheesecake, prone to collapsing or shedding its form.
Conversely, over-chilling can result in a dense, overly firm texture, compromising the creamy consistency desired.
The perfect chilling time usually ranges from four to six hours, however elements influencing this embrace the precise recipe, the ambient temperature, and the fridge’s cooling effectivity.
Warmer room temperatures necessitate an extended chilling period, whereas a colder refrigerator may shorten it.
Using a high-quality, full-fat cream cheese is essential for achieving a agency set; lower-fat options may require extended chilling.
Similarly, the type and quantity of sweetener employed can have an result on the setting time; some sweeteners could inhibit proper solidification.
Always guarantee your cheesecake is placed in a steady location within the refrigerator, away from air vents or areas prone to temperature fluctuations.
Consider using a relaxing bowl and elements when getting ready the cheesecake batter; this helps expedite the cooling and setting course of.
A sudden temperature change, like transferring the cheesecake from a heat kitchen to a really chilly refrigerator, would possibly trigger cracking or separation.
To prevent this, allow the cheesecake to cool slightly at room temperature (around 30 minutes) earlier than refrigeration.
If your cheesecake stays too delicate after the recommended chilling time, think about extending the refrigeration period by an additional 2-3 hours, checking periodically.
If, regardless of sufficient chilling, your cheesecake is still runny, the recipe may require adjustments. Ensure you’ve got used the right proportions of cream cheese and thickeners.
A potential wrongdoer could be insufficient gelatin or a low-quality cream cheese with a excessive water content.
Conversely, a very firm cheesecake may point out that you have over-chilled it or used an excessive quantity of thickener.
To treatment this, permit the cheesecake to sit at room temperature for some time earlier than serving, to slightly soften its texture.
Properly making ready the crust also impacts the general end result; a soggy crust can contribute to a less secure cheesecake.
Ensure your crust is absolutely baked (if applicable) and adequately cooled before including the filling.
Using a springform pan is helpful because it facilitates straightforward removal and serving with out disturbing the cheesecake.
Lastly, remember to always refer to your particular recipe’s directions, as chilling times can vary considerably based on components and preparation methods.
Careful observation and changes are key to mastering the artwork of chilling your keto cheesecake, ultimately resulting in a scrumptious, good dessert.
Pay consideration to your refrigerator’s temperature consistency. A fridge that fluctuates wildly can have an result on chilling occasions.
Consider utilizing a thermometer to watch the interior temperature of the cheesecake. A dependable temperature reading can present insights into its progress.
Don’t be afraid to experiment! Slight modifications to the recipe, corresponding to including a bit more cream cheese or a touch more gelatin, could be adjusted to your preference and your refrigerator’s efficiency.
Patience is crucial. Allow the cheesecake enough time to chill properly, resisting the urge to rush the process.
And finally, take pleasure in your perfectly chilled no-bake keto cheesecake!
Benefits of Adequate Chilling
Chilling a no-bake keto cheesecake is essential for a quantity of reasons, all contributing to a superior last product.
Firstly, sufficient chilling permits the cheesecake to properly set. No-bake cheesecakes depend on the cream cheese and different components solidifying by way of cooling, quite than baking. Insufficient chilling ends in a wobbly, unstable dessert, susceptible to crumbling or collapsing.
Secondly, chilling enhances the flavor improvement. The flavors of the cream cheese, sweeteners, and other elements meld collectively more fully through the chilling course of. This is particularly true for delicate or advanced flavor profiles. The longer the chilling period, the extra built-in and harmonious the ultimate taste turns into.
This integration manifests in several methods. Sharp notes from the cream cheese soften, permitting the sweetness and different flavors to come back ahead extra totally. The fats within the cream cheese and different ingredients crystallizes, resulting in a smoother, richer texture, and a more intense and well-rounded taste expertise.
Furthermore, chilling helps stop the cheesecake from becoming overly creamy or soft. A correctly chilled cheesecake maintains its shape and texture better, offering a more satisfying mouthfeel. This firmness also contributes to the enhanced taste perception – a cleanly defined chew, rather than a mushy one, permits the palate to discern each flavor element more effectively.
Consider the influence of specific ingredients. If using extracts like vanilla or almond, chilling allows their aromatic compounds to distribute more evenly all through the cheesecake, creating a extra nuanced and balanced aroma and taste. Similarly, the flavors of any added fruits or spices will combine extra easily, avoiding any harshness or unevenness.
The chilling course of additionally impacts the general mouthfeel. A appropriately chilled no-bake keto cheesecake has a creamy but firm texture. This steadiness contributes significantly to the enjoyment of the dessert. An under-chilled cheesecake will feel overly gentle and might even be troublesome to slice or serve cleanly.
Finally, the chilling time additionally offers a practical benefit in allowing the cheesecake to totally absorb any added toppings. If utilizing berries, chocolate shavings, or different garnishes, enough chilling ensures these additions settle into place without disrupting the underlying cheesecake texture.
In summary, sufficient chilling is not just a step in the preparation; it’s a fundamental component in reaching the desired texture, flavor profile, and overall high quality of a no-bake keto cheesecake. The longer the chilling (within reason – obviously not indefinitely!), the more the flavors meld, the firmer the texture becomes, and the richer the sensory expertise becomes.
Here’s a summary of the advantages:
- Proper Setting
- Enhanced Flavor Integration
- Smoother, Richer Texture
- Improved Mouthfeel
- Better Flavor Balance
- Absorption of Toppings
Achieving the right no-bake keto cheesecake hinges significantly on adequate chilling time. This isn’t merely a matter of comfort; it is essential for developing the desired texture and consistency.
Proper chilling allows the cheesecake filling to completely set. Without enough time in the refrigerator, the filling will remain soft, wobbly, and vulnerable to collapsing. This is very necessary with keto cheesecakes, which frequently rely on cream cheese as a main ingredient, a product that wants time to agency up properly.
The chilling course of facilitates the formation of a easy, creamy texture. The cream cheese and different fat-based parts will solidify gradually, resulting in an opulent mouthfeel that’s less grainy and extra velvety. A rushed chilling course of will go away the cheesecake grainy and ugly.
Adequate chilling time promotes a uniform consistency all through the whole cheesecake. This signifies that the filling will preserve a constant density from the middle to the perimeters, eliminating inconsistencies that usually seem as delicate or runny pockets inside the completed product.
Chilling also helps the flavors meld and deepen. The cool temperature allows the various elements, together with sweeteners, extracts, and different flavor elements, to combine more harmoniously. The result’s a more refined and balanced taste profile.
Furthermore, a well-chilled cheesecake is less complicated to slice and serve. A properly set cheesecake holds its form fantastically, allowing for clean, neat slices without crumbling or breaking apart. This is particularly useful when presenting the dessert to friends.
The chilling process impacts the overall stability of the cheesecake. A absolutely chilled cheesecake is far less susceptible to melting or softening at room temperature, guaranteeing it stays visually appealing and structurally sound for longer durations.
Beyond the instant results, chilling enhances the long-term preservation of the cheesecake. A correctly chilled cheesecake will keep its quality and freshness for an extended length within the refrigerator, extending its enjoyable shelf life.
The firmness gained through chilling additionally aids within the incorporation of any toppings or decorations. A stable base offers a steady platform for layering fruits, chocolate, or other gildings, making certain they continue to be in place and improve the general aesthetic enchantment.
In abstract, whereas tempting to rush the method, sufficient chilling time just isn’t merely a suggestion, however a basic step for achieving a scrumptious and visually stunning no-bake keto cheesecake. The resulting enhancements in texture, consistency, taste, and stability far outweigh the extra wait time.
Remember that the ideal chilling time may vary barely relying on the specific recipe and refrigerator temperature. Always seek the advice of the recipe directions for recommended chilling period, and allow for additional time if necessary to make sure perfection.
Paying attention to the chilling section is investing in the last high quality of your keto cheesecake; it is an funding that might be richly rewarded with a flawlessly smooth, creamy, and scrumptious dessert.
Adequate chilling is paramount for a successful no-bake keto cheesecake, significantly impacting its texture, taste, and shelf life.
The chilling process allows the cream cheese base to correctly agency up. Without enough chilling, the cheesecake will remain delicate, potentially runny, and prone to collapsing or turning into misshapen.
A correctly chilled cheesecake reveals a creamy, easy, and set texture, providing the specified mouthfeel expected from this dessert.
Chilling additionally enhances the event and integration of flavors. The elements have time to meld together, resulting in a extra harmonious and balanced style profile.
The extended chilling time contributes to an extended shelf life by slowing down bacterial progress. Cold temperatures inhibit the activity of microorganisms that might cause spoilage, extending the cheesecake’s secure consumption period.
A well-chilled cheesecake is far less prone to melting or softening at room temperature, an important issue for transport and serving, particularly throughout warmer climate.
The firm texture resulting from adequate chilling permits for easier slicing and serving. A soft cheesecake is tough to chop cleanly, typically leading to crumbling or uneven portions.
Chilling helps to stabilize the cheesecake’s structure, lowering the danger of cracking or separation of layers, leading to a more visually appealing completed product.
This stabilization prevents the migration of liquids inside the cheesecake, maintaining its overall integrity and stopping a watery or separated consistency.
Longer chilling durations usually lead to a richer, extra intense taste as a end result of time allowed for the elements to fully interact and mature.
In the context of a keto cheesecake, proper chilling is much more important due to the absence of baking, which usually solidifies the structure of traditional cheesecakes.
By chilling the keto cheesecake adequately, you ensure its structural stability, stopping the potential separation of fat and water elements, a standard problem in high-fat desserts.
The prolonged shelf life provided by correct chilling is also a sensible benefit, allowing you to arrange the dessert ahead of time for occasions or to enjoy it over a number of days.
Careful consideration to chilling time contributes to a superior culinary expertise, enhancing both the sensory attraction and the longevity of the no-bake keto cheesecake.
Sufficient chilling minimizes the chance of foodborne illness by limiting bacterial development, especially essential when handling dairy-based products.
The firmer consistency of a well-chilled cheesecake makes it easier to embellish, whether with fresh berries, chocolate shavings, or different desired toppings.
Proper chilling is a vital step in achieving the optimum texture, taste, and shelf life, turning a doubtlessly delicate dessert into a delicious and reliable deal with.
Ultimately, the funding of time in enough chilling yields a major return in the quality and delight of the no-bake keto cheesecake.
Ignoring the chilling course of can compromise the complete dessert, resulting in disappointment and doubtlessly wasted ingredients.
Therefore, following beneficial chilling instances diligently is a crucial step towards creating an ideal no-bake keto cheesecake.
Chilling Techniques for Best Results
Achieving the right creamy, clean texture in a no-bake keto cheesecake hinges critically on correct chilling time and technique. Rushing this process leads to a wobbly, unstable dessert, whereas inadequate chilling leaves it too soft and vulnerable to melting.
The best chilling temperature is constantly around 35-38°F (2-3°C). A fridge’s temperature can fluctuate, so utilizing a thermometer to monitor the fridge’s inner temperature is helpful, notably during hotter months.
Begin by making certain the cheesecake filling is completely clean and freed from lumps before chilling. Any remaining lumps will solidify and detract from the ultimate texture. A high-quality immersion blender or stand mixer is right to ensure a wonderfully smooth consistency.
The chilling course of must be gradual and even. Avoid placing the cheesecake in a location subject to excessive temperature changes, such as close to the fridge door or a vent.
For optimal results, think about a chilling time of no less than 4-6 hours, however ideally 8-12 hours, and even in a single day. This allows the filling to completely set and the flavors to meld.
The container selection is equally crucial. A springform pan offers ease of serving however can sometimes result in uneven chilling. Ensure the pan is properly sealed with plastic wrap to stop moisture absorption or changes in texture.
Alternatively, a glass pie dish supplies glorious visibility and even chilling. However, glass is extra prone to cracking under temperature modifications, especially if eliminated directly from the freezer (which isn’t beneficial for this recipe).
Consider utilizing a high-quality, freezer-safe container, particularly if you’re aiming for an extended chilling interval. This helps keep consistent temperature and stop temperature fluctuations that could impact the cheesecake’s texture.
Avoid using plastic containers that aren’t explicitly labelled as freezer-safe. Some plastics can leach chemical compounds into the cheesecake at low temperatures, compromising both taste and safety.
For finest outcomes, cowl the cheesecake utterly during chilling. This will stop a skin from forming on the floor and maintain the creamy consistency all through.
Use plastic wrap pressed instantly onto the cheesecake floor to remove air pockets and forestall crust formation. Then, cover the complete container to add an extra layer of protection against temperature fluctuations and unwanted smells.
Before serving, allow the cheesecake to come back to room temperature for no less than 15-20 minutes to improve its texture and make it easier to chop and serve. This allows the cheesecake to soften slightly with out compromising its structure.
Over-chilling could make the cheesecake too firm and tough to cut, whereas under-chilling leaves it vulnerable to crumbling. Finding the right stability of chilling time is vital to reaching the last word no-bake keto cheesecake expertise.
Remember to look at the cheesecake’s consistency as it chills. If you notice it is setting too rapidly or inconsistently, think about adjusting the chilling location or utilizing a slightly totally different container sooner or later.
Experimentation with chilling time and container kind can help you perfect your technique, leading to a deliciously easy and creamy keto cheesecake each time.
Always prioritize meals security. If you’re uncertain about the freezer safety of a container, err on the side of caution and choose a special option.
By paying close consideration to chilling time and container selection, you will elevate your no-bake keto cheesecake from merely good to actually distinctive.
Chilling a no-bake keto cheesecake is essential not just for setting the filling but also for preventing crystallization of the cream cheese and reaching a clean, creamy texture.
The best chilling temperature is persistently round 35-40°F (2-4°C). Fluctuations in temperature can result in uneven setting and potential crystallization.
A correctly chilled cheesecake may have a agency, but barely yielding texture, indicating a whole set. It shouldn’t wobble significantly when gently shaken.
The minimum chilling time is usually 4 hours, however for optimum results, 6-8 hours, and even overnight, is recommended.
Using a high-quality cream cheese with a decrease water content material is vital to minimizing crystallization. Look for manufacturers with higher fats content.
Ensure the cream cheese is at room temperature before mixing to prevent lumps and guarantee a smooth, homogenous batter. This allows for correct emulsification with different ingredients.
Thorough mixing is crucial to completely incorporate all elements and prevent pockets of unmixed cream cheese, which can crystallize.
Avoid over-mixing, nonetheless, as this could incorporate too much air, potentially resulting in a much less dense and secure cheesecake.
The use of a meals processor or stand mixer is right for attaining a wonderfully smooth batter, minimizing the likelihood of cream cheese clumps which can crystallize later.
Using a silicone mold or springform pan lined with parchment paper helps stop sticking and makes removal after chilling simpler.
Covering the cheesecake throughout chilling, ideally with plastic wrap pressed immediately onto the floor to forestall a pores and skin from forming, maintains optimum humidity and prevents moisture loss.
Avoid opening the fridge incessantly while the cheesecake chills, as temperature fluctuations can disrupt the setting course of and contribute to crystallization.
Crystallization is commonly manifested by a grainy or sandy texture in the cheesecake. This can be attributable to uneven chilling, improper mixing, or utilizing low-quality cream cheese.
If using sweeteners like erythritol, guarantee it’s finely powdered and fully integrated to keep away from a gritty texture. Consider sifting the sweetener earlier than including it to the batter.
The addition of a small quantity of sour cream or heavy cream to the batter can help create a creamier, smoother texture and scale back the prospect of crystallization.
Once chilled, allow the cheesecake to sit at room temperature for about 10-15 minutes before slicing to allow it to soften barely and enhance its sliceability.
If you discover crystallization after chilling, it might be difficult to remedy. Future batches ought to give consideration to better method and ingredient high quality.
Proper chilling methods and a spotlight to detail all through the preparation process are crucial for a perfectly clean, creamy, and scrumptious no-bake keto cheesecake.
Remember to consistently monitor the chilling temperature and avoid unnecessary temperature changes for one of the best results.
Experiment with different chilling methods and instances to search out what works best on your kitchen and gear.
Consistent temperature, thorough mixing, high-quality ingredients, and persistence are the keys to success in preventing crystallization and achieving a superior keto cheesecake.
Proper chilling is paramount for a profitable no-bake keto cheesecake, reworking a probably runny, unstable dessert right into a firm, sliceable masterpiece.
The essential chilling interval allows the cream cheese and different fat-based components to solidify completely, making a wealthy, dense texture.
Insufficient chilling ends in a wobbly, gentle cheesecake that’s troublesome to deal with and serve.
Aim for a minimal chilling time of a minimal of four hours, ideally in a single day, or even longer for optimum outcomes.
The longer it chills, the firmer and extra steady the cheesecake becomes, bettering its general quality and mouthfeel.
Consider the ambient temperature of your fridge; a colder refrigerator will obtain the specified firmness faster.
Avoid opening the fridge regularly during the chilling process, as temperature fluctuations can hinder the setting process.
For even chilling, use a well-insulated container or cowl the cheesecake with plastic wrap to prevent the formation of a skin.
A coated container additionally helps maintain consistent humidity ranges, preventing the cheesecake from drying out.
Humidity plays a major position; a barely humid setting helps maintain the moisture of the cheesecake with out compromising its firmness.
Too a lot humidity can lead to a sticky or overly gentle texture, while too little can lead to a dry, crumbly cheesecake.
The perfect humidity degree in your fridge is generally around 50-70%, but attaining exact management may be troublesome in a typical domestic fridge.
Using a well-sealed container and avoiding frequent opening of the fridge helps to maintain a relatively secure humidity stage.
If your fridge is exceptionally dry, consider putting a shallow dish of water inside (away from the cheesecake) to slightly improve humidity ranges.
However, keep away from extreme moisture, as this could lead to condensation and have an result on the cheesecake’s appearance and texture.
Observe your cheesecake because it chills; if it appears overly soft after the initial chilling interval, lengthen the chilling time further.
Patience is essential; dashing the chilling process will virtually actually compromise the final product.
A correctly chilled keto cheesecake ought to maintain its form perfectly when sliced, offering a smooth, creamy texture with a delightful, satisfying firmness.
Remember that the chilling time is not just about firmness, it additionally allows the flavors to meld together, making a extra harmonious and delicious overall taste.
Proper chilling is a vital step within the process that transforms a simple mixture of ingredients into a tasty, restaurant-quality no-bake keto cheesecake.
By following these pointers, you’ll achieve the proper stability of firmness, texture and taste, leading to a truly exceptional dessert.
Don’t underestimate the significance of sufficient chilling; it’s the ultimate touch that elevates your no-bake keto cheesecake to a stage of perfection.
Troubleshooting and Tips
Over-chilling your no-bake Keto Cheesecake No Bake cheesecake can result in a wide range of undesirable textures and flavors, so understanding the best chilling time is essential.
Identifying Over-Chilled Cheesecake:
Excessively agency texture: The cheesecake turns into too dense and tough to cut cleanly; it’d crumble or break apart easily.
Dry or crumbly consistency: Over-chilling can draw out moisture, leading to a dry and less creamy texture.
Flavor intensification (sometimes negative): While some flavors may intensify with chilling, extreme chilling can make sure parts taste overly sharp or bitter.
Difficulty in slicing: A very hard cheesecake is a nightmare to slice neatly and serve attractively.
Troubleshooting Over-Chilling:
Let it soften: The easiest solution is to let the cheesecake sit at room temperature for a brief period. Start with 15-20 minutes, checking the consistency frequently. A barely warmer surroundings (e.g., near a bowl of warm water, not directly in contact) may help speed the method, however avoid direct warmth sources.
Use a warm knife: Run your knife underneath sizzling water and wipe it dry before each slice. This prevents the cheesecake from sticking to the blade and creates cleaner, neater cuts.
Microwave (use with caution): For a very stiff cheesecake, you’ll find a way to try warming it briefly in the microwave in 10-second intervals. This technique requires close supervision to prevent melting the cheesecake inconsistently. It’s best for minor changes.
Re-whip the topping: If the topping, such as whipped cream, is merely too firm, gently whip it again with a mixer to revive its light and fluffy texture. A tablespoon of heavy cream could assist restore consistency.
Tips for Preventing Over-Chilling:
Follow the recipe carefully: Pay close attention to the really helpful chilling time specified in your chosen recipe. This time is often a stability between setting and avoiding over-chilling. Start checking for doneness barely before the advised time.
Use a reliable thermometer: While not all the time necessary, a food thermometer may help you monitor the interior temperature of the cheesecake, making certain it reaches a safe and adequately set state without excessive chilling.
Consider your fridge temperature: Some fridges run colder than others. If your fridge tends to be fairly cold, cut back the chilling time barely.
Check for doneness early: Begin checking the cheesecake’s consistency somewhat earlier than the recipe suggests. The middle ought to be set however not rock-hard.
Line your pan properly: Ensure your springform pan is correctly lined to prevent sticking and make elimination easier, reducing the risk of harm from excessive pressure when removing from the pan.
Use high-quality components: High-fat cream cheese and other ingredients contribute to a smoother, creamier, and fewer susceptible to drying-out cheesecake.
Adjust based on your local weather: In warmer climates, you might require a barely longer chilling time; conversely, in colder areas, you would possibly find you need less.
Remember, the goal is a superbly set, creamy, and scrumptious keto cheesecake. Practice makes good; via trial and error, you will discover the best chilling time for your specific recipe and fridge situations.
Under-chilling is a standard drawback that may wreck the feel and stability of a no-bake keto cheesecake. A properly chilled cheesecake ought to be firm and sliceable, not wobbly or runny.
Insufficient chilling time results in a soft, unstable cheesecake susceptible to crumbling or falling apart. This not only impacts the presentation but in addition the enjoyment of the dessert.
The ideal chilling time for a no-bake keto cheesecake varies relying on several elements including the scale and depth of the pan, the filling’s consistency (thicker fillings chill faster), and the ambient temperature of your fridge.
A good rule of thumb is a minimal of 4-6 hours for a smaller cheesecake, but ideally overnight (8-12 hours) for optimal outcomes.
If you’re quick on time, think about using a smaller pan or a shallower springform pan to decrease chilling time. A thinner layer of cheesecake will chill more shortly.
Ensure your fridge is about to the proper temperature (ideally between 35-38°F or 1-3°C). A hotter fridge will considerably improve chilling time, presumably resulting in under-chilling.
Avoid opening the fridge door frequently during chilling, as temperature fluctuations can hinder the chilling course of.
For quicker chilling, you can place the cheesecake in the freezer for a brief interval (1-2 hours maximum), followed by refrigeration. However, watch out not to freeze it stable, as this can alter the texture.
Consider utilizing a metallic springform pan as an alternative of a glass or ceramic one. Metal conducts chilly better, promoting quicker chilling.
If you discover your cheesecake remains to be too gentle after the beneficial chilling time, you may need to adjust your recipe. The type and amount of cream cheese can significantly impact the final consistency. Look for recipes that use a better ratio of cream cheese to other components.
If the recipe includes a cream cheese filling with a excessive liquid content material (e.g., extreme cream, lemon juice), reducing the liquid can improve the setting.
Always use high-quality, cold cream cheese straight from the refrigerator. Room-temperature cream cheese will not whip up correctly and will lead to a less stable filling that chills more slowly.
Make positive the crust is completely chilled before including the filling. A gentle crust can have an effect on the overall stability of the completed cheesecake.
Once chilled, keep away from removing the cheesecake from the fridge too quickly before serving. Let it sit at room temperature for only about 10-15 minutes to permit for slight softening, stopping it from being too chilly and dense.
If, regardless of your finest efforts, your cheesecake stays under-chilled, consider serving it in smaller parts or with a contrasting factor like recent berries or a keto-friendly chocolate sauce to compensate for the feel.
If your cheesecake is considerably under-chilled and does not set properly, you could want to contemplate making it once more, paying close consideration to the chilling time and recipe adjustments as described above.
Troubleshooting under-chilling requires persistence and a spotlight to detail. By following these tips, you can significantly improve your possibilities of creating an ideal, firm, and scrumptious no-bake keto cheesecake.
- Check Refrigerator Temperature: Ensure your refrigerator is cold enough.
- Chilling Time: Allow ample chilling time (at least 4-6 hours, ideally overnight).
- Pan Selection: Use a metal pan for quicker chilling.
- Recipe Adjustments: Consider using a better ratio of cream cheese to different elements.
- Ingredient Quality: Use cold, high-quality cream cheese.
- Freezing (Short Term): Use the freezer for a brief interval (1-2 hours max), then refrigerate.
- Crust Preparation: Ensure crust is thoroughly chilled earlier than adding filling.
Insufficient chilling time is a leading explanation for cracks and uneven setting in no-bake keto cheesecakes. A minimum of 4 hours is usually really helpful, however 6-8 hours, or even overnight, is ideal for optimum outcomes.
Ensure your cheesecake combination is totally chilled earlier than pouring it into the crust. A cold combination will set extra evenly and scale back the danger of cracking.
Use a high-quality cream cheese, ensuring it is at room temperature before mixing. This will forestall lumps and ensure a smoother, extra constant batter.
Whip the cream cheese thoroughly till it’s completely clean and fluffy. This incorporates air and creates a lighter texture, decreasing the probabilities of cracking.
Gently fold in the remaining components, avoiding over-mixing. Over-mixing incorporates too much air, which may lead to cracks as the cheesecake sets.
Don’t over-fill the crust. Leave about ½ inch of house on the top to permit for enlargement during chilling.
Pour the combination into the crust slowly and evenly to stop air bubbles from forming.
Smooth the highest of the cheesecake with a spatula or offset spatula for a fair floor. This helps prevent uneven setting and improves the aesthetic enchantment.
Cover the cheesecake tightly with plastic wrap, pressing it directly onto the surface to prevent a skin from forming.
Chill the cheesecake in a constant temperature surroundings. Avoid placing it close to a heat source or in drafty areas.
Use a well-made crust that is adequately chilled before pouring within the filling. A sturdy crust will present higher assist and cut back the risk of cracks.
Consider using a water bath throughout chilling. This helps create a more even temperature and reduces the chances of cracking, particularly for cheesecakes with a thinner filling.
If cracks nonetheless appear after enough chilling, consider including a skinny layer of whipped cream or ganache to the top to mask the imperfections.
The use of stabilizers, similar to gelatin or cornstarch, also can help to stop cracks and ensure a firmer, more secure cheesecake. Follow recipe instructions fastidiously when using stabilizers.
Ensure all ingredients are on the right temperature as laid out in your recipe. Deviations from beneficial temperatures can affect the ultimate consistency and increase the danger of cracking.
Don’t rush the method. Patience is vital to reaching a perfect, crack-free no-bake keto cheesecake. Allow ample chilling time and observe the recipe directions meticulously.
If utilizing a springform pan, ensure it is properly sealed to forestall leakage and keep a constant chilling environment.
If cracks do develop, do not despair! They usually do not have an effect on the style, and various topping strategies can easily camouflage any imperfections.
Experiment with different recipes and techniques to seek out what works greatest for you and your kitchen conditions. Some recipes are inherently extra prone to cracking than others.
Consider using a digital thermometer to ensure the filling is correctly chilled before pouring it into the crust and all through the chilling process. This will present more control and decrease the chance of temperature-related issues.
High humidity also can impact the setting of a no-bake cheesecake. Consider adjusting your chilling location when you’re in a very humid surroundings.
Once chilled, allow the cheesecake to sit down at room temperature for about 10-15 minutes before serving. This allows it to melt slightly and improves the feel.