The Best Kitchen Tools For Roasting Garlic Like A Pro
Choosing the Right Garlic
While the article focuses on roasting garlic, choosing the proper garlic beforehand significantly impacts the final taste and texture.

First, contemplate the variability. Hardneck garlic boasts larger cloves, good for roasting as a outcome of their robust taste that holds up properly to heat. Softneck garlic, with its smaller, more quite a few cloves, works properly too, though the milder flavor may be much less assertive after roasting.
Inspect the bulbs carefully. Avoid bulbs which are soft, bruised, or present signs of sprouting. A firm, heavy bulb signifies freshness and good high quality.
The papery outer pores and skin should be dry and intact, defending the cloves within. Loose or damaged skins can signal deterioration.
The bulb’s size isn’t the sole indicator of quality; concentrate on the burden. A heavier bulb usually signifies denser cloves with a more concentrated taste.
Once you’ve chosen an appropriate bulb, separating the cloves is essential. Gently break aside the bulb, avoiding forceful squeezing which may bruise the cloves.
Discard any cloves that present indicators of harm, discoloration, or mold. Even small blemishes can have an result on the style and texture throughout roasting.
If you’re only roasting a couple of cloves, it is easier to separate them immediately after breaking the bulb. For larger batches, you might prefer to peel them all of sudden.
Peeling garlic may be time-consuming. To expedite this, strive soaking the entire bulb in scorching water for a couple of minutes. This loosens the skins, making them simpler to take away.
Another methodology involves gently crushing each clove with the flat aspect of a knife, then slipping the skins off with your fingers.
Remember, the ultimate goal is to choose plump, agency cloves with intact skins, free from harm or blemishes. This attention to detail will significantly enhance the result of your roasted garlic.
The size and sort of garlic you choose can also rely in your recipe. A giant hardneck clove may be best for a hearty stew while smaller softneck cloves could also be preferable for a fragile sauce.
Ultimately, selecting superior garlic is an important first step, complementing the utilization of correct tools for roasting to attain peak flavor.
Consider the seasonality; garlic harvested in the late summer or early fall is mostly at its peak flavor.
Smell the garlic; a strong, pungent aroma is a good signal of its high quality and freshness.
If buying pre-peeled garlic, examine it fastidiously for any discoloration or unusual odors. Pre-peeled garlic tends to dry out extra rapidly and may lose a few of its taste.
Whether you opt for natural or conventionally grown garlic is a personal alternative, however natural choices usually have a richer flavor.
Finally, correct storage is essential. Store your garlic in a cool, darkish, and dry place to take care of its quality and prolong its shelf life.
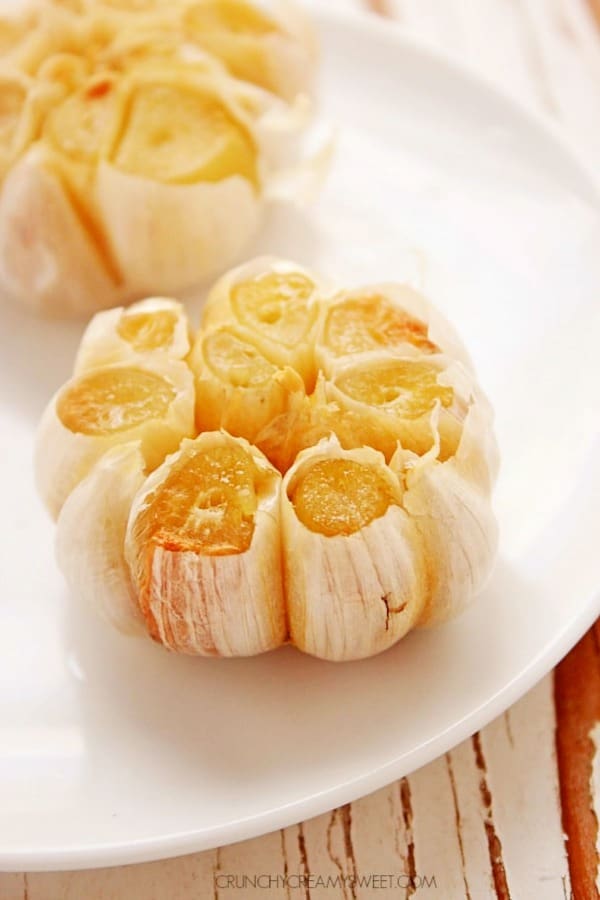
Roasting garlic mellows its sharp chew, remodeling it right into a candy, spreadable delight. But not all garlic is created equal in relation to roasting.
For optimum roasting, soft-necked garlic varieties are generally preferred over hard-necked sorts. Hard-necked garlics, while scrumptious in other purposes, are inclined to have a firmer texture even after roasting, and their cloves might separate less simply.
Soft-necked garlic, characterized by its pliable neck and ability to be braided, presents a extra constant roasting expertise. The cloves roast evenly and turn into wonderfully tender.
Within soft-necked varieties, think about the size of the bulb. Larger bulbs, while containing extra cloves, may not roast as uniformly as smaller to medium-sized bulbs. Smaller bulbs often cook dinner by way of extra evenly.
Look for bulbs with plump, firm cloves, free from bruises or blemishes. Avoid garlic with soft spots or indicators of sprouting, as these indicate age and can affect flavor and texture.
While specific garlic cultivars differ in taste, most soft-necked varieties will work nicely for roasting. Popular choices usually embrace these labelled as “California White,” “Arbol,” or “Silverskin” varieties, known for his or her delicate to medium flavor profiles.
The “purple stripe” varieties typically possess a extra intense flavor, which is still delicious roasted however may be overpowering for some palates. Experimentation might help you find your good roast garlic flavor desire.
Beyond the sort, contemplate the time of year you’re purchasing your garlic. Garlic harvested earlier in the season may have a slightly milder taste in comparison with later harvests which regularly possess a extra pronounced style.
Regardless of the variety chosen, correct preparation is vital. Trimming the top off the garlic bulb, exposing the cloves, is crucial for even roasting. Don’t peel the cloves utterly earlier than roasting—the papery pores and skin helps protect them.
Finally, do not neglect that roasting time can vary relying on the dimensions of the bulb and your oven. Smaller bulbs will roast sooner. Over-roasting can result in a burnt or bitter flavor, so maintain a close eye on your garlic whereas it’s within the oven.
Experimentation is vital to discovering your favourite garlic variety for roasting. Try differing kinds and sizes to find the right steadiness of flavor and texture in your culinary creations.
Don’t hesitate to sample a roasted clove while it’s nonetheless heat to gauge doneness. The clove ought to be delicate and simply mashed with a fork. The subtle sweetness must be obvious.
Once you’ve mastered the artwork of roasting garlic, you must use it to raise countless dishes, from simple pasta sauces and mashed potatoes to soups, spreads, and even roasted vegetables. The possibilities are infinite.
Essential Roasting Tools
Roasting garlic transforms its pungent chunk right into a candy, mellow flavor good for enhancing numerous dishes. While you can technically roast garlic in foil packets, achieving truly even roasting and easy cleanup requires the best instruments.
Essential Roasting Tools:
Head-of-Garlic Trimmer/Knife: A sharp paring knife works, but a specialized garlic trimmer permits for exact removing of the top of the garlic bulb with out damaging the cloves, ensuring even roasting.
Small Oven-Safe Dishes: Several options exist, every with execs and cons. Consider these:
Small ramekins or oven-safe bowls: These present even heat distribution and are straightforward to clean. Choose a fabric that will not crack underneath heat, like stoneware or ceramic.
Cast-iron skillet (small): Offers glorious heat retention, leading to deeply roasted garlic. Its sturdiness ensures longevity. However, it could be heavier and requires extra careful dealing with.
Small baking dish or gratin dish: Suitable if you’re roasting a number of heads of garlic. Choose one with low sides for optimal roasting and simple retrieval.
Olive Oil: High-quality olive oil not solely lubricates the cloves, aiding even roasting, but in addition infuses the garlic with its wealthy flavor. Consider utilizing extra virgin olive oil for one of the best taste.
Aluminum Foil (Optional): While not strictly essential, foil can be used to create a makeshift lid in your dish, trapping moisture and accelerating the roasting course of. However, direct warmth may lead to barely sooner browning.
Spatula or Spoon: For safely removing the roasted garlic cloves from their skins after roasting, a small spatula or spoon is invaluable.
Storage Container (Airtight): Once roasted, garlic ought to be saved in an hermetic container in the fridge to retain its flavor and moisture. A small glass jar or hermetic food storage container works nicely.
Oven-Safe Dishes – Detailed Considerations:
Material: Choose oven-safe materials like ceramic, stoneware, glass, or forged iron. Avoid supplies that aren’t labeled oven-safe as they’ll crack or shatter underneath high warmth.
Size and Shape: The perfect dimension is large enough to comfortably maintain the garlic bulb(s) but not so large that the garlic is unfold too skinny, resulting in uneven cooking. A shallow dish is preferred for optimum roasting.
Ease of Cleaning: Opt for a dish with a non-stick surface or one that’s easy to clean clean. Some dishes are dishwasher-safe, saving you effort and time.
Heat Distribution: Even warmth distribution is essential for perfectly roasted garlic. Darker-colored dishes generally take up heat higher than lighter-colored ones.
Durability: Select a durable dish that may stand up to repeated use and excessive temperatures without chipping, cracking, or shedding its integrity.
By investing in these important instruments and carefully contemplating your oven-safe dish choices, you’ll be well-equipped to roast garlic to perfection every time, unlocking its full potential in your culinary creations.
Roasting garlic to perfection requires more than just a head of garlic and an oven; the proper tools elevate the experience and ensure persistently scrumptious results.
At the heart of profitable garlic roasting lies the selection of proper roasting pans. A cast iron skillet, with its even warmth distribution, is a high contender. Its weight retains warmth successfully, resulting in uniformly roasted cloves.
Alternatively, a small oven-safe baking dish, like a ramekin or a small ceramic dish, supplies excellent results. Ensure it is oven-safe up to no less than 400°F (200°C).
A shallow baking dish with a lid, like a lined casserole dish, creates a extra humid environment within the oven. This helps the garlic soften and caramelize beautifully.
For those in search of a more rustic approach, particular person small foil packets are an excellent choice. Each clove is wrapped individually, resulting in more uniformly roasted cloves compared to roasting all of them collectively.
Beyond the main roasting vessel, small bowls play a vital role. These are important for holding the essential components that improve the garlic’s taste profile throughout roasting. Think small, heat-safe bowls.
One small bowl is important for holding your chosen roasting oil. Extra virgin olive oil is a classic selection, imparting a rich, fruity flavor to the roasted garlic. Other choices embrace avocado oil, or even a high-smoke level oil like grapeseed oil, which can better face up to high roasting temperatures.
Another small bowl ought to be reserved for your chosen herbs. Fresh herbs like rosemary, thyme, and oregano add depth and complexity to the roasted garlic. Dry herbs can additionally be used, however utilizing recent herbs offers a brighter taste and extra vibrant aroma.
Beyond the bowls and roasting dishes, having a sturdy oven mitt is important for safely dealing with sizzling dishes. Consider also a wire rack to raise the baking dish, making certain even heat circulation around the garlic.
Finally, a good quality garlic press will be extremely useful for easily extracting the roasted garlic cloves from their skins as soon as they’ve cooled. Some folks find a fork or spoon simply as effective. This device just isn’t strictly essential for roasting, but makes post-roasting a lot easier.
Investing in these essential tools is not going to solely simplify the process of roasting garlic, however it will additionally result in a extra flavorful and consistent product, taking your culinary creations to the subsequent degree.
Remember to choose tools that are sturdy, straightforward to clean, and comfy to make use of for a truly gratifying garlic roasting expertise. Happy roasting!
While not strictly “instruments,” aluminum foil and parchment paper play significant roles in attaining completely roasted garlic.
Aluminum foil presents a strong, reflective barrier, ideal for creating a contained roasting setting. Its power prevents leakage and makes for simple cleanup.
The foil’s reflective properties help to bounce heat back onto the garlic, promoting even roasting and preventing burning.
However, foil can generally impede browning, because it creates a extra insulated area.
Parchment paper, on the other hand, roasted garlic cloves provides a extra breathable setting.
It allows for some moisture evaporation, which may contribute to a barely crispier, more intensely caramelized end result.
Parchment paper can be naturally non-stick, simplifying the removing of the roasted garlic cloves.
The draw back is that parchment paper is less durable than foil and may tear extra simply, significantly if the garlic is especially juicy.
For actually professional outcomes, many cooks contemplate combining both strategies.
They might wrap the garlic heads in parchment paper first, then enclose the parchment packet in a layer of foil.
This strategy balances the advantages of both supplies: the parchment for even browning and moisture management, and the foil for added safety and contained roasting.
Beyond foil and parchment, a number of important instruments elevate the roasting process.
A good high quality chef’s knife is essential for trimming the top of the garlic head, allowing for even roasting and straightforward clove removal.
A roasting pan, preferably one with a tight-fitting lid, ensures even heat distribution.
A small bowl of olive oil is essential for drizzling over the garlic before roasting, adding taste and moisture.
Optional additions embrace fresh herbs like rosemary or thyme, which can be tucked around the garlic head to add fragrant complexity.
A meat thermometer isn’t strictly needed for roasting garlic, but it can be helpful for monitoring the internal temperature, making certain the cloves are tender and cooked by way of however not mushy.
Finally, a sturdy pair of tongs or oven mitts are essential for safely handling the hot roasting pan and garlic as soon as it’s removed from the oven.
Choosing between foil and parchment, or using each, depends on the specified consequence. Experimentation is vital to discovering your most well-liked method.
With the best instruments and a little bit of apply, achieving perfectly roasted garlic – tender, sweet, and completely delicious – turns into a simple and rewarding culinary experience.
Roasting Techniques
While the prompt asks about roasting strategies, particularly dry roasting, and never kitchen instruments for roasting garlic, I will reply regarding dry roasting methods applicable to garlic, and different vegetables and nuts, which will implicitly contact upon suitable instruments.
Dry roasting, in essence, includes cooking food immediately in a dry heat supply, usually an oven, without added liquid or fats.
This approach brings out the natural sugars and creates a rich, caramelized flavor.
For garlic, dry roasting mellows its pungency and transforms it right into a sweet, spreadable delight.
Let’s delve into the specifics of dry roasting garlic:
Preparation: Begin by separating the garlic cloves. You can depart them entire, halve them, or even take away the papery skins, depending in your desire and the desired consequence. For complete cloves, the roasting time shall be longer than for halved cloves.
The Roasting Vessel: A roasting pan or oven-safe dish works nicely. Consider utilizing a small oven-safe bowl, especially if roasting a single head of garlic. For bigger quantities, a shallow baking pan offers extra even distribution.
Seasoning (Optional): A drizzle of olive oil (minimal, only for stopping sticking) or a sprinkle of herbs (rosemary, thyme) can improve the flavour. However, dry roasting emphasizes the inherent garlic taste, making added seasoning largely unnecessary.
Roasting Temperature and Time: The optimum temperature for dry roasting garlic is round 350-400°F (175-200°C). Roasting time varies depending on the scale of the garlic cloves and your preferred degree of doneness. Smaller cloves, or those which have been halved or the papery pores and skin eliminated, will roast sooner (around 30-40 minutes). Whole cloves could require 45-60 minutes or even longer. It’s best to verify the garlic for doneness frequently.
Checking for Doneness: The garlic is ready when the cloves are gentle and simply squeezed. Their color will deepen to a golden brown. If some cloves are ready before others, you presumably can take away them and continue to roast these less accomplished.
Cooling and Storage: Remove the roasted garlic from the oven and let it cool barely before handling. The cloves might be very gentle. Store leftover roasted garlic in an hermetic container within the refrigerator for as much as per week. It may additionally be frozen for longer storage.
Beyond garlic, dry roasting can be glorious for:
Vegetables: Root vegetables like carrots, potatoes, parsnips, and sweet potatoes are well-suited for dry roasting. Their natural sugars caramelize, producing a delicious sweetness.
Nuts: Dry roasting nuts (almonds, walnuts, pecans) enhances their taste and texture. Be cautious to observe nuts closely to prevent burning.
Seeds: Pumpkin and sunflower seeds can be dry roasted for a flavorful snack.
Remember that the key to successful dry roasting is monitoring the meals rigorously to prevent burning and achieving the specified level of doneness. The barely charred edges that often result from dry roasting add to the interesting taste and look of the dish.
While the immediate asks about roasting strategies and oil-based strategies, it is mismatched with the specified title about roasting garlic. Therefore, I’ll concentrate on oil-based garlic roasting techniques and the best instruments for them.
The most typical and arguably finest technique for roasting garlic involves submerging the entire head in oil. This oil-based method yields extremely delicate, candy, and spreadable roasted garlic.
Essential Tools:
1. Small Oven-Safe Dish: A ramekin, small cast iron skillet, or perhaps a small oven-safe bowl works nicely. The key’s choosing a dish shallow enough to completely submerge the garlic head whereas nonetheless allowing space for even heating.
2. Good Quality Olive Oil: Use extra virgin olive oil for the best flavor. The oil not solely cooks the garlic, but also infuses it with taste, so choose an oil you enjoy.
3. Garlic Head(s): Choose agency, plump heads of garlic without any delicate or bruised cloves.
4. Sharp Knife: A sharp knife is needed to trim the top of the garlic head, exposing the cloves. This allows the oil to penetrate and the cloves to roast correctly. A serrated knife can be useful for chopping through the powerful skin.
5. Aluminum Foil (Optional): Foil can be utilized to create a tight seal around your garlic and oil, stopping spattering and ensuring even cooking, particularly if using a shallower dish.
6. Basting Brush (Optional): While not strictly needed, a basting brush can be utilized to ensure all cloves are coated with oil, especially when you choose not to absolutely submerge the garlic.
The Oil-Based Roasting Process:
1. Preparation: Preheat your oven to 375°F (190°C). Trim about 1/4 inch off the highest of the garlic head, exposing the cloves.
2. Oiling: Drizzle a beneficiant quantity of olive oil over the exposed cloves, ensuring they are totally coated. You can both submerge the whole head in enough oil to cover the cloves fully, or you ought to use a basting brush for extra focused oil application. Consider including a pinch of salt and pepper for extra taste.
3. Roasting: Place the garlic head (in its dish) into the preheated oven. If utilizing foil, tightly wrap the dish earlier than placing it within the oven. Roast for 40-60 minutes, or till the garlic cloves are very delicate and easily squeezable.
4. Cooling: Remove from the oven and let cool slightly. The garlic will proceed to soften as it cools. Once cool sufficient to handle, squeeze the roasted cloves out of their skins. You can discard the papery outer skin.
Tips and Variations:
• Experiment with totally different herbs and spices: Add rosemary, thyme, or other herbs to the oil for extra flavor.
• Use several varieties of oil: While olive oil is most popular, you can experiment with other high-heat oils like avocado oil.
• Consider using a roasting pan with a rack: This technique is useful for allowing for even roasting and fewer oil absorption.
Roasted garlic is flexible and can be used in varied dishes, from pasta sauces and soups to spreads and dips. The soft, sweet taste elevates any recipe it’s added to.
While the prompt requests info on roasting methods and herb-infused strategies, it’s focused on garlic. Therefore, the next focuses on garlic roasting, incorporating the requested details.
Roasting garlic is an easy yet transformative approach that mellows its pungent flavor, yielding a sweet, almost caramel-like taste good for spreading, soups, sauces, and extra.
The most simple methodology includes cutting off the top of a whole head of garlic, exposing the cloves, drizzling with olive oil, and wrapping in foil before roasting at a low temperature (around 350-400°F or 175-200°C) for 40-60 minutes, or till soft and golden.
However, optimizing the roasting course of for max flavor requires consideration to element.
Choosing the best garlic: Select agency, plump heads with dry, papery skins, avoiding any showing indicators of sprouting or bruising. The dimension of the pinnacle doesn’t considerably impact the roasting course of itself, but it’s going to decide the final yield.
Preparing the garlic: Trimming the highest is crucial, but be careful to not damage the cloves. A sharp knife is really helpful for a clear reduce. Removing the papery outer layers is optional; some cooks depart them on for further safety during roasting.
Oil Selection: High-quality further virgin olive oil is ideal; its fruity notes complement the roasted garlic beautifully. Other oils like avocado oil and even melted butter can work, however the taste profile will differ.
Seasoning: While easy roasting is scrumptious, including herbs enhances the flavour. A basic herb-infused method involves incorporating fresh rosemary, thyme, or even a touch of oregano into the roasting process.
Herb-Infused Roasting Method: After trimming the garlic, place the pinnacle in a small roasting pan. Add a quantity of sprigs of contemporary rosemary and thyme, drizzle generously with olive oil, ensuring all cloves are coated. Season with sea salt and freshly cracked black pepper. You can add a pinch of red pepper flakes for a delicate heat.
Roasting Considerations: Roasting time is dependent upon the scale of the garlic head and oven temperature. Lower temperatures (350°F) result in softer, sweeter garlic, whereas barely higher temperatures (400°F) might produce a barely extra caramelized flavour, however with a barely greater danger of burning.
Checking for Doneness: The garlic is ready when the cloves are easily squeezed with a fork, and the oil has infused superbly. Over-roasting may end up in burnt edges or overly dry cloves.
Post-Roasting: Once cooled, the roasted cloves may be easily squeezed out of their skins. Store leftover roasted garlic in an hermetic container within the refrigerator for as much as every week.
Best Kitchen Tools: A sharp knife for cleanly trimming the garlic prime is important. A small roasting pan, ideally oven-safe, is most popular for even roasting. A good high quality basting brush can be utilized for applying the oil evenly if desired. Lastly, sturdy foil can be used to wrap the garlic, especially for individual parts.
By mastering these techniques, you possibly can elevate your roasted garlic sport from easy to chic, creating a flexible ingredient for countless culinary creations.
Tools for Post-Roasting
Beyond the oven, achieving completely roasted garlic hinges on efficient post-roasting instruments. These instruments streamline the process of extracting the soft, candy cloves from their skins, minimizing mess and maximizing flavor.
A easy but efficient device is a fork. Gently press the roasted bulb with the tines of a fork to separate the cloves. This methodology works well for smaller bulbs and permits for extra control, however it could be slightly slower and fewer efficient for larger portions.
For larger batches, a spoon, particularly a sturdy one with a rounded bowl, proves surprisingly adept. The rounded shape helps to scoop out the cloves with out damaging them excessively.
Another excellent possibility is a garlic press, however not in the traditional sense of mincing uncooked garlic. Instead, the press can be utilized to softly squeeze the roasted cloves from their papery skins. The delicate consistency of roasted garlic makes this technique exceptionally straightforward, extracting the cloves with minimal effort and waste.
A small, sharp knife provides precision for removing the cloves. Carefully slice through the highest of the roasted bulb after which individually pry out the cloves. This methodology is ideal for if you solely need a few cloves or if you have to rigorously extract them intact.
Beyond particular person clove extraction, consider using a mortar and pestle. Once the cloves are extracted, this device is superb for mashing or finely grinding the roasted garlic right into a paste or purée. The resulting texture is easy and perfect for sauces, dips, or spreads.
For a really effortless approach to larger portions, a food processor is invaluable. Simply add the roasted cloves (skins removed) to the bowl and pulse until you reach your desired consistency—from chunky to fully clean.
If you like a superbly clean and uniform texture with out the necessity for a food processor, an immersion blender is an excellent various. This handheld gadget blends the garlic instantly in a bowl, decreasing cleanup.
Lastly, a good set of measuring spoons and cups are important after roasting. This ensures you measure out the exact amount of roasted garlic wanted on your recipe, maximizing taste management and consistency.
- Fork: Gentle separation of cloves, finest for smaller portions.
- Spoon: Efficient scooping of cloves, good for bigger quantities.
- Garlic Press: Gentle extraction of soppy, roasted cloves.
- Sharp Knife: Precision clove removal.
- Mortar and Pestle: Mashing or grinding into paste/purée.
- Food Processor: Efficient processing for big quantities.
- Immersion Blender: Smooth purée creation with out transferring to another vessel.
- Measuring Spoons/Cups: Accurate measurement of roasted garlic.
A food processor excels at reworking roasted garlic right into a easy paste or purée, perfect for sauces, dips, and spreads. Its sharp blades efficiently mince the softened cloves, eradicating skins and making a consistent texture.
Prior to processing, make certain the garlic is absolutely roasted and cooled barely to prevent scalding. This minimizes the chance of burns and permits for easier handling.
For significantly large batches of roasted garlic, a food processor’s capability considerably streamlines the method, saving considerable time and effort in comparison with handbook methods corresponding to mincing with a knife.
Different food processors supply varying blade choices. The commonplace blade is sufficient for most functions, attaining a nice puree. However, if a coarser texture is desired, a slicing or chopping blade might be utilized initially, adopted by pulsing with the standard blade.
To stop the processor from overheating, pulse the roasted garlic in short bursts, permitting it to relaxation in between. This is especially essential with larger portions. Over-processing can lead to a bitter style.
Cleaning a food processor after use is simple. Many models function dishwasher-safe components. For faster cleanup, add somewhat water and a drop of dish soap, pulse for a couple of seconds, after which rinse completely.
Beyond puréeing, a meals processor can be used to incorporate the roasted garlic into other elements. For example, you can add olive oil, lemon juice, and herbs to create a flavorful garlic paste immediately within the processor.
The pulse operate allows for larger control over the final consistency. You can simply achieve a chunky paste or a completely easy purée by adjusting the coronary heart beat duration.
Consider the size of the meals processor in relation to your roasting needs. Smaller fashions are ideal for individual or small family use, whereas bigger models accommodate higher portions of roasted garlic and other ingredients.
Before buying a meals processor specifically for this task, ensure it has a sturdy motor able to dealing with the sometimes powerful texture of roasted garlic cloves. Read evaluations to gauge its performance and longevity.
The capacity to shortly and efficiently remodel roasted garlic into a usable kind is a significant advantage of utilizing a food processor. It enhances both comfort and consistency in culinary preparations.
Ultimately, a food processor is a flexible and efficient software within the post-roasting phase, offering a seamless transition from roasted cloves to delicious garlic-infused culinary creations.
Remember to always train caution when using a food processor; hold fingers away from the blades and comply with the manufacturer’s instructions for protected operation and cleaning.
For those who frequently roast garlic, the funding in an excellent high quality food processor presents important time savings and improved consistency in the final product.
Beyond its operate in creating garlic pastes, the meals processor can be used to combine the roasted garlic with other components, similar to nuts, cheeses, or spices to create unique spreads and condiments.
In conclusion, the meals processor stands out as a powerful and versatile device for post-roasting garlic, simplifying the method and maximizing the flavor potential of this beloved ingredient.
Beyond the roasting itself, reaching completely mashed roasted garlic hinges on the proper post-roasting instruments. While seemingly easy, the method requires careful consideration to avoid damaging the delicate cloves and maximize the creamy texture.
A fork is a well-liked and available choice. Its tines allow for penetration and efficient mashing, particularly when dealing with numerous cloves. However, the effectiveness of a fork depends tremendously on the garlic’s softness. If the roasting wasn’t lengthy enough, the cloves may stay firm, leading to uneven mashing and irritating resistance.
For completely tender garlic, a fork works splendidly. The tines can gently break down the roasted cloves, making a smooth, nearly paste-like consistency. The comparatively blunt suggestions minimize the risk of damaging the cloves additional.
Using a fork additionally offers a level of control. You can adjust the pressure applied to achieve your most well-liked texture, from chunky to completely easy. This is especially useful when you plan to make use of the roasted garlic in a dish where a certain consistency is preferred.
However, forks aren’t perfect. Their tines can sometimes leave small pieces of garlic unmashed, requiring additional effort or a secondary tool for complete puréeing.
A knife, specifically a butter knife or a small paring knife, offers a unique method. Its broad, flat blade allows for a more even pressing action. This is particularly advantageous if you wish to retain extra of the roasted garlic’s shape and texture, creating a tough paste as an alternative of a very smooth purée.
A knife’s flat floor offers better management for finer adjustments, useful for preserving bigger, intact pieces of garlic throughout the mashed mixture. This is preferable for some recipes that require visible flecks of roasted garlic.
The blade of a knife, nevertheless, can typically be too sharp for the delicate roasted cloves, leading to unintended chopping or slicing. This can lead to an undesirable, less creamy texture and would possibly create a gritty sensation.
For a really easy and consistent texture, combining both fork and knife techniques may be the simplest approach. Using a fork to initially break down the garlic cloves, followed by a knife to additional smooth out any remaining lumps and obtain the desired consistency presents one of the best of both worlds.
Ultimately, the best device is dependent upon personal desire and the desired ultimate texture of the roasted garlic. Experimenting with each a fork and a knife will let you determine which device, or mixture of instruments, works finest in your particular person roasting and mashing fashion.
Consider the ultimate software of your roasted garlic as properly. If it’s going into a soup or unfold, a completely clean texture is fascinating, and a fork followed by a spoon or meals processor could be ideal. However, if it’s meant for a garnish or a topping, the marginally coarser texture produced by a knife alone could possibly be visually appealing and equally delicious.
Beyond forks and knives, different choices for reaching completely mashed roasted garlic exist, including potato mashers, food processors, and even a simple mortar and pestle, every providing a unique method to the task.
Storing Roasted Garlic
Roasting garlic transforms its pungent chew into a candy, mellow taste excellent for enhancing numerous dishes. But properly storing your roasted garlic is crucial to preserving its deliciousness and preventing spoilage.
Airtight containers are your best friend when it comes to storing roasted garlic, whether or not it’s entire heads or separated cloves. The secret is to reduce exposure to air, which can cause the garlic to dry out, lose its taste, and probably develop mould.
For complete roasted heads, a small, airtight glass jar is right. The glass prevents any off-flavors from leaching into the garlic, unlike some plastics. Ensure the jar is completely sealed to create an air-tight environment.
If you have already separated the roasted cloves, contemplate smaller airtight containers. Mason jars are a preferred and versatile selection, out there in a range of sizes. You can easily portion the garlic into smaller quantities for individual makes use of, preventing waste.
Another glorious possibility is utilizing food-grade freezer bags, particularly should you plan to freeze your roasted garlic. Make certain to press out as a lot air as possible before sealing the bag. Freezing is a unbelievable methodology for long-term storage, permitting you to get pleasure from roasted garlic’s deliciousness for months to return.
Regardless of the container you choose, do not forget that cleanliness is paramount. Ensure your containers are thoroughly washed and dried earlier than storing the roasted garlic. Any lingering moisture can encourage mildew growth.
Proper storage can lengthen the shelf lifetime of your roasted garlic considerably. Refrigerated roasted garlic, stored in an hermetic container, usually lasts for a couple of week. Frozen roasted garlic can remain in good situation for several months, if not longer.
Here are some particular container suggestions:
Glass Jars: Offer superior safety against flavor transfer and are easy to scrub.
Airtight Plastic Containers: Convenient and lightweight, but be aware of potential plastic-to-food interactions; opt for BPA-free choices.
Food-Grade Freezer Bags: Ideal for freezing larger portions of roasted garlic, ensuring minimal air exposure.
Vacuum-Sealed Bags: Remove nearly all air, extending the storage life even further (requires a vacuum sealer).
Beyond containers, consider these tips for optimum storage:
Allow to Cool Completely: Before storing, ensure the roasted garlic has cooled all the means down to room temperature to prevent condensation contained in the container.
Portion for Convenience: Divide roasted garlic into smaller parts for straightforward use and to avoid repeated opening and closing of the container, minimizing air publicity.
Label and Date: Clearly label your containers with the date of roasting for easy identification and to watch the freshness.
By following these simple tips, you possibly can enjoy the flavorful advantages of your roasted garlic for weeks and even months, making it a available ingredient for a big selection of delicious recipes.
Roasting garlic transforms its pungent chew into a candy, mellow flavor good for countless dishes. But what about storing that deliciousness for later?
While you probably can definitely retailer roasted garlic within the fridge, freezing provides a longer shelf life and maintains its high quality remarkably nicely.
Refrigerator Storage:
Store roasted garlic cloves in an airtight container, preferably a glass jar or a reusable food-safe container with a tight-fitting lid.
This method is ideal for using roasted garlic inside per week. The taste and texture will steadily degrade over time.
Ensure the container is completely sealed to stop the garlic from drying out or absorbing odors from different meals in the refrigerator.
For optimum freshness, consider using roasted garlic paste instead of individual cloves. Simply mash the cloves with a fork and store in an airtight container.
Freezing Roasted Garlic:
Freezing whole cloves: This method is greatest for sustaining the integrity of individual cloves, perfect for adding to soups, stews, or as a garnish.
Place the roasted garlic cloves in a single layer on a baking sheet lined with parchment paper. Freeze until stable, about 2-3 hours.
Once frozen, transfer the cloves to a freezer-safe bag, urgent out as much air as potential. Label and date the bag.
Freezing roasted garlic paste/puree: This methodology is ideal for sauces, dips, and spreads.
Puree the roasted garlic cloves in a meals processor until smooth. You can add a tablespoon or two of olive oil to create a smoother paste and stop freezer burn.
Pour the puree into an ice dice tray. Fill each part utterly and freeze till stable.
Once frozen, pop out the garlic cubes and switch them to a freezer-safe bag or container. Label and date.
Freezing roasted garlic in olive oil: This methodology infuses the oil with the roasted garlic’s taste, creating a delicious cooking oil.
Submerge the roasted garlic cloves in further virgin olive oil in a freezer-safe container, guaranteeing the cloves are completely covered.
Label and date the container. This methodology yields a flavorful oil that can be utilized in cooking or as a finishing oil for salads or roasted greens.
Thawing Frozen Garlic:
For whole cloves, thaw in a single day in the refrigerator. Alternatively, you possibly can thaw them quickly by putting them in a bowl of cold water.
Frozen garlic paste or puree can be used instantly from frozen in many recipes. The consistency might change slightly relying on how long you use it.
For garlic infused olive oil, thaw it in the refrigerator for straightforward use. Once thawed, retailer it within the fridge for optimal quality.
Proper storage ensures you’ll have the ability to benefit from the deliciousness of roasted garlic for weeks, even months, extending the culinary advantages of your roasting efforts.
Remember to always label and date your frozen garlic to guarantee you’re using the freshest product.
Beyond Basic Roasting
Roasting garlic is a transformative course of, elevating its delicate sweetness and mellowing its pungent chunk. While the oven is the traditional methodology, the microwave provides a surprisingly effective and sooner various for reaching completely roasted garlic.
Before diving into microwave roasting, let’s discuss the important instruments that may help you achieve professional-level results, no matter your chosen technique. A good ceramic or glass bowl is paramount. Avoid metallic bowls in the microwave, as they can trigger arcing and damage your equipment. The bowl ought to be deep sufficient to comfortably maintain the garlic head with out the cloves spilling out.
A sharp knife is crucial for properly trimming the top of the garlic head. You wish to take away just sufficient to expose the cloves with out damaging them excessively. A chef’s knife or a paring knife works nicely; the secret’s precision.
For simple and efficient cleanup, consider using a microwave-safe silicone baking dish or cover. These present a contained environment for the roasting process, minimizing splatter and making post-roasting cleanup a breeze. They’re particularly helpful for much less experienced cooks, making certain a tidier expertise.
Now, let’s turn to the microwave roasting technique. Start by trimming the top of the garlic head, about 1/4 inch off, exposing the tops of the cloves. Drizzle about a teaspoon of olive oil over the minimize floor, ensuring that it penetrates between the cloves.
Place the garlic head, cut-side up, in your chosen microwave-safe bowl. Add a tablespoon of water to the underside of the bowl; this helps create steam, selling even roasting and preventing the garlic from drying out. Cover the bowl with a microwave-safe lid or plastic wrap, leaving a small vent for steam to escape.
Microwave on high for 2-5 minutes, relying on the facility of your microwave and the scale of the garlic head. Smaller heads will take much less time. Check the garlic after 2 minutes; the cloves must be easily pierced with a fork when they’re accomplished. If they’re nonetheless agency, proceed microwaving in 30-second intervals until tender.
Once roasted, let the garlic cool barely in the bowl. The residual heat will continue to cook the cloves. Once cool sufficient to handle, gently squeeze the cloves out of their skins. The cloves shall be delicate, sweet, and easily squeezed from their papery casings.
The roasted garlic can be utilized in a wide range of dishes. It’s delicious unfold on bread, integrated into pasta sauces, added to soups and stews, or used as a flavorful topping for pizzas and roasted vegetables. Its versatility makes it a staple ingredient in lots of kitchens.
Remember, microwave energy varies, so regulate cooking times as needed. Always use warning when dealing with sizzling bowls and garlic. With the proper tools and method, microwave-roasted garlic is a quick and effortless method to add a burst of scrumptious taste to your culinary creations.
Beyond the fundamental instruments, consider a small silicone spatula for easily extracting the roasted cloves from their skins. This makes the process even smoother and less messy.
Finally, experiment with different oils. Infused oils like garlic-infused olive oil or herb-infused olive oil will add one other layer of taste to your roasted garlic.
Roasting garlic on the grill elevates its sweetness and mellows its pungency, taking it beyond the straightforward oven-roasting technique. It provides a smoky dimension that’s unimaginable to duplicate indoors.
To achieve perfectly roasted garlic on the grill, you may want the right instruments. While you presumably can actually improvise, investing in a quantity of key gadgets will significantly improve your outcomes and reduce frustration.
Heavy-Duty Grill Pan or Grill Basket: A grill pan with good warmth distribution prevents the garlic from burning and ensures even roasting. A grill basket is good for smaller heads and prevents them from falling via the grates.
Aluminum Foil: Foil packets are a simple, efficient method for roasting garlic on the grill. They contain the heat and moisture, preventing the garlic from drying out.
Tongs: Essential for safely maneuvering the garlic heads, whether in a pan, basket, or foil packet, on and off the recent grill.
Instant-Read Thermometer: While not strictly needed, a thermometer helps make certain the garlic is completely roasted. The inner temperature should attain round 200°F (93°C) for optimum softness.
Heavy-Duty Gloves: Protect your hands from the warmth, particularly when working with sizzling foil packets or removing the garlic from the grill pan.
Beyond these core tools, contemplate these helpful additions:
Olive Oil Spray Bottle: A mild coating of olive oil earlier than roasting adds moisture and enhances the flavor. This is particularly useful when utilizing foil packets.
Herb Grinder or Mortar and Pestle: To simply incorporate roasted garlic into different dishes, grinding it finely enhances its versatility. This allows for higher mixing and reduces clumping.
Airtight Container: Once roasted, garlic stores best in an hermetic container in the fridge. This keeps it contemporary for an extended interval.
Preparation is essential. Trim the top off every garlic head to expose the cloves. Drizzling with olive oil earlier than roasting is helpful. This prevents drying out and also infuses more taste. Whether you’re using a grill pan, basket, or foil packets, guarantee even warmth distribution throughout the garlic heads. Monitor the cooking course of intently, adjusting the warmth as wanted to keep away from burning.
Mastering the artwork of grilling garlic unlocks a world of culinary possibilities. With the best instruments, you can elevate your grilling game and benefit from the uniquely smoky and candy flavor of completely roasted garlic in numerous dishes.
Experiment with different herbs and spices added to the foil packets or sprinkled over the garlic within the grill pan for diverse flavor profiles. The smoky essence imparted by the grill mixed with the sweetness of the roasted garlic creates an unforgettable culinary expertise.