
How To Make A Layered Keto Cheesecake Without Baking
Crust Preparation
Creating a flawlessly easy and scrumptious no-bake keto cheesecake hinges on a masterful crust. Forget traditional graham crackers; we’re venturing into the realm of keto-friendly options.
Nut-Based Crusts: The Foundation of Keto Success
Almonds, pecans, macadamia nuts – these are your keto crust comrades. Their naturally excessive fat content material contributes to the rich texture we crave, while their low carb depend keeps us firmly within our macros.
- Almond Flour Crust: This is arguably the most popular alternative. Almond flour provides a nice, barely crumbly texture. Experiment with adding spices like cinnamon or nutmeg for a warm, comforting twist. To bind the flour, you will want a fat source. Butter, melted coconut oil, or even cream cheese work well.
- Pecans or Macadamia Nuts: These nuts provide a extra robust, intense flavor profile. Processing them into a rough meal (using a meals processor) is crucial. You might need barely extra binding agent compared to almond flour to attain the specified consistency.
- Nut Butter Crust: For an ultra-easy strategy, pre-made almond or pecan butter turns into your greatest friend. The creamy texture contributes to a denser, much less crumbly crust, requiring minimal effort.
Beyond Nuts: Exploring Other Options
While nuts are the celebrities of the keto crust present, other ingredients can contribute distinctive textures and flavors.
- Coconut Flour: Coconut flour absorbs plenty of liquid, so begin with small additions and modify accordingly. It lends a barely candy, coconutty taste that can complement certain cheesecake fillings superbly.
- Chia Seeds or Flax Meal: These add a binding component and a slightly nutty style. Use them sparingly, as they may find yourself in a considerably dense crust if overused. They pair properly with almond flour to create a extra pliable crust.
- Nutritional Yeast: This provides a tacky flavor that harmonizes with many cheesecake fillings, making it a secret weapon for these who desire a savory twist.
Sweeteners & Spices: Adding Depth and Complexity
Don’t underestimate the power of subtle additions to raise your keto crust.
- Erythritol or Monk Fruit Sweetener: Use sparingly to add a contact of sweetness without compromising the keto side.
- Vanilla Extract: Enhances the general flavor and masks any doubtlessly off-putting notes from the nuts or other components.
- Salt: A pinch of salt balances the sweetness and enhances the other flavors.
Layering for Success: Building Your No-Bake Keto Cheesecake Crust
Press the crust combination firmly into the bottom of your springform pan. Ensure a fair layer to forestall uneven settling. For added stability and texture, contemplate creating a layered crust. A base layer of finely floor nuts, followed by a barely coarser layer, can add an fascinating textural distinction.
Chilling is Key: After layering the crust, refrigerate it for a minimal of half-hour (or even longer) to firm up before including the cheesecake filling. This ensures a sturdy base for your scrumptious creation and prevents the crust from becoming soggy.
Remember to all the time regulate ingredient portions primarily based in your most popular crust texture and the precise keto-friendly components you select. Experimentation is vital to discovering your excellent no-bake keto cheesecake crust recipe!
Crafting the right keto cheesecake crust requires precision and a spotlight to element, especially when omitting the baking step. This ensures a deliciously crisp, yet tender, base that enhances the creamy filling.
Begin by choosing your crust ingredients. While conventional graham crackers are off-limits in a keto food regimen, we’ll use almond flour as the foundation, providing a naturally nutty flavor and the proper texture.
Measure out the exact quantity of almond flour laid out in your recipe. Using a kitchen scale for accuracy is extremely really helpful for optimal results. Too a lot flour will end in a dry, crumbly crust; too little will make it too dense and potentially soggy.
Next, incorporate your fat source. This is crucial for binding the crust and giving it that attribute buttery richness. Unsalted butter, chilled and cubed, is right. The coldness is necessary as it prevents the crust from changing into too oily during processing.
Add a contact of sweetener – usually erythritol or powdered monk fruit – to balance the slight bitterness of the almond flour and lend a refined sweetness. The amount will depend on your style preference.
A pinch of salt enhances the flavors of the other components. It shouldn’t be omitted, even in desserts.
Now, the mixing process: If you’re using a meals processor, pulse the elements till a rough, crumbly mixture forms. Be cautious to not over-process; you want some seen texture rather than a smooth paste.
If opting for a manual approach, use your fingers to mix the elements in a bowl. Work shortly and effectively to prevent the butter from melting excessively. The objective is to incorporate the butter without making a dough.
Once the combination resembles moist sand, it’s prepared for the pressing stage. Select your springform pan and take away the sides. Place the pan on a parchment-lined plate to facilitate effortless removing later.
Evenly distribute the crust mixture into the pan, utilizing the bottom of a measuring cup or your fingers to firmly press it into a good layer. Ensure that there are no gaps or skinny spots.
For additional compactness and to create a dense, less crumbly base, use the back of a spoon to additional press down on the crust. A slight indentation around the edges will assist to forestall the filling from overflowing.
Once the crust is firmly packed, refrigerate it for a minimal of half-hour. This allows the butter to solidify, solidifying the structure and stopping it from crumbling when the filling is added. Refrigerating for longer—up to an hour—is even higher.
After chilling, your completely ready keto crust is prepared to receive the luscious cheesecake filling. Enjoy the delicious results of your meticulous preparation.
For a no-bake keto cheesecake, crust preparation begins with deciding on your preferred keto-friendly crust elements. Popular selections include almond flour, coconut flour, pecans, or a mixture thereof.
Measure the dry ingredients exactly. Accuracy is key to achieving the specified texture and stopping a crumbly or overly dense crust.
If utilizing nuts, pulse them in a meals processor till finely ground, however not into a powder. You need some texture remaining for a pleasing crunch.
Add your chosen fat supply – melted butter, coconut oil, and even cream cheese – to the dry ingredients. The amount will depend in your recipe but should create a moist, barely sticky combination.
Mix completely until all components are evenly combined and the mixture types a cohesive mass. A fork or your palms work properly for this step.
The combination ought to maintain its form when pressed; if it’s too dry, add a little extra fat, a teaspoon at a time, till it reaches the specified consistency.
Once the crust mixture is ready, choose your cheesecake pan. Springform pans are perfect for simple removal, however any removable-bottom pan will work.
Lightly grease the pan with butter or coconut oil. This prevents sticking and makes removing much easier later.
To press the crust into the pan, evenly distribute the crust combination throughout the bottom of the pan. Use the bottom of a measuring cup, or the back of a spoon, to firmly press the mixture into an even layer.
Ensure the crust is uniformly compacted to forestall gaps or uneven thickness. A denser crust will hold up higher beneath the weight of the cheesecake filling.
Pay particular consideration to the perimeters of the pan, urgent the crust firmly against the perimeters to create a neat, even end.
For a more refined crust, you can use a small rolling pin to gently roll over the surface to achieve a wonderfully easy and even layer.
Once the crust is firmly pressed into the pan, chill it in the refrigerator for no much less than half-hour. This helps to solidify the crust and prevents it from changing into soggy if you add the filling.
Chilling the crust additionally ensures a neater, extra defined edge when the cheesecake is removed from the pan after setting.
After chilling, the crust might be agency and ready to obtain the scrumptious keto cheesecake filling.
The preparation of the crust is crucial for the overall success of your no-bake keto cheesecake. A well-made crust will present a perfect complement to the creamy filling.
Remember to adjust the recipe based on your preferences and the precise components you are using. Experiment with different nuts and sweeteners to create your own signature crust.
Don’t be afraid to experiment with totally different pressing strategies to attain the desired crust consistency and texture.
With somewhat endurance and attention to detail, you possibly can create a beautiful and delicious keto cheesecake crust that’s positive to impress.
Crust Preparation is crucial for a successful no-bake keto cheesecake. A good crust offers a textural distinction and complements the creamy filling. Begin by selecting your crust base. Almond flour, coconut flour, or a combination are in style keto-friendly options.
Measure your dry ingredients exactly. Accuracy ensures the right consistency and prevents a crumbly or overly dense crust.
For added flavor, consider incorporating spices like cinnamon, nutmeg, or cardamom. A contact of sweetener, like erythritol or monk fruit, can enhance the sweetness with out compromising the ketogenic diet.
Melt the butter or coconut oil fully before adding it to the dry components. This ensures even distribution and helps bind the crust.
Mix totally till the mixture resembles wet sand. Avoid overmixing, which can make the crust powerful.
Press the crust firmly into the bottom of your chosen springform pan. Use the bottom of a measuring cup or a similar device to ensure even distribution and a compact base.
Chill the crust within the refrigerator for a minimal of 30 minutes. This step permits the crust to firm up before including the filling, preventing it from becoming soggy.
Blind baking (optional) helps stop a soggy crust, particularly if your filling contains plenty of moisture. Although this recipe is no-bake, blind baking offers additional insurance.
If blind baking, line the crust with parchment paper and fill it with pie weights or dried beans. This prevents the crust from puffing up throughout baking.
Bake at 350°F (175°C) for 10-12 minutes, or until frivolously golden.
Remove the pie weights and parchment paper and let the crust cool completely before including the filling.
Even with out blind baking, chilling the crust adequately is essential. A well-chilled crust will hold its form and texture higher.
Experiment with different crust additions to seek out your favorite flavor combinations. Chopped nuts, seeds, or even shredded coconut can add texture and taste.
Proper crust preparation is key to achieving a scrumptious and satisfying no-bake keto cheesecake. Don’t rush this step for the most effective results.
Consider utilizing a food processor to mix the components rapidly and efficiently for a finer texture.
If the crust seems too dry after including the melted fat, add a tablespoon or two of water or cream at a time until it holds its form when pressed.
For a richer taste, consider using browned butter as an alternative of standard butter in your crust. The nutty notes complement the cheesecake beautifully.
Remember to use an excellent quality springform pan to ensure straightforward removal of the cheesecake once it is set. Lightly grease the pan earlier than urgent within the crust to forestall sticking.
Always measure elements carefully for consistent results. Using a kitchen scale for correct measurements can be notably helpful.
After chilling the crust, you probably can optionally freeze it for an extended period to make sure it is very firm before adding the cheesecake filling, particularly in hotter climates.
Cheesecake Filling
The creamy coronary heart of a no-bake keto cheesecake hinges on a flawlessly executed filling. This is the place the magic happens, transforming simple elements into a decadent, dreamy dessert.
Before we start assembling the filling, let’s guarantee we have gathered all the required elements. Precision is essential in keto baking, as even minor substitutions can influence the feel and sweetness.
Ingredients for the Keto Cheesecake Filling:
Cream Cheese: Use full-fat cream cheese, at room temperature. This ensures a smooth, easily-blendable base. The fat content is crucial for each richness and the creamy texture. Aim for at least 8 ounces (227g).
Sweetener: Your alternative of keto-friendly sweetener is critical. Popular choices embrace erythritol, monk fruit, or a mix. Remember that totally different sweeteners have completely different levels of sweetness, so regulate the amount according to your desire and the precise sweetener used. Start with half of cup (100g) and regulate to taste.
Heavy Cream: Full-fat heavy cream is important for achieving the right cheesecake consistency. It provides richness, creaminess, and helps to stabilize the filling. About 1 cup (240ml) ought to suffice.
Vanilla Extract: A contact of high-quality vanilla extract elevates the flavor profile considerably. Just 1-2 teaspoons will do.
Lemon Juice (Optional): A squeeze of recent lemon juice (about 1 tablespoon) can brighten the filling and minimize through any potential cloying sweetness from the sweetener. This is only elective, based mostly on private desire.
Salt: A pinch of salt enhances the flavors of the opposite elements. It balances the sweetness and creates a more advanced style. Don’t skip this seemingly insignificant ingredient.
Optional Flavorings: Consider adding other keto-friendly flavorings for a personalized effect. Extracts like almond or peppermint may be delicious. A teaspoon of cocoa powder for a chocolate cheesecake variation can also be a popular selection. Remember to regulate the sweetener accordingly if adding different flavors.
Gathering the Ingredients:
Before you start, ensure all components are on the correct temperature. Room temperature cream cheese is crucial for seamless blending. Cold ingredients will result in lumps and a much less easy filling. Have your sweetener measured and prepared to go. If utilizing a blend, fastidiously measure each component to maintain the right proportions.
Prepare your mixing bowl and beaters (hand mixer or stand mixer). Have your measuring cups and spoons clear and prepared. Having every thing readily accessible will streamline the blending course of and stop interruptions.
Check the expiration dates on all of your ingredients, particularly the cream cheese and heavy cream. Using recent, high-quality elements will yield the best results. If you’re adding any optional flavorings, ensure they are also measured and inside straightforward reach.
With all elements prepped and measured, you’re able to create a powerful no-bake keto cheesecake filling. The cautious gathering and preparation of your components will contribute to a flawlessly easy and delicious outcome.
For a creamy, dreamy no-bake keto cheesecake filling, the cream cheese is the star, and its preparation is crucial.
Begin with high-quality, full-fat cream cheese, ideally brick-style. This yields a richer, smoother texture than whipped cream cheese.
Ensure the cream cheese is at room temperature. This is non-negotiable for achieving a flawlessly smooth filling. Cold cream cheese might be difficult to beat and may end in a lumpy texture.
Remove the cream cheese from the fridge no much less than 2 hours before you intend to begin making the filling, and even longer relying on the temperature of your kitchen.
You can speed up the softening course of slightly by cutting the cream cheese into smaller items.
Using a stand mixer or a hand mixer, beat the cream cheese on medium pace till it’s fully easy and creamy. Scrape down the perimeters of the bowl as wanted to include all of the cream cheese.
The goal is to eliminate any lumps or streaks of unmixed cream cheese. This stage might take 5-10 minutes relying in your gear and the preliminary temperature of the cream cheese.
Once the cream cheese is perfectly smooth, steadily add your sweetener. For a keto cheesecake, you will probably use a sugar substitute like erythritol, monk fruit, or a mix. Add it slowly, beating constantly to forestall clumping.
The quantity of sweetener will rely on your personal choice and the sweetness of your chosen sugar substitute. Start with a smaller quantity and add extra to style, guaranteeing that you simply fully incorporate every addition earlier than including extra.
Next, incorporate any other flavourings. Vanilla extract is a classic selection, but you can also experiment with extracts like almond, lemon, or other keto-friendly flavourings.
Add these flavourings gradually, mixing till fully mixed. Be cautious to not overmix, which could incorporate too much air and make the filling less dense.
If your recipe contains bitter cream or heavy cream, add these gradually, beating on low velocity until simply combined. Again, avoid overmixing to maintain up the creamy texture.
Sour cream adds tanginess and creaminess, while heavy cream adds richness and fluffiness. The ratio of those components to the cream cheese will have an result on the final consistency of your filling.
Once all elements are completely mixed, style the filling and adjust sweetness or flavourings as needed.
Finally, earlier than layering it into your crust, give the filling a final mild mix to make sure every little thing is evenly distributed.
Avoid over-mixing at this stage. Over-mixing can incorporate air, resulting in a less dense and probably less steady filling.
Proper cream cheese preparation is crucial for a flawlessly smooth and scrumptious no-bake keto cheesecake.
Remember, endurance is vital to an ideal cheesecake filling. Take your time, and enjoy the process!
Achieving a creamy, decadent cheesecake filling with out baking requires cautious consideration of the sweetener and its incorporation.
Many keto-friendly sweeteners, not like granulated sugar, do not dissolve as readily and may depart a gritty texture if not correctly handled.
Erythritol, monk fruit, and allulose are well-liked choices, typically used in combination to leverage their individual strengths and decrease aftertastes.
Begin by fastidiously measuring your chosen sweetener(s). Accuracy is paramount for a balanced taste profile.
If using powdered sweeteners, whisk them thoroughly with a portion of the cream cheese to forestall clumping.
This preliminary whisking creates a smooth paste, guaranteeing even distribution all through the filling.
Gradually add the remaining cream cheese, whisking constantly to maintain a clean, lump-free consistency.
The use of a stand mixer or a robust hand mixer is very beneficial for this stage; the volume of the combination and the density of cream cheese require significant energy.
A sluggish, steady velocity initially prevents splattering and ensures even mixing of the ingredients.
Once the cream cheese is fully incorporated and the mixture is clean and homogenous, you presumably can progressively add other elements of the filling.
These could embrace bitter cream, vanilla extract, lemon zest, or other flavorings.
Each addition must be incorporated fully before including the subsequent to maintain up the consistency and keep away from separation.
Consider the temperature of your components. Cold cream cheese will require more effort to mix and should result in a much less smooth filling.
Allowing the cream cheese to melt barely at room temperature (but not turn into excessively soft) improves incorporation and texture.
If using liquid sweeteners like stevia or liquid monk fruit, add them progressively whereas whisking vigorously to forestall a sudden change in consistency.
Over-mixing can incorporate too much air, resulting in a less dense and doubtlessly airy filling that may not set properly.
Taste the combination incessantly to adjust the sweetness degree to your preference. Remember that the sweetness will mellow barely as the cheesecake chills.
Once the specified sweetness and consistency are achieved, carefully layer the filling into your ready crust.
Gently spread the filling to ensure an even layer, avoiding excessive stirring or agitation which may incorporate air.
Refrigerate for a minimum of four hours, or preferably overnight, to allow the filling to set fully.
This chilling interval allows the fats to solidify, leading to a rich, agency, and scrumptious no-bake keto cheesecake filling.
Experiment with totally different sweetener mixtures to search out your best stability of sweetness and texture. Keep notes in your findings for future batches.
Using a high-quality cream cheese is important for achieving a creamy, luxurious texture. Don’t skimp on this key ingredient.
Proper sweetener incorporation is significant for the success of your no-bake keto cheesecake. Attention to detail will yield a scrumptious end result.
The basis of a no-bake keto cheesecake lies in its creamy, luscious filling. This filling differs significantly from its baked counterpart, primarily as a outcome of absence of heat-setting brokers like flour or cornstarch.
The essential ingredient is cream cheese, preferably full-fat for the richest texture and taste. Use a high-quality model, guaranteeing it’s at room temperature for optimal creaminess and ease of blending. Cold cream cheese will lead to a lumpy, much less easy filling.
Sweetener is crucial. For a keto-friendly strategy, think about using erythritol, monk fruit, or a blend of sugar alcohols. The quantity will depend on personal preference and the depth of the sweetener. Start with a smaller amount and regulate to style, as sugar alcohols can have completely different ranges of sweetness.
Eggs act as a vital binding agent and emulsifier in no-bake cheesecake. However, since we’re avoiding baking, we have to guarantee they’re thoroughly included to prevent a grainy texture. This means using a powerful mixer and mixing on high pace for several minutes until completely smooth and glossy. Too little mixing leads to a much less steady filling, more prone to separation.
Sour cream or Greek yogurt adds tang and further enhances the creaminess. Full-fat variations are preferable for richness and texture. The addition of bitter cream or yogurt additionally helps to balance the sweetness and prevents the cheesecake from being overly rich.
Vanilla extract is a basic addition, enhancing the general taste profile. A teaspoon or two will suffice, relying on choice. Other flavor extracts, like lemon or almond, may be incorporated for distinctive variations, complementing the cream cheese base.
For added richness and depth, contemplate incorporating heavy cream. This provides an expensive mouthfeel and helps to lighten the general texture, stopping the filling from being too dense. Be sure to make use of heavy cream and never whipping cream as it incorporates less fat and should not stabilize the filling properly.
Sometimes, a pinch of salt enhances the flavors, making a stability that accentuates each the sweet and tangy components. It prevents the sweetness from being overpowering.
Once all components are totally mixed, the mixture must be chilled for a quantity of hours, allowing the flavors to meld and the filling to set properly. This chilling process is essential for a stable, agency cheesecake. The longer it chills, the firmer it will become, permitting for easy layering and slicing.
For a layered keto cheesecake, this fastidiously crafted filling turns into the star, layered between keto-friendly crusts or other elements like berries or chocolate. The chilling step is much more essential in layered cheesecakes to ensure that the layers preserve their shape and do not mix together.
Remember to all the time taste and adjust the sweetness and tanginess based on your liking. Experiment with different flavor mixtures to create your individual distinctive and scrumptious no-bake keto cheesecake masterpiece.
Creating the perfect creamy, dreamy cheesecake filling is crucial for a no-bake keto cheesecake. The richness and tang should be perfectly balanced, and the texture easy and splendid.
Begin with high-quality cream cheese, preferably full-fat. Let it sit at room temperature for about half-hour to melt. This is crucial for easy mixing and a clean, lump-free filling. Cold cream cheese will lead to a lumpy, uneven texture.
Use a stand mixer or a robust hand mixer. A whisk might work, however it’ll be a strenuous arm exercise and fewer efficient at incorporating air.
Once the cream cheese is softened, add it to the mixing bowl. Beat it on medium pace until fully clean and creamy. Scrape down the edges of the bowl regularly to make sure every little thing is nicely integrated.
Next, progressively add your sweetener. For a keto cheesecake, think about using erythritol, monk fruit, or a blend of keto-friendly sweeteners. Add it slowly, somewhat at a time, beating on low velocity till just combined. Adding an extreme quantity of too rapidly can lead to lumps.
The quantity of sweetener will rely on your choice for sweetness and the type of sweetener used, so begin with much less and modify to taste. Remember, the sweetness shall be slightly much less noticeable after chilling.
Now, incorporate the bitter cream. Full-fat bitter cream provides a wonderful tang and creaminess. Again, add it steadily, beating on low speed until simply mixed. Don’t overmix, as this could trigger the filling to turn out to be too thin.
For additional flavor, consider including a teaspoon or two of vanilla extract. Pure vanilla extract is best for the most intense flavor.
If you’re using any flavorings beyond vanilla, similar to lemon zest or almond extract, now’s the time to add them. A little goes a good distance, so begin with a small amount and taste-test as you go.
Once all components are mixed, beat the combination on low to medium velocity for an additional minute or two, just to make sure everything is perfectly clean and emulsified. The filling should be thick and creamy, not runny.
Before adding the filling to your crust, give it a last taste take a look at. Adjust the sweetness or add more vanilla or flavorings as needed.
If the filling appears too thick, you can add a tablespoon or two of heavy cream, beating on low pace till it reaches your required consistency. However, avoid adding an extreme amount of, as this could make the filling too thin and susceptible to separating.
For a layered keto cheesecake, divide the filling into separate bowls after mixing, adding your desired flavorings or colorings to each portion earlier than layering in your crust. For instance, one layer could be plain, one might have a swirl of chocolate, and another may have berries incorporated.
Once layered, cowl the cheesecake and refrigerate for a minimal of 4 hours, or ideally overnight, to permit the filling to set fully. This permits the flavors to meld and the cheesecake to reach its perfect creamy texture.
- Use room temperature cream cheese
- Gradually add sweetener
- Don’t overmix
- Taste and modify as needed
- Refrigerate for no less than 4 hours
Layering the Cheesecake
Begin with a sturdy, high-sided springform pan, guaranteeing it is utterly clear and dry. This prevents leaks and ensures a smooth, even cheesecake.
For the bottom, we’ll use a keto-friendly crust. Common selections embrace almond flour, crushed pecans, or a mix of nut flours. Pulse your chosen components in a food processor until finely ground, virtually like breadcrumbs.
Add a binding agent, sometimes melted coconut oil or butter. This helps the crust hold its form and prevents it from crumbling. The exact quantity will rely on your chosen crust elements and desired consistency; start with a small quantity and add more as wanted till a moist, clumping texture is achieved.
Press the combination firmly and evenly into the underside of the ready springform pan. Use the underside of a measuring cup or your fingers to ensure a compact, stage base. Avoid making it too thin; it should be about 1/4 inch thick.
Refrigerate the crust for no much less than 30 minutes to allow it to firm up. This is crucial for preventing a soggy backside as quickly as the cheesecake layers are added.
While the crust chills, prepare the primary cheesecake layer. This usually entails a cream cheese-based mixture, sweetened with a keto-friendly various like erythritol or monk fruit sweetener.
In a large mixing bowl, beat cream cheese until completely easy and creamy. Use an electrical mixer for best outcomes; a stand mixer works exceptionally well for larger batches.
Gradually add your chosen sweetener, beating continually till absolutely incorporated. Don’t rush this process; inconsistently mixed sweetener can lead to a grainy texture.
Next, incorporate any desired flavorings for this first layer. Vanilla extract is a basic choice, but you could additionally experiment with lemon zest, cocoa powder (for a chocolate layer), and even extracts like almond or peppermint.
Whisk in a small amount of heavy cream or coconut cream to lighten the mixture and create a smoother, more luxurious texture. Be careful to not overmix; a couple of light folds are enough.
Once the primary layer mixture is smooth and creamy, fastidiously pour it over the chilled crust in the springform pan. Spread it evenly, using a spatula to clean out any lumps or air pockets.
Gently tap the pan on the counter to launch any trapped air bubbles. This minimizes the danger of cracks or uneven settling throughout chilling.
Cover the springform pan tightly with plastic wrap and refrigerate for a minimal of 4 hours, or ideally overnight, to permit the first layer to set utterly. The longer it chills, the firmer and more stable the layer might be for subsequent additions.
Before including subsequent layers, ensure the primary layer is fully set and agency to the touch. This will stop layers from mixing or blurring collectively.
Begin with a sturdy, no-bake crust. A keto-friendly possibility may involve almond flour, coconut flour, or a combination, blended with melted butter and sweetener like erythritol or monk fruit.
Press the crust firmly and evenly into the bottom of your springform pan. Use the bottom of a measuring cup or an analogous software to ensure a compact, even base.
Chill the crust for at least half-hour to allow it to firm up earlier than continuing to the following layer.
For the preliminary cheesecake layer, you will want a cream cheese base. Use full-fat cream cheese, softened to room temperature for optimum mixing. This prevents lumps and ensures a smooth, creamy texture.
Beat the cream cheese until fully easy and fluffy. A stand mixer is ideal, but a hand mixer will also work effectively.
Gradually add your keto-friendly sweetener, guaranteeing it’s thoroughly integrated before including extra. Avoid over-mixing, as this will introduce air bubbles.
Incorporate a contact of vanilla extract for enhanced taste. A pinch of salt balances the sweetness.
Slowly incorporate heavy cream into the cream cheese combination. Start with a small amount and gradually add more, mixing till the specified consistency is achieved. The mixture must be thick however still pourable.
Pour this primary cheesecake layer onto the chilled crust. Smooth the top with an offset spatula for an even floor.
Chill this layer for a minimum of 2 hours, or till it is fully set. This is crucial for stopping the layers from mixing whenever you add subsequent layers.
For subsequent layers, you can explore a wide range of flavors and textures. Consider a berry layer with keto-friendly jam or a chocolate layer using melted darkish chocolate and a contact of heavy cream.
If utilizing a jam layer, guarantee it isn’t too runny. If essential, thicken it slightly by gently simmering it with a thickening agent like xanthan gum.
If incorporating a chocolate layer, mood the chocolate correctly to prevent seizing. Let the chocolate cool barely earlier than including it to the chilled cheesecake layer.
After each subsequent layer, return the cheesecake to the fridge to chill and set fully earlier than adding the following layer. Allow no less than 2 hours of chilling time per layer to make sure stability.
For a last topping, you would use a sprinkle of cocoa powder, keto-friendly chocolate shavings, contemporary berries, or whipped cream (made with heavy cream and a keto-friendly sweetener).
Once all layers are added and chilled, carefully launch the cheesecake from the springform pan. Run a thin knife or offset spatula across the edges to loosen it.
Serve chilled. The layered impact will be visually appealing and provide a pleasant vary of flavors and textures in each chew.
Remember to always use keto-friendly components to keep up the low-carb nature of your dessert.
Proper chilling between every layer is important for preventing the layers from blending together and making a smooth, uniform texture somewhat than the meant layered effect.
Success in creating a layered no-bake keto cheesecake hinges on careful layering methods that stop the layers from blending together and ruining the visible enchantment and texture.
Begin with a sturdy, stable base. A keto-friendly crust, perhaps produced from almond flour, coconut flour, or a mix, is crucial. Ensure it’s completely chilled and agency before proceeding to the next layer.
The next step is arguably probably the most critical: preparing the cheesecake filling. Keto cheesecakes often use cream cheese as a base, which must be on the good consistency. Overly gentle cream cheese will readily combine with subsequent layers. Make certain your cream cheese is cold but not rock onerous; purpose for a barely pliable consistency.
For multi-layered cheesecakes, each layer should be individually set before including the subsequent. This often involves chilling the finished layer for a major period — sometimes a number of hours and even overnight — in the refrigerator. This permits the layer to agency up substantially, resisting the weight and potential mixing of subsequent layers.
Consider the density of your layers. A lighter layer, similar to a whipped cream or a berry coulis, should ideally be positioned on a denser layer, like the primary cheesecake filling, to prevent it from sinking or mixing.
When including each layer, use light strategies. Don’t simply pour or drop the filling. Instead, use a spoon or spatula to unfold it evenly and gently across the earlier layer, minimizing disruption. A thin, even spreading method is much much less more doubtless to cause mixing in comparability with merely dumping the layer on top.
Employing a piping bag or a ziplock bag with a nook snipped off could be helpful for precision. This methodology offers more control over the location and thickness of each layer, ensuring even distribution and reducing the chance of unintended mixing.
Temperature management is essential. Keeping all components chilled throughout the process significantly reduces the danger of layers melting and blending collectively. Work in a cool setting and use chilly bowls and utensils.
Some recipes could benefit from using a layer of neutral-flavored keto-friendly jam or jelly to act as a barrier between layers with contrasting textures or flavors. This skinny layer may help to forestall the layers from instantly interacting and mixing.
After the final layer is added, chill the whole cheesecake for an extended period to ensure complete setting. This permits the layers to bond together whereas retaining their particular person integrity.
Finally, think about the types of layers you’re utilizing. Layers with related textures or consistencies are extra vulnerable to mixing. Choose layers with contrasting textures (e.g., a creamy cheesecake filling and a crunchy topping) to reduce the chances of mixing.
If you’re adding components like recent berries, add them as the ultimate layer simply earlier than serving to take care of freshness and forestall them from releasing extra moisture and inflicting the layers to run.
- Use a sturdy, chilled crust.
- Chill cream cheese to attain the right consistency.
- Chill every layer thoroughly earlier than including the following.
- Use light spreading methods.
- Maintain constantly cold temperatures.
- Consider using a barrier layer between contrasting textures.
- Chill fully after layering.
- Choose layers with differing textures.
- Add delicate components just earlier than serving.
Chilling and Setting
Achieving a superbly chilled and set no-bake keto cheesecake relies closely on understanding refrigeration time and techniques.
The chilling course of is crucial for several causes. First, it permits the cream cheese filling to fully agency up. Cream cheese, even when whipped, retains a degree of fluidity at room temperature. Refrigeration solidifies the mixture, creating the specified creamy texture and preventing a soupy cheesecake.
Second, chilling facilitates the proper setting of the layering. If layers are added before the previous layer is sufficiently agency, they could combine, leading to a less visually appealing and doubtlessly much less structured cheesecake.
The optimum refrigeration time is dependent upon a quantity of elements: the specific recipe, the ambient temperature, and the desired stage of firmness. A common guideline is to relax each layer for at least 2-3 hours before including the following. For instance, if the cheesecake involves a crust, a cookie base, a cream cheese filling, and a topping, you should ideally chill the crust first, followed by the cream cheese filling, and at last the topping, giving each layer adequate time to solidify.
However, it’s essential not to over-chill. Prolonged refrigeration, especially in a freezer, can lead to ice crystal formation in the cream cheese filling, resulting in an unpleasant, gritty texture. The setting course of should end in a clean, creamy consistency; not a frozen, stable one.
Consider utilizing a thermometer to monitor the temperature of the filling. This might help determine when each layer is sufficiently agency. While a specific temperature isn’t always essential, the sensation of the filling ought to present a good indicator. It should be firm enough to hold its form without being rock-hard.
The use of a refrigerator with a constant temperature is important. Fluctuations in temperature can intervene with the chilling and setting process. A refrigerator that’s too warm will result in slow setting, whereas one that’s too chilly can lead to the aforementioned ice crystal formation.
Furthermore, the container used for the cheesecake ought to be air-tight to forestall the highest layer from drying out, and it also aids in consistent chilling. A glass or ceramic dish is preferable over metallic because it helps keep a steady temperature.
When assembling a layered keto cheesecake, endurance is essential. Allow ample refrigeration time between layers, ensuring that every is properly set earlier than proceeding. This methodical strategy will end in an attractive, scrumptious, and structurally sound dessert. Rushing the method can result in a messy, poorly set ultimate product.
In summary, understanding the dynamics of chilling and setting, and managing the refrigeration time appropriately, is crucial to creating a wonderfully layered and scrumptious no-bake keto cheesecake. The purpose is a clean, firm, and visually interesting last end result, and this will only be achieved with careful consideration of refrigeration.
Achieving a perfectly chilling and set no-bake keto cheesecake requires meticulous attention to temperature management.
Avoid drastic temperature fluctuations in any respect prices. These fluctuations can cause cracking, weeping, or an uneven texture.
Begin with completely chilled elements. Your cream cheese, particularly, ought to be very chilly, virtually bordering on firm.
This chilly cream cheese helps prevent the mixture from changing into too gentle, which can lead to a less set cheesecake.
Use a high-quality, cold heavy cream for a easy and creamy consistency.
Similarly, guarantee your sweetener (erythritol, monk fruit, and so forth.) is at room temperature to correctly incorporate it into the batter without inflicting temperature inconsistencies.
Once the cheesecake filling is prepared, switch it instantly to the ready crust.
Avoid letting the filling sit at room temperature for any extended period earlier than transferring.

Cover the cheesecake tightly with plastic wrap, making certain no air pockets are present. This prevents the formation of a pores and skin on the floor.
Refrigerate the cheesecake for a minimal of 6-8 hours, preferably in a single day. This allows ample time for correct setting.
A consistent cold temperature throughout the refrigeration interval is essential. Avoid putting the cheesecake near the door of the refrigerator or in areas topic to temperature changes.
Consider using a thermometer to monitor the temperature inside your fridge; ensuring it’s constantly between 35°F and 40°F (2°C and 4°C).
After the initial chilling interval, you probably can gently examine for setting by giving the cheesecake a slight jiggle. If there’s only a slight wobble in the middle, it is ready.
If the cheesecake nonetheless feels too gentle, return it to the refrigerator for another 1-2 hours.
For much more steady setting, you can place the cheesecake in a bigger container, filling the gap with ice water.
This technique creates a extra consistent chilly setting and aids in quicker setting.
Once the cheesecake is absolutely set, avoid rapid temperature adjustments. Let it come to room temperature progressively earlier than serving.
Allowing it to take a seat at room temperature for about 15-20 minutes will soften it slightly without compromising its structure.
By carefully managing temperatures throughout the preparation and chilling course of, you possibly can guarantee your no-bake keto cheesecake has a perfect set, smooth texture, and scrumptious taste.
Remember, patience is key to a perfectly chilled and set no-bake keto cheesecake.
Optional Toppings and Garnishes
For a really decadent and visually interesting no-bake keto cheesecake, consider the significance of optional toppings and garnishes. These components elevate the dessert from simple to spectacular, adding each taste complexity and aesthetic enchantment.
Keto-friendly topping ideas abound, providing a wealth of choices to swimsuit various palates. Think beyond the usual suspects and discover inventive combinations.
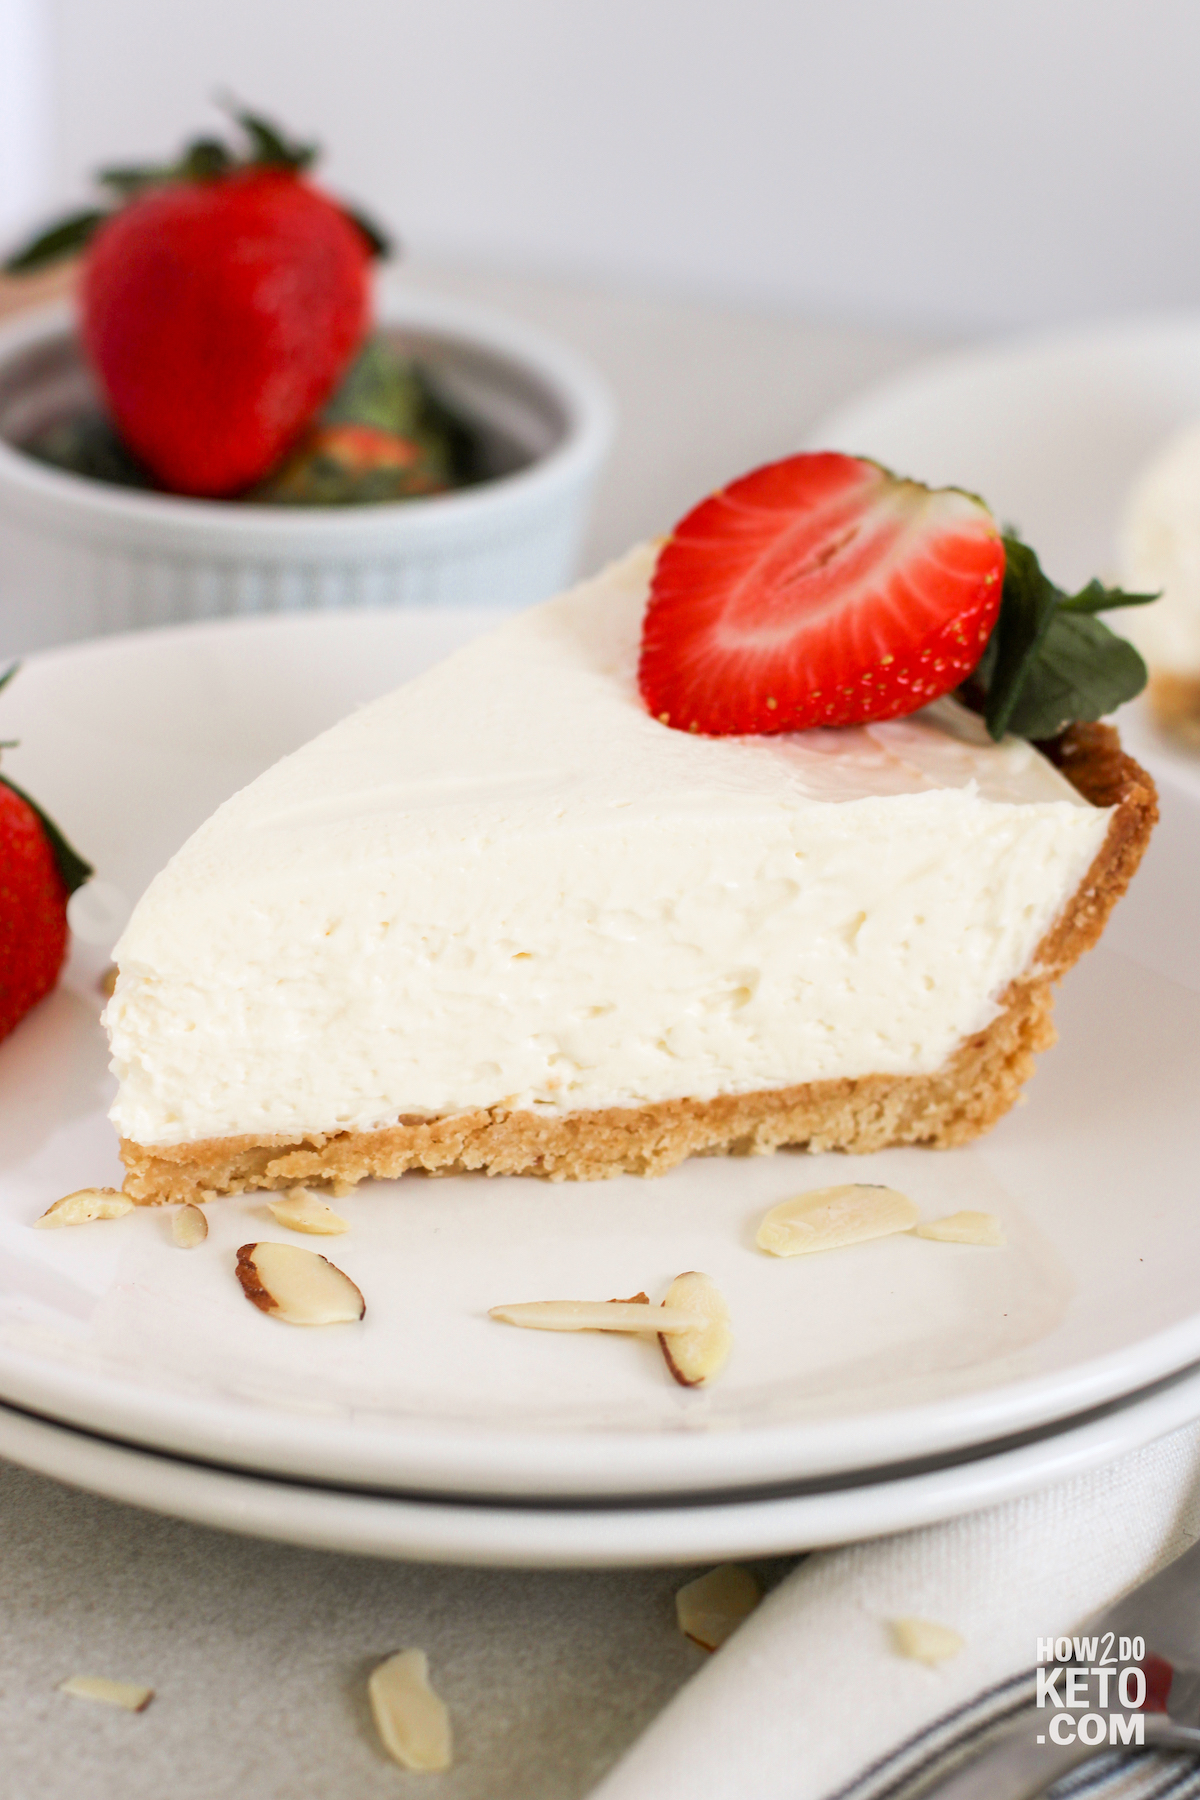
A berry medley is always a crowd-pleaser. Fresh raspberries, blueberries, and strawberries supply a vibrant color distinction and a refreshing tartness that cuts through the richness of the cheesecake. Ensure they’re unsweetened or minimally sweetened to keep up the keto-friendliness.
For a touch of magnificence, consider a chocolate ganache. Use a high-quality dark chocolate (70% cacao or higher) and heavy cream to create a wealthy, decadent topping. The bitterness of the darkish chocolate balances the sweetness of the cheesecake beautifully.
A sprinkle of keto-friendly nuts provides satisfying crunch and healthy fat. Almonds, pecans, and macadamia nuts are glorious decisions. Toast them lightly beforehand to boost their taste and aroma. Consider finely chopping them for even distribution.
To create a visually striking impact, contemplate a whipped cream topping. Use heavy cream and a keto-friendly sweetener (like erythritol or stevia) to create a light-weight and fluffy topping. You can even add a touch of vanilla extract for additional flavor.
For a more intense taste profile, strive a sugar-free caramel sauce drizzled over the cheesecake. Many keto-friendly caramel sauces are available commercially, or you might make your individual utilizing erythritol and heavy cream.
A low-carb crumble adds a textural factor that contrasts nicely with the creamy cheesecake. You can make this using almond flour, coconut flour, and keto-friendly sweeteners. Incorporate spices like cinnamon or nutmeg for warmth.
If you need to add a refreshing twist, think about a lime zest and zest-infused whipped cream. The bright citrus notes will cut through the richness of the cheesecake.
A sprinkle of chia seeds adds a delicate nutty taste and a lift of fiber and omega-3 fatty acids.
Consider using chocolate shavings or cocoa nibs for a more subtle and visually appealing garnish.
Remember to always check the nutritional info of any store-bought toppings to make sure they align together with your ketogenic diet goals. When making your individual toppings, fastidiously measure your sweeteners to maintain the integrity of your keto plan.
Experiment with different mixtures of those toppings and garnishes to create your signature no-bake keto cheesecake masterpiece.
The key to a profitable keto cheesecake topping is stability. Consider each flavor and texture to create a harmonious and memorable dessert experience. Don’t be afraid to get creative and experiment with different flavor profiles!
For a really decadent no-bake keto cheesecake, think about optionally available toppings and garnishes that improve both flavor and presentation. These additions ought to complement the wealthy, creamy base without overpowering it.
Berry Sensations: Fresh berries like raspberries, blueberries, and strawberries provide a vibrant colour distinction and a tart counterpoint to the cheesecake’s sweetness. A easy arrangement of berries across the perimeter or a scattering across the top is visually appealing and scrumptious.
Chocolate Decadence: A dusting of unsweetened cocoa powder provides a subtle chocolate notice without disrupting the keto-friendliness. Alternatively, shaved dark chocolate (at least 70% cacao) presents a extra intense chocolate experience, providing each visual attraction and a textural element.
Nutty Delights: Chopped pecans, walnuts, or macadamia nuts offer a satisfying crunch and a nutty depth of flavor. Their earthy notes complement the creamy cheesecake fantastically. Toasting the nuts beforehand enhances their taste profile additional.
Citrus Zest: A refined addition of finely grated lemon or lime zest brightens the cheesecake’s flavor profile, including a refreshing citrusy notice that cuts by way of the richness. A small quantity goes a long way, so begin with a teaspoon and adjust to taste.
Coconut Flair: Toasted coconut flakes add a tropical twist and a nice textural contrast. Their barely candy and nutty flavor profile blends harmoniously with the cheesecake’s creaminess.
Spice it Up: A pinch of cinnamon or nutmeg sprinkled over the top offers a warm, comforting aroma and flavor, particularly suitable for autumnal or winter presentations.
Whipped Cream Elegance: A dollop of unsweetened whipped cream (made with heavy cream and a keto-friendly sweetener like erythritol or stevia) provides an expensive touch and elevates the presentation. It supplies a fluffy distinction to the dense cheesecake.
Meringue Kisses: Small, fastidiously made keto-friendly meringue kisses (using a keto-friendly sweetener) could be piped onto the cheesecake, offering a fragile sweetness and delightful textural contrast.
Chocolate Shavings and Sauce: A drizzle of sugar-free chocolate sauce or a scattering of chocolate shavings provides a touch of class and intense chocolate taste. Consider utilizing a high-quality darkish chocolate to keep up the keto-friendly nature of the dessert.
Garnish Suggestions for Layering: If making a layered cheesecake, think about using completely different garnishes in each layer to add visual interest and various flavors. For instance, a berry layer could be topped with a sprinkle of toasted almonds, whereas a cream cheese layer might be enhanced with a dusting of cocoa powder.
Presentation Matters: Arrange your chosen toppings thoughtfully. Consider utilizing a piping bag for a more refined look or arranging the garnishes in a visually interesting pattern. A simple, elegant presentation enhances the general dining experience.
Remember to always consider the general flavor profile of your cheesecake when selecting toppings and garnishes. The objective is to create a harmonious stability of flavors and textures that may delight the palate.
Ultimately, the best garnishes are those that complement your personal preferences and enhance the overall enjoyment of your delicious, no-bake keto cheesecake.
Troubleshooting
Troubleshooting a no-bake keto cheesecake, particularly addressing cracks, requires a methodical approach specializing in potential culprits throughout every stage: preparation, mixing, chilling, and serving.
Ingredient Temperature: Ensure all elements, particularly the cream cheese, are at room temperature. Cold cream cheese is not going to whip correctly, resulting in a less secure mixture susceptible to cracking. Let it sit out for at least an hour or two before starting.
Cream Cheese Quality: Use high-quality, full-fat cream cheese. Lower fat varieties have more water content, growing the probability of cracking. Check for any indicators of spoilage or uncommon texture earlier than utilizing.
Whipping Technique: Over-whipping the cream cheese combination incorporates an extreme quantity of air, creating a less dense texture that is extra more likely to crack. Whip until easy and creamy, not stiff peaks. Under-whipping, nevertheless, will lead to a lumpy cheesecake.
Sugar Alcohol Substitution: The kind and amount of keto-friendly sweetener can affect the final texture. Some sugar alcohols are better at preventing cracking than others; experimenting to search out your excellent balance may be needed. Too a lot sweetener can also enhance the risk of cracking.
Acidic Ingredients: Lemon juice or different acidic components can impact the soundness of the combination, so use them sparingly. Excessive acidity could cause curdling, resulting in a more fragile texture.
Mixing Technique: Gentle folding of components, significantly the whipped cream, is crucial. Vigorous mixing will deflate the mixture and cut back its stability. Incorporate components fastidiously, a little at a time.
Chilling Process: Slow, even chilling is crucial. Rapid temperature changes could cause stress on the cheesecake, leading to cracks. Cover the cheesecake loosely with plastic wrap to forestall a pores and skin from forming. Chilling should be gradual in a constant temperature setting.
Serving Temperature: Serve the cheesecake cold, straight from the refrigerator. Let it sit at room temperature for a brief time if needed, however keep away from extended publicity to heat temperatures which is in a position to soften and potentially crack the cheesecake.
Base Preparation: A properly prepared base—whether it’s almond flour, coconut flour, or different keto-friendly options—provides a stable foundation. Ensure it’s evenly pressed into the pan and fully chilled before including the filling to forestall settling or shrinkage.
Pan Selection: Using a springform pan is recommended to ensure easy removal and a cleaner presentation. Make certain the pan is correctly sealed to prevent any leaks. A high-quality springform pan that seals tightly will reduce the probabilities of points.
Troubleshooting Cracks: If cracks appear after chilling, you may attempt to subtly disguise them with toppings like berries or chocolate shavings. A thicker layer of topping might help, however it is dependent upon the severity of the cracks.
Recipe Adjustments: Consider adjusting the recipe barely in subsequent makes an attempt. Adding a small amount of cornstarch or xanthan gum may help create a extra stable mixture, however use these cautiously as they will affect texture.
Prevention is Key: Paying consideration to particulars all through the complete course of, from ingredient choice and preparation to chilling and serving, is the greatest way to forestall cracks in your no-bake keto cheesecake.
If issues persist even after attempting these options, fastidiously review the recipe, consider using a special recipe, or search recommendation from experienced keto bakers.
Troubleshooting texture issues in a no-bake Quick Keto Cheesecake No Bake cheesecake is essential for achievement. A correctly made no-bake cheesecake ought to have a creamy, clean, and dense texture, not grainy, icy, or watery.
Addressing Graininess:
Insufficient Cream Cheese Softening: Ensure your cream cheese is totally softened to room temperature. Lumps of cold cream cheese is not going to mix easily, resulting in a grainy texture. Let it sit out for no less than a few hours, or even microwave it briefly bursts (10-15 seconds at a time) whereas stirring incessantly, until gentle and pliable.
Over-mixing: Over-mixing incorporates too much air, resulting in a grainy texture. Mix solely until the ingredients are just mixed. Use a spatula to scrape down the edges of the bowl and ensure every little thing is evenly integrated.
Incorrect Cream Cheese Type: Full-fat cream cheese is important. Reduced-fat or low-fat versions have a higher water content and won’t create the desired creamy texture.
Using a Low-Quality Cream Cheese Substitute: If substituting cream cheese, make positive the substitute is of excessive quality and intently mimics the feel and fat content of full-fat cream cheese.
Addressing Icy Texture:
Insufficient Chilling Time: The cheesecake needs enough chilling time to set correctly. Rushing the chilling process may end up in an icy texture. Allow a minimal of 4-6 hours, preferably overnight.
Using Cold Ingredients: Make positive all components are at room temperature before mixing to prevent temperature shock, which may result in crystallization and an icy texture.
Improper Storage: Storing the cheesecake near a freezer or in fluctuating temperature environments also can trigger it to turn into icy.
Addressing Wateriness:
Too Much Liquid: Carefully measure the quantity of liquids known as for in the recipe, avoiding over-pouring. Using a kitchen scale for precise measurements is beneficial.
Using a Wet Crust: Make positive your keto crust is completely cooled and crisp before adding the cheesecake filling. If using a pre-made crust, guarantee it isn’t too moist earlier than including the filling.
Incorrect Cream Cheese Substitute: Some cream cheese substitutes may comprise more water than others, leading to a runnier filling. Carefully select a substitute known for its thickness.
Addressing a Lack of Density:
Insufficient Fat Content: Ensure the recipe uses sufficient full-fat components to provide richness and density. The proper stability of fat is key to a dense, creamy texture.
Incorrect Sweetener: Some sweeteners may not mix as nicely and will end in a less dense cheesecake. Ensure you’re using a high-quality sweetener that dissolves properly.
General Troubleshooting Tips:
Read the Recipe Carefully: Before beginning, rigorously read and perceive the recipe, paying close consideration to ingredient quantities and directions.
Use Fresh Ingredients: Fresh ingredients will yield the most effective results. Old or expired ingredients can have an result on the feel and style of your cheesecake.
Adjust Sweetener: If your cheesecake appears too tart, adjust the quantity of sweetener to your desire. Taste take a look at the batter earlier than chilling.
Practice Makes Perfect: Don’t be discouraged if your first try is not excellent. Practice and experimentation will help you good your no-bake keto cheesecake recipe.
By carefully addressing these potential points and following the recipe directions precisely, you’ll find a way to create a scrumptious and perfectly textured no-bake keto cheesecake.
Troubleshooting flavor imbalances in a no-bake keto cheesecake is essential for attaining a delicious outcome. The delicate balance of cream cheese, sweetener, and different flavorings requires careful consideration.
Sweetener Issues:
Too Sweet: If your cheesecake is overwhelmingly sweet, reduce the amount of sweetener in your next try. Consider utilizing a much less intensely candy different, or balancing the sweetness with a extra pronounced flavoring like lemon or vanilla.
Not Sweet Enough: Conversely, inadequate sweetness might indicate needing extra sweetener. Start by including a small quantity at a time, tasting as you go, to avoid overdoing it. Different sweeteners have various ranges of sweetness; erythritol, for instance, is less candy than stevia.
Off-Flavors from Sweetener: Some sugar alcohols, like erythritol, can have a barely cooling or bitter aftertaste that some find disagreeable. Experiment with completely different keto-friendly sweeteners to search out one that enhances the opposite flavors without clashing.
Cream Cheese Problems:
Grainy Texture/Sour Taste: Low-quality cream cheese can considerably impact the final product’s texture and style. Using full-fat, high-quality cream cheese is vital for a smooth, creamy texture and a wealthy, balanced taste. Make sure it’s brought to room temperature before mixing.
Inconsistent Texture: If the cheesecake is lumpy or uneven, ensure the cream cheese is thoroughly softened and crushed to a smooth consistency before incorporating different components. Over-mixing also can lead to a grainy texture, so mix only till just mixed.
Flavoring and Add-in Issues:
Overpowering Flavors: If a particular flavoring (like lemon zest, extract, or spices) is just too robust, reduce the quantity used next time. Remember that flavors intensify because the cheesecake chills.
Weak or Missing Flavors: If a taste is simply too subtle, increase the amount steadily, tasting as you go. Ensure your flavorings are recent and high-quality. Consider utilizing a mix of flavors for a extra complex profile.
Inconsistent Flavor Distribution: Gently fold in add-ins like berries or chocolate chips to make sure even distribution all through the cheesecake layers. If they sink to the bottom, it could indicate the batter is merely too thick or the add-ins are too heavy. Try utilizing less dense elements or lighter folding strategies.
Addressing Layering Issues:
Layers Not Setting Properly: Ensure your cheesecake base and each layer is totally chilled earlier than adding the next. This allows each layer to firm up, preventing mixing or blurring of the layers.
Layers Separating: If the layers separate, it might be due to incompatibility between the elements. For occasion, utilizing a watery layer may cause separation. Make certain the elements in each layer are well-combined and barely thickened before chilling.
General Troubleshooting Tips:
Taste as you go: This is essentially the most essential step! Adjust the sweetness, flavorings, and other ingredients in accordance with your style preferences throughout the method.
Keep detailed notes: Record the exact portions of each ingredient you use. This will help you recreate successes and troubleshoot failures more effectively.
Don’t be afraid to experiment: Try completely different mixtures of sweeteners, flavorings, and add-ins to discover your perfect keto cheesecake recipe.
Patience is key: Allow sufficient chilling time for the cheesecake to set correctly. Rushing the method can lead to a less-than-perfect result.
By addressing these potential flavor and texture issues systematically, you’ll find a way to significantly enhance your chances of making a delicious and superbly layered keto cheesecake.
Storage and Serving
For a no-bake keto cheesecake, storage and serving are essential to maintaining its texture and stopping melting.
Ideally, you will want to retailer the cheesecake in an hermetic container in the refrigerator. This prevents it from absorbing odors and retains it chilly enough to retain its firm consistency.
A well-sealed container is essential; think about using a lidded glass dish or a plastic container with a tight-fitting lid. Avoid storing it in an open container, as this exposes the cheesecake to air, which may dry it out and affect its texture.
The refrigerator’s temperature should be constantly round 35-40°F (2-4°C). Fluctuations in temperature could cause the cheesecake to melt or become inconsistently agency.
For optimum storage length, aim to eat the cheesecake within 3-5 days. Beyond this timeframe, the standard and texture may start to degrade, even with proper refrigeration.
When serving, contemplate permitting the cheesecake to sit down at room temperature for about 10-15 minutes earlier than cutting and serving. This helps soften the cheesecake barely, making it easier to chop into neat slices and enhancing its creamy texture.
Use a pointy knife, ideally a skinny, offset spatula or a pastry knife, to chop the cheesecake. A uninteresting knife may cause the cheesecake to crumble.
Gently wipe the knife clean after every slice to prevent sticking and guarantee clean cuts.
Serving recommendations for this layered keto cheesecake would possibly embody:
Fresh berries, corresponding to raspberries or blueberries (consider the carb depend per serving)
A sprinkle of sugar-free chocolate shavings
A dollop of sugar-free whipped cream
A drizzle of sugar-free caramel sauce
Chopped nuts (almonds, pecans, and so on.)
Remember to always consider the dietary info of any toppings you add, to take care of the ketogenic nature of the dessert.
Freezing the cheesecake is feasible, but it may have an effect on the texture upon thawing. If you choose to freeze it, wrap it tightly in plastic wrap, then in aluminum foil to prevent freezer burn. Allow it to thaw fully within the fridge before serving.
For one of the best outcomes and to keep away from spoilage, at all times observe proper food security tips and eat the cheesecake within the recommended timeframe.
Proper storage helps maintain the creamy, easy, and scrumptious texture of your no-bake keto cheesecake, making certain a pleasant deal with.
Consider the number of servings you need when getting ready the cheesecake. Making a smaller batch ensures much less waste if you cannot consume it inside the beneficial storage time.
Note that the particular storage time might differ barely based on elements used and environmental conditions.
For optimum storage, the no-bake keto cheesecake must be saved refrigerated in an hermetic container. This prevents it from absorbing odors and keeps it fresh for as a lot as 5 days.
To serve, allow the cheesecake to sit at room temperature for about 15-20 minutes before slicing. This will soften it barely, making it easier to chop and serve neat slices.
Consider utilizing a sharp, thin knife for slicing. A serrated knife works nicely, too, making certain clean, even parts. Wipe the knife clear between each slice to stop sticking.
Serving recommendations rely upon the event and personal preferences. A simple serving could be a slice of cheesecake on its own, presumably garnished with fresh berries (strawberries, raspberries, blueberries are keto-friendly in moderation) for a contact of color and sweetness.
For a extra elegant presentation, think about using a cake server or small offset spatula to fastidiously transfer the cheesecake slices to particular person plates.
Alongside the cheesecake, you can serve keto-friendly accompaniments. A dollop of sugar-free whipped cream or a sprinkle of chopped nuts (like pecans or macadamia nuts) add texture and refined flavor.
A drizzle of sugar-free chocolate sauce or a raspberry coulis (puréed raspberries sweetened with a keto-friendly sweetener) would complement the cheesecake beautifully.
For a more substantial dessert expertise, consider pairing the cheesecake with a aspect of fresh berries and a small portion of keto-friendly granola or a crunchy nut mix.
If serving for a party or gathering, put together the cheesecake forward of time and store it in the fridge. Arrange the slices attractively on a platter, perhaps with a few of the garnishes mentioned above.
Remember to contemplate dietary restrictions when selecting garnishes and accompaniments. Clearly label any allergens, similar to nuts or dairy, if necessary.
For a visually interesting presentation, consider using different colored berries or strategically arranging the garnishes on high of every slice.
You also can create individual servings by portioning the cheesecake into small ramekins or glasses before chilling. This is ideal for particular person desserts or catering purposes.
To elevate the presentation even additional, use edible flowers or fresh mint sprigs as a garnish. These add a contact of elegance and visible appeal.
Ultimately, the most effective serving suggestion depends on the occasion and your personal desire. Get artistic and experiment with completely different garnishes and accompaniments to create a delightful and memorable dessert experience.
Remember to suppose about the general aesthetic of your presentation. A clear, simple presentation could be simply as effective as a extra elaborate one.
Don’t be afraid to experiment with completely different serving types and garnishes to search out what works greatest for you and your guests.
Enjoy your delicious, no-bake keto cheesecake!