

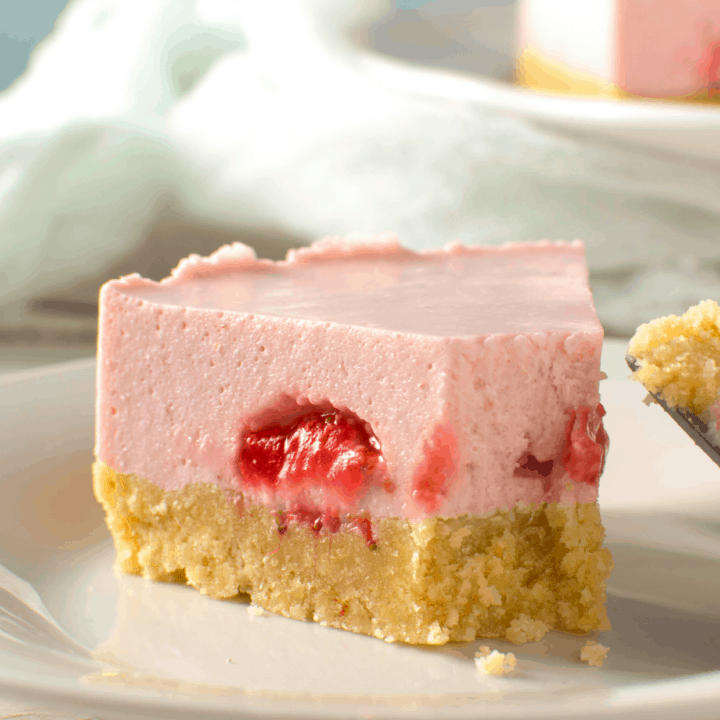
How To Make A Keto Cheesecake Pie
Keto Crust
Creating a very decadent keto cheesecake requires cautious consideration of the crust, as this is where many low-carb recipes fall quick.
A subpar crust can easily derail the entire keto cheesecake expertise, resulting in a soggy bottom or a bland, disagreeable texture.
Fortunately, several glorious keto-friendly crust options exist, every with its personal distinctive characteristics and preparation technique.
Almond flour is a popular selection, offering a naturally nutty flavor and a comparatively fine crumb. It’s readily available and blends nicely with other elements for added complexity.
Coconut flour, whereas extra absorbent than almond flour, imparts a subtle coconut flavor that complements the creamy cheesecake filling superbly. It requires a bit more liquid to bind properly however ends in a denser crust.
A mix of almond and coconut flour regularly provides the most effective of each worlds—combining the feel of almond flour with the binding power of coconut flour. Experiment with different ratios to search out your choice.
Nut butter, such as almond butter or cashew butter, adds richness and moisture to the crust, contributing to a extra tender and fewer crumbly texture. Be mindful of added sugars, opting for unsweetened varieties.
Pecans or different nuts, finely chopped, create a splendidly crunchy crust with a definite nutty taste. They are a fantastic addition to almond or coconut flour primarily based crusts.
Psyllium husk powder acts as a binder, helping to carry the crust collectively without adding many carbs. It’s significantly helpful when using nut flours, enhancing their binding properties.
Cheese, such as cream cheese or parmesan, adds a savory element to the crust, complementing the cheesecake filling and enhancing its richness. It contributes to a melt-in-your-mouth texture.
The course of of creating a keto crust normally includes combining dry elements (flours, nuts, psyllium husk), wet ingredients (nut butter, melted butter, eggs, or cheese), and then pressing the combination firmly right into a pie dish.
Baking the crust for a brief time earlier than including the cheesecake filling is extremely beneficial; this prevents a soggy backside and ensures a crisp texture.
Blind baking, where you line the crust with parchment paper and fill it with pie weights before baking, additional helps to forestall shrinkage and guarantee an even bake.
Consider these components when selecting your keto cheesecake crust:
- Texture: Do you favor a crumbly, crunchy, or tender crust?
- Flavor: What flavors will complement the cheesecake filling best?
- Ingredients: What ingredients do you may have on hand, and which ones align with your dietary preferences?
- Ease of preparation: How a lot time and effort are you prepared to invest in making the crust?
By thoughtfully selecting the best ingredients and mastering the baking course of, you can create a keto cheesecake crust that’s not solely low-carb but additionally extremely scrumptious, elevating your whole dessert expertise.
Experiment with different combinations of ingredients to seek out your good keto cheesecake crust recipe. Don’t be afraid to get creative!
The ideal keto cheesecake crust might be a delightful balance of crispness, taste, and texture, seamlessly complementing the rich and creamy filling.
Remember to rigorously measure your components and comply with the baking directions intently for one of the best results.
Enjoy the process and the scrumptious consequence of your homemade keto cheesecake!
For a keto-friendly cheesecake, a sturdy and scrumptious crust is paramount. Almond flour varieties the base of many keto crusts, offering a naturally nutty flavor and a pleasing texture.
Begin by gathering your elements: 1 ½ cups almond flour (finely ground is finest for a smoother crust), ¼ cup erythritol or your most popular keto-friendly sweetener (granulated or powdered work well), ¼ teaspoon salt, and 6 tablespoons (3 ounces) of unsalted butter, melted.
Preheat your oven to 350°F (175°C). This ensures the crust bakes correctly and prevents a soggy bottom.
In a medium-sized bowl, whisk together the almond flour, sweetener, and salt. This distributes the sweetener evenly and prevents pockets of sweetness or dryness.
Slowly pour in the melted butter, mixing with a fork or your arms until the combination is properly combined and resembles moist sand. If it is too dry, add a teaspoon of melted butter at a time till it comes collectively.
Press the combination firmly into the bottom of a 9-inch springform pan. Use the bottom of a measuring cup or your fingers to ensure a fair layer, pushing the crumbs into the corners and sides. A slightly thicker crust will hold up better beneath the burden of the cheesecake.
Prick the crust throughout with a fork. This prevents air bubbles from forming and creating a puffy crust during baking. It additionally helps to make sure even baking.
Blind bake the crust for 10-12 minutes. This essential step pre-bakes the crust, preventing it from changing into soggy from the moist cheesecake filling. You can do that by either covering the crust with parchment paper and filling with pie weights or dried beans, or simply by pricking it nicely and baking it uncovered.
Remove the crust from the oven and let it cool utterly before including the cheesecake filling. This prevents the filling from cracking and ensures a nice, clear finish.
For additional taste, contemplate including spices like cinnamon or nutmeg to the crust mixture. A teaspoon of vanilla extract also can enhance the overall style.
If you like a more flavorful crust, you can toast the almond flour earlier than adding the other components. Toasting will intensify its nutty taste, making a richer crust. Simply spread it on a baking sheet and bake at 350°F (175°C) for 5-7 minutes, stirring sometimes, until flippantly golden.
Variations abound! You may incorporate shredded coconut for added texture and flavor, or use totally different keto-friendly sweeteners like stevia or monk fruit. Experiment to search out your excellent keto cheesecake crust!
Once the crust is cooled and the cheesecake filling is ready, fastidiously pour the filling over the cooled crust, spreading evenly. Bake in accordance with your cheesecake recipe instructions.
After baking, permit the cheesecake to chill utterly earlier than refrigerating for at least four hours, or ideally in a single day, to allow the filling to set correctly.
Enjoy your scrumptious, keto-friendly cheesecake!
For a keto cheesecake, the crust is essential; it must be sturdy enough to hold the filling yet soften in your mouth.
Almond flour is your best friend here. Its barely nutty flavor complements the cheesecake fantastically, and it offers the necessary construction.
Consider adding a contact of coconut flour for additional binding. A tablespoon or two will help the crust hold collectively higher, preventing crumbling.
Don’t underestimate the facility of fats in a keto crust. Melted butter provides richness and helps bind the dry elements.
You might incorporate cream cheese into the crust combination for further flavor and moisture. A few tablespoons will do wonders.
Sweetener is essential, but use sparingly. Erythritol or monk fruit are excellent keto-friendly choices; begin with a small quantity and add extra to style.
A pinch of salt enhances the flavors of each the crust and the filling. Don’t skip it!
Preheat your oven to 350°F (175°C). This ensures even baking and a wonderfully crisp crust.
Press the crust mixture firmly into the underside of a springform pan. Use the bottom of a measuring cup or your fingers to make sure a fair layer.
Pre-baking the crust is recommended to stop sogginess. Bake it for about 8-10 minutes, until flippantly golden.
Keep a detailed eye on the crust while it bakes; it could burn shortly. If it begins to brown too much, cover it loosely with foil.
Once the crust is baked, let it cool utterly earlier than adding the cheesecake filling. This prevents the filling from cracking.
If you prefer a more decadent crust, consider adding chopped nuts like pecans or macadamia nuts. Their texture and flavor will elevate the crust to a different degree.
Experiment with spices. A dash of cinnamon or nutmeg can create a warm, comforting aroma and flavor profile.
For a truly distinctive twist, incorporate shredded coconut into your crust. The coconut adds a tropical touch that pairs surprisingly nicely with cheesecake.
Remember to make use of a great high quality almond flour. The finer the grind, the smoother your crust might be.
Don’t be afraid to regulate the recipe to your liking. If you favor a sweeter crust, add extra sweetener. If you want a nuttier crust, add more nuts.
Properly measuring your elements is essential for a profitable keto crust. Use a kitchen scale for accuracy.
Once the cheesecake is full, refrigerate it for no much less than 4 hours, or ideally overnight, to permit the flavors to meld and the filling to set completely.
Enjoy your selfmade keto cheesecake! The effort is well worth the delicious, guilt-free reward.
Consider including a keto-friendly topping, similar to sugar-free chocolate shavings or contemporary berries, for an additional touch of elegance.
Storing your keto cheesecake properly is important. Keep it refrigerated in an airtight container for as much as three days.
Freezing parts of the cheesecake can be an effective way to increase its shelf life.
Making a keto cheesecake crust might seem challenging at first, however with a little practice, you’ll become a professional in no time!
Keto Cheesecake Filling
For a very decadent keto cheesecake filling, begin by gathering your ingredients meticulously. Accuracy is essential to reaching that good creamy texture.
You’ll want a good quality cream cheese, softened to room temperature. This is essential; chilly cream cheese will be lumpy and difficult to include easily. Aim for no much less than 16 ounces, presumably extra depending on the scale of your pie.
Next, measure out your sweetener. Erythritol or monk fruit are in style keto-friendly selections. Start with ½ cup to ¾ cup, however keep in mind you can always add more to taste, so it’s best to err on the facet of warning.
Don’t overlook the eggs! Large eggs, ideally 2 to three, will bind the filling and provides it a stunning richness. Make positive they’re at room temperature as well for optimum emulsification.
For a contact of tang and further richness, a generous spoonful of sour cream (full-fat, naturally) is a welcome addition. Around ¼ cup should do the trick.
Now, for the flavor enhancer. A teaspoon or two of vanilla extract elevates the flavor profile significantly. Pure vanilla extract is all the time really helpful for the most effective results.
Optional elements can actually personalize your cheesecake. A pinch of salt balances the sweetness. A splash of lemon juice provides brightness. Consider including a tablespoon or two of heavy cream for further lusciousness and a lighter texture.
If you feel adventurous, experiment with other keto-friendly extracts, like almond or coconut. Just remember to add them sparingly, slightly goes a good distance.
Once you’ve got gathered all of your elements, rigorously measure each one into separate bowls. This ensures precise measurements and avoids accidental spills or mistakes.
Having everything prepared beforehand streamlines the baking course of and minimizes the chance of overmixing the batter. This is particularly necessary for a keto cheesecake, the place overmixing can lead to a tricky texture.
Remember to verify your keto sweetener for any specific directions or warnings earlier than utilizing it. Some sweeteners may behave in a unique way than others during baking.
With all of your elements measured and prepared, you may be well on your method to making a chic keto cheesecake filling. The cautious selection and preparation of components are the inspiration for a truly exceptional dessert.
For a very decadent keto cheesecake, the cream cheese basis is paramount. Begin with high-quality, full-fat cream cheese, making certain it’s at room temperature. This is crucial for achieving a smooth, creamy texture; chilly cream cheese will end in lumps and inconsistencies.
Start by beating the softened cream cheese in a stand mixer (or with a hand mixer) on medium speed. Scrape down the sides of the bowl incessantly to ensure every thing is thoroughly integrated and there are not any stubborn pockets of cream cheese clinging to the sides.
Gradually add your sweetener – sometimes a keto-friendly choice like erythritol, monk fruit, or a mix. Add it in a slow, steady stream whereas the mixer is running. Avoid dumping it all in without delay, as this will lead to clumping.
The amount of sweetener will depend in your private choice, but start with less than you suppose you will want and modify to style. Remember that the crust and any further flavorings will also contribute to the general sweetness.
Once the sweetener is totally incorporated, beat the mixture until it is fully smooth and fluffy. This usually takes a number of minutes of constant mixing. You’ll discover a definite change in texture and color – it’ll turn into lighter and airier.
Next, add your eggs, one at a time, beating nicely after each addition. This is one other crucial step for reaching a easy, lump-free filling. Beating nicely incorporates the eggs correctly and prevents curdling throughout baking.
If you are utilizing any extracts like vanilla or almond, add them at this stage. A teaspoon or two will significantly enhance the flavour profile of your cheesecake.
For added richness, consider incorporating bitter cream or heavy cream. This will boost the creamy texture and lend a tangy depth of taste. Gradually add these ingredients, mixing till absolutely incorporated and sustaining a clean consistency.
If adding bitter cream or heavy cream, remember to make sure they’re at room temperature to forestall any separation or curdling. Cold dairy products are a common wrongdoer for a grainy cheesecake filling.
Finally, before pouring the filling into the crust, cross it by way of a fine-mesh sieve. This is an optional however extremely really helpful step. It removes any tiny lumps which may have formed, ensuring an exceptionally clean and luxurious keto cheesecake filling. This further step is worth the effort.
Once sieved, gently pour the filling into your ready keto crust. Avoid pouring it from a high peak to stop creating air bubbles. A slow, steady pour is greatest. Gently faucet the pan to release any air bubbles which will have shaped.
With careful consideration to those steps, you will create a keto cheesecake filling that is each luscious and creamy, an ideal complement to your keto crust.
Creating a really decadent keto cheesecake filling requires cautious attention to both cream cheese and sweetener selection.
Full-fat cream cheese is crucial; its larger fat content contributes to the wealthy, creamy texture characteristic of a traditional cheesecake, while minimizing the necessity for added thickeners.
Avoid low-fat or fat-free choices, as they’ll lead to a grainy, watery filling that fails to set correctly.
For sweetness, a number of keto-friendly choices exist, each impacting the final taste profile differently.
Sweetener Options and Measurements:
Erythritol: A sugar alcohol with a mild sweetness and minimal aftertaste. Use roughly ¾ to 1 cup for a standard 9-inch cheesecake, adjusting based mostly on personal desire. It blends nicely and contributes to a clean texture.
Monk Fruit Sweetener: Extraordinarily candy, slightly goes a long way. Start with 2-4 tablespoons for a 9-inch cheesecake and taste-test incessantly. Too much can go away a barely bitter aftertaste.
Stevia: Another intensely sweet option, similar to monk fruit. Begin with 1-2 tablespoons and adjust accordingly. It can have a slightly licorice-like aftertaste for some.
Allulose: A low-calorie sugar that is similar to sugar in style and texture. It is a comparatively new keto sweetener and can be more expensive. Use roughly the identical amount as granulated sugar (about 1 cup for a 9-inch cheesecake).
Blended Sweeteners: Many discover success mixing sweeteners to achieve the specified degree of sweetness and mitigate any off-flavors. For example, combining erythritol with a small amount of monk fruit or stevia can create a balanced sweetness with no lingering aftertaste.
Remember that the sweetness of keto sweeteners can vary by model, so all the time verify the packaging for sweetness comparisons and regulate accordingly.
Beyond the sweetener, achieving the right keto cheesecake filling involves cautious attention to different ingredients.
A contact of vanilla extract enhances the flavour, while a pinch of salt balances the sweetness and brings out the richness of the cream cheese.
Heavy cream, added gradually, lightens the filling and contributes to its luxurious texture. Start with ½ cup for a 9-inch cheesecake and add more if needed to reach your required consistency. Overmixing can incorporate too much air, doubtlessly leading to cracks.
Eggs, sometimes 2-3 massive eggs, bind the filling and contribute to its set. Add them separately, making certain every is fully included earlier than including the next. This prevents curdling and ensures a smooth, consistent texture.
For a really elevated keto cheesecake, consider incorporating different keto-friendly flavorings like lemon zest, cocoa powder (for chocolate cheesecake), or a splash of almond extract.
Once the filling is ready, bake it slowly and at a decrease temperature (around 300°F or 150°C) in a water bathtub to create a easy, creamy texture and stop cracking. This would require longer baking occasions; count on it to take roughly an hour to an hour and a half.
Always allow the cheesecake to chill utterly before chilling to forestall cracking and ensure a perfect set.
The cream cheese is the star of any keto cheesecake filling, and you may need a good quality, full-fat possibility for the most effective texture and taste.
Begin by bringing your cream cheese to room temperature. This ensures it is smooth and simply incorporates the other elements with out turning into lumpy. Let it sit out for a minimum of an hour before starting.
Next, add your sweetener. Erythritol, monk fruit, or stevia are in style keto-friendly decisions. The quantity will depend on your private desire for sweetness and the model of sweetener you utilize. Start with less than you suppose you need and add extra gradually, tasting as you go. Remember that the sweetener will blend after which intensify barely as it sits, so do not overdo it.
Eggs are crucial for the structure and texture of your cheesecake filling. They bind every little thing together and contribute to a creamy, wealthy consistency. Use large eggs, preferably at room temperature, for optimal results. Start by including one egg at a time, totally incorporating every one before including the subsequent. This prevents curdling and ensures a easy batter.
For added richness and flavor, think about adding a splash of heavy cream. This provides moisture and an opulent mouthfeel. A tablespoon or two is often sufficient, however regulate to your desire.
Vanilla extract is a classic addition to cheesecakes, enhancing the general taste profile. A teaspoon or two will do the trick. Other flavorings, like lemon zest or almond extract, may also be integrated for a extra distinctive twist. Experiment to find your best keto cheesecake taste mixture.
Once all the elements are combined, use a hand mixer or a stand mixer on low velocity to softly incorporate everything. Be careful to not overmix; overmixing can incorporate an extreme quantity of air, leading to a much less dense and probably cracked cheesecake.
After mixing, pressure the batter by way of a fine-mesh sieve to take away any lumps. This ends in an incredibly clean and velvety cheesecake filling, elevating the general high quality of your keto dessert.
Before pouring the filling into your ready keto crust (consider utilizing almond flour, coconut flour, or a combination), let it rest within the refrigerator for about half-hour. This permits the flavors to meld and the filling to thicken barely. This step helps to prevent cracking throughout baking.
Baking a keto cheesecake requires a decrease temperature and longer baking time compared to a conventional cheesecake. Bake in a water bathtub to prevent cracking and ensure even cooking. This entails inserting the cheesecake pan in a bigger baking pan filled with hot water.
Always enable the cheesecake to cool fully before refrigerating. This prevents the cheesecake from collapsing. Refrigerate for at least 4 hours, or ideally in a single day, to allow the filling to set fully.
Finally, garnish your keto cheesecake together with your favorite keto-friendly toppings. Whipped cream, sugar-free chocolate shavings, or berries are excellent choices.
Creating a flawlessly easy and crack-free keto cheesecake filling requires careful consideration to element and approach. The key lies in balancing the proper ingredients and following a exact technique.
Begin with cream cheese, guaranteeing it is at room temperature. This is essential for attaining a creamy, easily-blendable texture. Cold cream cheese will end in lumps and an uneven consistency.
Use a stand mixer or hand mixer for optimum blending. A whisk will work, but requires more elbow grease and may not achieve the same degree of smoothness. Beat the cream cheese until fully smooth and creamy, scraping down the sides of the bowl incessantly to include all the cheese.
Gradually add the sweetener, whether or not it is erythritol, monk fruit, or a keto-friendly blend. Adding it progressively prevents clumping and ensures even distribution of sweetness.
Next, incorporate the eggs, separately, beating well after every addition. Don’t overmix, as this can incorporate an excessive amount of air, resulting in cracks throughout baking. Mix until simply combined.
Adding bitter cream or heavy cream enhances the richness and creaminess of the filling. Again, incorporate gradually and blend until simply mixed. Be mild to avoid incorporating extreme air.
Vanilla extract, almond extract, or lemon zest are great for including flavor complexity. A touch of salt balances the sweetness.
Once all ingredients are mixed, strain the batter through a fine-mesh sieve. This removes any lumps and ensures a wonderfully smooth texture which can help stop cracking.
For extra crack prevention: Add a tablespoon or two of cornstarch. Although it provides carbohydrates, the amount is minimal within the context of the overall keto recipe, and it drastically reduces cracking.
Pour the strained batter into your ready keto crust. A water tub is highly beneficial. This helps create a more even baking setting and prevents the cheesecake from cracking and drying out.
Bake at a low temperature for an extended duration. This gradual baking prevents the cheesecake from curdling or cracking. Monitor carefully and regulate baking time if necessary, depending in your oven.
Once baked, let the cheesecake cool utterly within the oven with the door barely ajar. This gradual cooling prevents rapid temperature adjustments that contribute to cracking.
After cooling in the oven, switch it to the fridge to relax for no less than four hours, ideally in a single day. This permits the cheesecake to set completely and develop its wealthy, creamy texture.
To stop cracking through the cooling course of think about these strategies:
- Water Bath: A water bathtub creates a extra even baking surroundings, preventing fast temperature fluctuations.
- Slow Cooling: Allow the cheesecake to chill progressively within the oven earlier than transferring it to the refrigerator.
- Room Temperature Ingredients: Using room temperature cream cheese and different elements helps create a easy batter.
- Proper Mixing: Avoid overmixing the batter, as this will incorporate too much air.
- Straining: Straining the batter removes any lumps, resulting in a smoother texture.
By rigorously following these steps, you may create a scrumptious and flawless keto cheesecake with a smooth, crack-free filling every time.
Baking the Cheesecake
First, let’s handle the crucial aspect of making ready the baking pan for a flawless keto cheesecake. Proper pan preparation is vital to preventing sticking and making certain a clear launch.
Begin by selecting the best pan. A 9-inch springform pan is ideal for cheesecakes, offering straightforward removing once baked. Avoid utilizing a glass pan as it can lead to uneven baking.
Generously grease the bottom and sides of the springform pan with butter or coconut oil. Don’t skimp on this step – a thin layer will not suffice. Make certain to completely coat each floor that can come into contact with the cheesecake batter.
Next, line the bottom of the pan with parchment paper. This provides an extra layer of protection against sticking and makes removal even easier. Cut the parchment paper slightly bigger than the bottom of the pan to permit for easy lifting later.
After greasing and lining the underside, contemplate frivolously dusting the entire pan with a keto-friendly flour alternative like almond flour or coconut flour. This extra step adds another barrier between the cheesecake and the pan.
Now, let’s transfer on to the precise baking strategy of the keto cheesecake itself. The key to a creamy, smooth texture lies within the precise preparation of the batter and the baking temperature.
Start by ensuring all your components are at room temperature. This consists of the cream cheese, eggs, and any sweeteners you’re utilizing (erythritol or different keto-friendly alternate options are frequent choices).
Beat the cream cheese until completely easy and creamy. This prevents lumps within the final product. Use a stand mixer or a hand mixer for greatest outcomes; make sure the cream cheese may be very soft to begin with.
Gradually add your sweetener, beating until totally incorporated. The amount of sweetener will rely on your desire, but don’t overdo it; the cream cheese ought to still have a slight tang.
Incorporate the eggs one by one, mixing properly after every addition. Be gentle to avoid over-mixing, which might introduce air bubbles and lead to cracks within the completed cheesecake.
Add any further keto-friendly elements, corresponding to vanilla extract, lemon zest, or a keto-friendly chocolate. Mix till simply combined.
Pour the batter into your ready springform pan. Use a spatula to easy the top, ensuring a good layer.
Place the springform pan in a larger baking pan. This creates a water tub, preventing the cheesecake from cracking and ensuring even baking. Pour scorching water into the larger pan, reaching about midway up the sides of the springform pan.
Bake in a preheated oven at a low temperature, typically around 325°F (160°C). Baking times differ relying on your oven and the scale of the cheesecake, but generally, it takes between 50-70 minutes.
Check for doneness using a toothpick inserted into the center. If it comes out with just some moist crumbs attached, it is ready. If it is still wet, bake for another 10-15 minutes, checking periodically.
Once baked, let the cheesecake cool utterly in the oven with the door barely ajar. This gradual cooling prevents cracking. Then, refrigerate for no less than 4 hours, preferably in a single day, to permit it to set utterly.
After refrigeration, carefully run a thin knife or spatula around the edges of the cheesecake to loosen it from the pan. Release the springform clasp and gently raise the cheesecake out of the pan, utilizing the parchment paper to assist. If needed, gently heat the pan for simpler launch.
Garnish as desired, and enjoy your scrumptious keto cheesecake!
- Use a 9-inch springform pan.
- Grease and flour the pan thoroughly.
- Line the underside with parchment paper.
- Ensure all ingredients are at room temperature.
- Beat the cream cheese until smooth.
- Add eggs separately, mixing gently.
- Bake in a water bathtub at low temperature.
- Cool gradually in the oven, then refrigerate.
- Gently release from the pan utilizing a knife and parchment paper.
Preheat your oven to 325°F (160°C). This gentle heat prevents cracking and ensures even baking.
For the crust, mix 1 ½ cups almond flour, ¼ cup erythritol or your most well-liked keto-friendly sweetener, and 4 tablespoons of melted unsalted butter. Mix till crumbly.
Press the mixture firmly into the bottom of a 9-inch springform pan. You need a fair layer; use the underside of a measuring cup to pack it down.
Bake the crust for 10-12 minutes, or till lightly golden. Remove and let cool fully.
While the crust cools, put together the cheesecake filling. In a large bowl, beat three (8 ounce) packages of cream cheese till clean and creamy. Make positive it is softened to room temperature for best results.
Gradually add 1 ½ cups of erythritol or your chosen keto sweetener, beating till totally incorporated. Scrape down the edges of the bowl as wanted.
Beat in four massive eggs, one by one, mixing nicely after each addition. Don’t overmix.
Add 1 teaspoon of vanilla extract and a pinch of salt. Mix till simply mixed.
Carefully pour the filling into the cooled crust.
Now for the water bathtub: Wrap the bottom of the springform pan tightly in aluminum foil, making a seal to forestall water from seeping in. This is crucial.
Place the springform pan into a bigger roasting pan. Pour sufficient scorching water into the roasting pan to come about midway up the perimeters of the springform pan.
Carefully place the roasting pan within the preheated oven. The water bathtub helps create a moist surroundings, stopping cracks and making certain a smooth, creamy texture.
Bake for 50-60 minutes, or until the cheesecake is usually set across the edges however still slightly jiggly in the heart. The middle will firm up because it cools.
Turn off the oven and go away the cheesecake within the oven with the door barely ajar for 1 hour. This sluggish cooling helps stop cracking.
After an hour, carefully remove the cheesecake from the water bath and let it cool completely on a wire rack at room temperature.
Once cool, cowl and refrigerate for a minimal of 4 hours, or preferably in a single day, to allow the cheesecake to completely set.
Before serving, fastidiously run a skinny knife across the edges of the springform pan to loosen the cheesecake.
Remove the sides of the springform pan and gently switch the cheesecake to a serving platter.
Garnish as desired – maybe with some sugar-free chocolate shavings or fresh berries (use sparingly to stay keto-friendly).
Enjoy your delicious keto cheesecake!
- Tip 1: Use room temperature cream cheese for a smoother batter.
- Tip 2: Don’t overmix the batter, as this could incorporate too much air and lead to cracks.
- Tip 3: The water bath is crucial for a creamy, crack-free cheesecake. Don’t skip it!
- Tip four: Let the cheesecake cool gradually to avoid sudden temperature changes that might cause cracks.
- Tip 5: Be patient! Allow enough chilling time for the cheesecake to set properly.
Preheat your oven to 325°F (160°C). This decrease temperature ensures even baking and prevents cracking.
For the crust, you’ll sometimes use almond flour, coconut flour, or a combination. Press the crust mixture firmly into the bottom of your springform pan. Baking the crust beforehand helps forestall a soggy backside. Bake the crust for 8-10 minutes, or until frivolously golden.
In a separate bowl, beat cream cheese till completely clean and creamy. This is crucial for a smooth, lump-free cheesecake.
Gradually add your sweetener (erythritol, monk fruit, or stevia are in style keto options) and beat until totally incorporated. Be cautious to not over-beat.
Add eggs one at a time, mixing properly after each addition. Again, avoid overmixing to prevent air bubbles which can lead to cracks.
Stir in vanilla extract and some other desired flavorings (lemon zest, cinnamon, and so forth.).
Pour the cheesecake batter over the pre-baked crust.
Place the springform pan in a larger baking pan. Pour sizzling water into the larger pan, filling it about midway up the edges of the springform pan. This creates a water bath, providing a moist surroundings for even baking and stopping cracks.
Bake for 50-60 minutes, or till the cheesecake is about around the edges but the heart still jiggles slightly. The middle will agency up extra because it cools.
Turn off the oven and go away the cheesecake inside with the door slightly ajar for one more hour. This slow cooling prevents cracking.
Remove the cheesecake from the water tub and let it cool utterly at room temperature. This course of normally takes several hours.
Once completely cool, refrigerate the cheesecake for a minimum of 4 hours, or preferably overnight, to permit it to completely set and the flavors to meld.
Before serving, fastidiously run a thin knife around the edges of the cheesecake to loosen it from the springform pan. Release the perimeters of the pan.
Garnish as desired with berries, whipped cream (ensure it’s keto-friendly), or chocolate shavings.
Important Notes on Baking Time and Temperature:
- Baking time can vary relying in your oven and the size of your springform pan. Always check for doneness utilizing a toothpick or cake tester inserted into the middle. It should come out with only some moist crumbs attached, not moist batter.
- The water bath is crucial for preventing cracks and guaranteeing even baking. Don’t skip this step!
- Overbaking will lead to a dry, cracked cheesecake. It’s higher to slightly underbake and let the cheesecake end setting within the fridge.
- Oven temperatures can fluctuate, so it is all the time a good suggestion to watch your cheesecake carefully over the last 15-20 minutes of baking.
- Allowing the cheesecake to cool gradually within the oven after turning it off is crucial for preventing cracks. Patience is key!
Enjoy your delicious keto cheesecake!
The cooling process for a keto cheesecake is essential to its texture and prevents cracking. A gradual cool-down is key.
Once the keto cheesecake is baked and seems set across the edges but still barely jiggly in the middle, instantly remove it from the oven.
Turn off the oven and leave the cheesecake inside with the door barely ajar for about an hour. This allows for a gradual preliminary cooling, lowering the shock of temperature change.
After an hour, carefully remove the cheesecake from the oven and let it cool completely on a wire rack at room temperature. This can take a number of hours, presumably 3-4 relying on the scale and thickness of the cheesecake.
Avoid putting the cheesecake immediately on a cold floor, as this could trigger thermal shock and cracking.
Once cooled to room temperature, fastidiously cover the cheesecake with plastic wrap, pressing it immediately onto the floor to stop a skin from forming. This is significant for maintaining moisture.
Refrigerate the lined cheesecake for at least 6-8 hours, or preferably in a single day. This permits the filling to fully set and the flavors to meld.
The longer it chills, the firmer and extra stable the cheesecake will turn out to be.
Before serving, remove the cheesecake from the refrigerator about half-hour prior to allow it to come to a barely softer consistency. This improves its texture and makes it simpler to slice.
If you discover any cracks forming despite following these steps, do not worry! They often occur and do not significantly affect the style or high quality. You can often disguise minor cracks with a topping.
Running a thin knife or offset spatula around the edges of the cheesecake before making an attempt to remove it from the springform pan will help in stopping breakage.
To take away the cheesecake from the springform pan, run a thin knife or offset spatula across the edges and slowly launch the edges of the pan. The cheesecake ought to slide out simply once fully cool and set.
Remember that the cooling course of is a patient one. Avoid dashing the steps to realize a wonderfully easy and delicious keto cheesecake.
Here’s a summarized step-by-step process:
- Oven Cooling: 1 hour with oven door ajar.
- Room Temperature Cooling: 3-4 hours on wire rack.
- Refrigeration: 6-8 hours (or overnight).
- Pre-Serving: 30 minutes at room temperature.
Following these steps fastidiously will result in a beautifully smooth and delicious keto cheesecake with a creamy, firm texture.
Optional Toppings and Garnishes
For a keto cheesecake pie, the focus is on minimizing sugar and maximizing healthy fats, so optional toppings and garnishes should replicate that.
Sugar-free chocolate shavings provide a decadent contact without the carb overload. Look for choices sweetened with stevia, erythritol, or monk fruit.
The quality of the sugar-free chocolate is essential. Cheaper brands can have an off-putting aftertaste, so investing in a higher-quality model is worthwhile.
Consider using darkish chocolate shavings (at least 70% cacao) as they naturally contain much less sugar than milk chocolate, even in their sugar-free versions.
To improve the chocolate flavor and forestall it from being overly sweet (even with sugar-free options), pair it with a barely bitter factor.
A sprinkle of sea salt on prime of the chocolate shavings beautifully enhances the richness of the chocolate and the cheesecake.
Alternatively, a drizzle of sugar-free chocolate sauce (again, examine the sweetener) would supply an extra layer of chocolatey goodness.
For a more refined presentation, consider arranging the chocolate shavings in a decorative pattern, quite than merely scattering them.
Beyond chocolate, different keto-friendly garnishes can complement the cheesecake. Fresh berries (like raspberries or blueberries, in moderation due to their pure sugar content) provide a tart distinction to the creamy cheesecake.
A few chopped macadamia nuts or pecans provide a satisfying crunch and wholesome fat, adding textural curiosity to the pie.
Whipped cream made with heavy cream and a sugar-free sweetener (if desired) adds a lightweight and ethereal component.
A sprinkle of cinnamon or nutmeg can present heat and spice, complementing the chocolate and cheesecake flavors.
Consider utilizing a sugar-free caramel sauce (again, examine the components carefully) for a unique flavor profile. Be conscious of the portion dimension, as even sugar-free caramel can impact your daily carb rely.
Remember to examine the dietary data of all sugar-free products to make sure they fit inside your ketogenic macros. Even sugar-free options can include small amounts of carbohydrates.
The secret is moderation. Even with keto-friendly toppings, too much can throw off your macros. A little goes a good distance in enhancing the style and presentation of your keto cheesecake pie.
Experiment with different combinations to find your favorite topping and garnish pairings. Consider the overall flavor profile of your cheesecake when choosing toppings.
For instance, if you’ve added a strong citrus component to your cheesecake, chocolate could be too overpowering. A nut-based topping may be a extra suitable choice.
Finally, presentation issues. Carefully arranging your chosen toppings can elevate your keto cheesecake pie from a easy dessert to a wonderful and impressive creation.
For a keto cheesecake pie, elective toppings and garnishes can considerably improve both the flavour and visible appeal. Consider these keto-friendly choices:
Low-Carb Berry Compote: A easy compote of berries like raspberries, strawberries, or blueberries, sweetened with a keto-friendly sweetener like erythritol or stevia, supplies a tart and refreshing counterpoint to the wealthy cheesecake filling. Reduce the berries gently with a little water and sweetener till they soften and launch their juices. Strain when you prefer a smoother consistency.
Sugar-Free Chocolate Shavings: Dark chocolate with a excessive cocoa content material (70% or higher) is of course lower in carbohydrates and provides an opulent contact. Grate or shave the chocolate and sprinkle it over the cooled cheesecake. Ensure it’s a sugar-free selection.
Keto-Friendly Whipped Cream: This is arguably the most versatile and in style topping. To guarantee it stays keto-friendly, use heavy cream (at least 36% fat) and a keto-friendly sweetener like erythritol or monk fruit. Avoid utilizing sugar-based whipped cream alternatives.
Making Keto Whipped Cream: Chill your heavy cream thoroughly. In a calming bowl, beat the heavy cream with an electric mixer till soft peaks type. Gradually add your chosen keto-friendly sweetener, beating until stiff peaks form. Be cautious to not overwhip, as this may end up in butter.
Flavor Variations: Enhance your keto whipped cream with extracts like vanilla, almond, or peppermint. You could even add a pinch of cocoa powder for a chocolate-flavored whipped cream.
Serving Temperature: Serve the whipped cream instantly or store it chilled, but keep in mind it could not hold its shape as well after sitting for a while.
Chopped Nuts: Almonds, pecans, macadamia nuts, and walnuts add a delightful crunch and wholesome fat. Choose unsalted varieties to regulate the sodium content material.
Sugar-Free Caramel Sauce: Many sugar-free caramel sauces can be found commercially, but you may also make your personal utilizing erythritol and heavy cream, fastidiously simmered till thickened. A small drizzle adds an irresistible contact of sweetness and richness.
Lemon Zest: A brilliant and refreshing citrusy notice, somewhat lemon zest provides a complicated contact and cuts through the richness of the cheesecake. Use a microplane grater for the best zest.
Coconut Flakes (Unsweetened): Toasted coconut flakes present a refined sweetness and a pleasant texture, including a tropical twist to your cheesecake.
Chia Seeds: A sprinkle of chia seeds provides a subtle crunch and a boost of fiber and omega-3 fatty acids. These are minimally impactful on the keto food plan in small quantities.
Presentation: Arrange your chosen toppings artfully. Consider making a visually interesting pattern or simply sprinkling them generously over the whole pie. A dusting of cocoa powder can also add a visually appealing touch.
Important Note: Always verify the dietary information of any store-bought ingredients to ensure they align along with your ketogenic dietary objectives. Pay close consideration to internet carbs, as some “sugar-free” options still include significant quantities.
While a traditional keto cheesecake depends on cream cheese, eggs, and sweetener for its richness, berry toppings offer a delightful contrast in each texture and flavor, including a refreshing burst to the otherwise dense dessert.
Fresh Berries: The easiest and often most effective possibility. Raspberries, blueberries, strawberries, and blackberries all present a vibrant color and juicy sweetness that balances the creaminess of the cheesecake. Consider arranging them artfully on high for visible enchantment. Remember to gently pat them dry before adding to keep away from excess moisture weakening the crust.
Berry Coulis: A coulis is a easy puree of berries, usually strained to remove seeds for a refined texture. This may be drizzled elegantly over the cheesecake, making a glossy end. The sweetness can be adjusted with a keto-friendly sweetener like erythritol or monk fruit. A touch of lemon juice enhances the berry flavor.
Berry Compote: Similar to a coulis, however thicker in consistency, a compote sometimes entails simmering berries with a small quantity of liquid (water or a keto-friendly sweetener) until they soften and launch their juices. This leads to a jam-like texture that adheres to the cheesecake nicely. Spices like cinnamon or cardamom can be added for heat and complexity.
Berry Reduction: This involves simmering berries over low heat for an extended period, decreasing them to a concentrated syrup. This approach intensifies the berry taste and creates a syrupy glaze. The reduction process would possibly require an extended cooking time, however the result is a richly flavored topping.
Frozen Berries: Using frozen berries could be a convenient alternative, particularly throughout occasions when recent berries are out of season or unavailable. Allow them to thaw barely earlier than using to prevent excessive watering down of the topping. Consider blending slightly thawed berries for a Quick Keto Cheesecake No Bake coulis or compote.
Berry Crisp/Crumble: For a textural contrast, a small amount of keto-friendly crumble topping may be added. This would involve combining almond flour, sweetener, and melted butter (or a keto-friendly substitute) and baking it separately earlier than sprinkling over the cheesecake. The crumble provides a pleasing crunch and enhances the berry taste profile.
Considerations for Keto Cheesecake: When selecting berry toppings, contemplate the sugar content material. While berries are naturally lower in sugar in comparison with different fruits, be mindful of the general carbohydrate count in your keto cheesecake. Opt for lower-sugar berries like raspberries and blackberries. The quantity of the topping must also be moderated to maintain up the ketogenic macro stability.
Presentation: The visible appeal of your keto cheesecake is essential. Consider utilizing a piping bag to create swirls of berry coulis or fastidiously arranging recent berries in an ornamental sample. Garnishing with a couple of recent mint leaves or a sprinkle of shredded coconut (unsweetened) can add an extra touch of elegance.
Ultimately, the selection of berry topping is dependent upon private preference and the specified flavor profile. Experiment with completely different combos and methods to create a visually stunning and deliciously satisfying keto cheesecake pie.
For a keto cheesecake pie, elective toppings and garnishes can significantly elevate the dessert’s presentation and taste profile with out compromising the low-carb nature of the base.
Nuts and Seeds: A sprinkle of finely chopped nuts like pecans, walnuts, or macadamia nuts provides a pleasant textural contrast and a lift of wholesome fat. The subtle bitterness of pecans enhances the creamy cheesecake, while walnuts add a richer, earthier observe.
Macadamia nuts, with their buttery taste and smooth texture, present a luxurious touch. Remember to use sparingly to avoid overwhelming the cheesecake’s delicate taste.
Seeds, such as chia seeds or pumpkin seeds, supply a unique textural expertise. Chia seeds, when lightly toasted, impart a barely nutty taste and create a satisfying crunch. Pumpkin seeds, equally toasted, add a pleasing, barely sweet crunch.
Consider utilizing a combination of nuts and seeds for a extra advanced taste and texture profile. A mix of finely chopped pecans and toasted pumpkin seeds, for example, creates a beautiful visual distinction and delivers a multifaceted style.
Other Keto-Friendly Garnishes: Beyond nuts and seeds, various other keto-friendly choices exist to reinforce the aesthetic attraction and taste of your keto cheesecake pie.
Fresh berries (strawberries, raspberries, blueberries) can be used sparingly, as they contain some sugar. A small amount adds a burst of freshness and a contact of sweetness with out significantly impacting the keto-friendliness.
A drizzle of sugar-free chocolate sauce, made with erythritol or stevia, creates a chic end and introduces a wealthy chocolate factor that superbly enhances the cheesecake.
A dusting of unsweetened cocoa powder provides a complicated touch of chocolate flavor and a dark, elegant visual appeal.
Shredded coconut (unsweetened) can be used cautiously; while it adds a tropical taste and texture, it does contain some carbohydrates.
For a extra sophisticated garnish, consider thinly sliced almonds arranged artfully across the perimeter of the pie. This provides a visually interesting border and enhances the nutty flavor of the cheesecake.
Remember to consider the general taste profile of your cheesecake when choosing toppings and garnishes. A cheesecake with a robust citrus element might profit from a dusting of cocoa powder or a sprinkle of toasted coconut, while a extra traditional flavor profile could possibly be enhanced with nuts and seeds.
Ultimately, the most effective garnishes are those that complement the cheesecake’s taste, add visual attraction, and stay true to the ketogenic dietary method.
Experiment with totally different mixtures to find your favorite topping and garnish combos and personalize your keto cheesecake pie.
Always measure the carbohydrate content material of your chosen toppings and garnishes to make sure they align together with your daily macro goals.
Storage and Serving
Proper storage and serving of your keto cheesecake pie is essential to sustaining its texture and taste.
Once fully cooled, cover the cheesecake with plastic wrap, pressing it directly onto the surface to stop a skin from forming.
Refrigerate the pie for at least four hours, or ideally overnight, to permit the flavors to meld and the filling to set completely.
For longer storage (up to three days), keep the pie refrigerated, tightly covered with plastic wrap.
Avoid storing it close to strong-smelling foods, as the cheesecake can take in odors.
When serving, fastidiously remove the plastic wrap and use a pointy knife, dipped in hot water and wiped clean between every slice, for clean cuts.
Serve chilled. Garnish as desired with recent berries (consider the carb count!), keto-friendly chocolate shavings, or a sprinkle of powdered erythritol.
Leftovers ought to be stored refrigerated and consumed within 3 days for optimum high quality and safety.
To stop the cheesecake from drying out, you possibly can loosely tent the pie with aluminum foil if it’s going to be saved for the total three days.
Freezing keto cheesecake is possible, but the texture may change barely. Wrap the pie tightly in plastic wrap, then in aluminum foil, for freezer storage.
If freezing, it’s best to freeze individual slices rather than the whole pie to make serving simpler. Allow it to thaw completely in the fridge earlier than serving.
The texture could be barely softer after freezing, however the taste will generally stay glorious.
Remember to check the expiration dates of any ingredients used within the pie before storing and consuming it.
Proper handling will ensure you and your guests can benefit from the deliciousness of your keto cheesecake pie for a few days!
Here’s a useful guidelines for storing and serving:
Cool utterly before covering.
Refrigerate for a minimal of four hours, ideally overnight.
Use plastic wrap to forestall pores and skin formation.
Store for as a lot as three days in the refrigerator.
Use a pointy, hot-water-dipped knife for serving.
Serve chilled.
For freezing, wrap tightly in plastic wrap and foil.
Thaw frozen pie fully within the refrigerator earlier than serving.
For optimal storage of your keto cheesecake pie, after it has utterly cooled, wrap it tightly in plastic wrap after which again in aluminum foil. This double-wrapping creates a superior barrier in opposition to freezer burn and helps preserve the pie’s texture.
Store the wrapped pie in the fridge for as much as 5 days. Ensure it’s positioned on a secure shelf to forestall jostling and potential cracking.
For longer-term storage, freeze the pie. Follow the identical double-wrapping method as described above. Frozen keto cheesecake pie can last for up to 3 months. Remember to thaw it completely in the refrigerator before serving.
When serving, enable the pie to come to room temperature for the most effective taste and texture. This often takes about 1-2 hours within the refrigerator, depending on the dimensions of the pie and your fridge’s temperature.
Serving suggestions for your keto cheesecake pie are varied and scrumptious. Consider these choices:
A easy and chic serving entails slicing the pie into neat wedges and putting them on individual dessert plates. Garnish every slice with a couple of fresh berries (like raspberries or blueberries, preserving in thoughts their carb content), a sprig of mint, or a dusting of powdered erythritol (a keto-friendly sweetener).
For a more decadent presentation, think about serving your keto cheesecake pie in individual ramekins or small glasses. This allows for portion control and adds a touch of sophistication to your dessert display. Use the same garnish options as talked about above.
Accompany your keto cheesecake pie with a dollop of unsweetened whipped cream, a keto-friendly chocolate sauce, or a sprinkle of chopped nuts (such as pecans or almonds) for further flavor and texture. Remember to examine the carb depend of any added toppings to stay within your ketogenic macro goals.
If serving at a celebration or gathering, contemplate making ready a choice of small bites to enrich the cheesecake. Keto-friendly options include cheese and charcuterie boards, vegetable crudités with a keto-friendly dip, or even some sugar-free cookies.
Another serving idea is to supply totally different sauces or toppings as facet dishes, permitting your guests to customize their parts. This could embrace sugar-free caramel sauce, a raspberry coulis, or a sprinkle of cocoa powder. Remember to obviously label any keto-friendly toppings.
No matter your chosen serving methodology, do not forget that presentation is essential. Use attractive plates and cutlery, and contemplate adding a small garnish to every portion. This will enhance the general eating expertise and impress your visitors.

Finally, remember to inform your guests that the pie is keto-friendly, particularly if some may be unfamiliar with the food regimen. This permits them to make knowledgeable selections and revel in their dessert guilt-free.
Proper storage and considerate serving will improve the enjoyment of your scrumptious keto cheesecake pie.