
Cooking Pork Ribs On A Pellet Grill: Tips And Techniques
Preparation
Preparation:
1. Choose the proper ribs: Look for ribs which may be meaty and have good marbling. Avoid ribs that are thin or have lots of fat.
2. Remove the membrane: The powerful membrane on the again of the ribs can prevent the smoke and flavor from penetrating the meat. Use a pointy knife to rigorously remove the membrane.
3. Trim the ribs: Cut the ribs into individual items, removing any extra fats or cartilage.
4. Season the ribs: Rub the ribs liberally with your favourite dry rub. Be sure to get all sides of the ribs.
5. Let the ribs relaxation: Allow the ribs to rest at room temperature for at least half-hour earlier than cooking. This will help the dry rub to penetrate the meat.
Selecting the Right Ribs
Spare Ribs: Located at the belly of the pig, spare ribs are the most popular sort of ribs. They have an excellent amount of meat and a nice layer of fats, making them tender and flavorful. Spare ribs are usually reduce into individual ribs and are sometimes used for grilling or smoking.
Baby Back Ribs: Baby again ribs are taken from the loin of the pig, closer to the spine. They are smaller and shorter than spare ribs, with much less meat and a thinner layer of fat. Baby back ribs are recognized for his or her tenderness and are sometimes thought-about essentially the most flavorful.
St. Louis-Style Ribs: St. Louis-style ribs are created from spare ribs which were trimmed of the sternum and cartilage. This provides them a extra uniform form and makes them easier to grill or smoke. St. Louis-style ribs are recognized for his or her smoky flavor and fall-off-the-bone tenderness.
Country-Style Ribs: Country-style ribs are created from the shoulder of the pig. They have a good quantity of meat and fats, making them flavorful and tender. Country-style ribs are sometimes minimize into individual ribs and are sometimes used for grilling or smoking.
Baby again ribs vs. spare ribs
– Baby again ribs: These ribs are cut from the loin and have a shorter, extra curved form. They are generally thought of to be extra tender and flavorful than spare ribs, however they’re additionally costlier.
– Spare ribs: These ribs are reduce from the belly and have a longer, flatter shape. They aren’t as tender as child again ribs, but they’ve a more robust taste. They are additionally less expensive than baby back ribs.
Prime, selection, or select grade
Prime:
- Highest high quality grade
- Comes from youthful animals
- Has extra marbling (fat inside the muscle)
- More tender and juicy
Choice:
- Second highest high quality grade
- Comes from slightly older animals
- Has less marbling than Prime
- Still tender and juicy, but not fairly as a lot as Prime
Select:
- Lowest quality grade
- Comes from older animals
- Has the least quantity of marbling
- Less tender and juicy than Prime or Choice
Trimming and Preparing
Trimming and Preparing
Before you start cooking your pork ribs, it’s important to trim and put together them correctly. This will assist to make certain that they prepare dinner evenly and that you get the absolute best taste. Here are a number of ideas:
Remove the membrane. The membrane is a thin layer of tissue that covers the underside of the ribs. It could be powerful and chewy, so it’s necessary to remove it before cooking. To do that, merely insert a knife underneath the membrane and peel it off.
Trim the surplus fats. Pork ribs can have a lot of extra fat, which can make them greasy and troublesome to cook evenly. Trim off any massive pieces of fat, but don’t take away all of it, as some fat is critical for taste and moisture.
Cut the ribs into particular person portions. If you’re cooking a big rack of ribs, you might need to reduce them into individual portions before cooking. This will make them easier to handle and serve.
Season the ribs. Once the ribs are trimmed and ready, it’s time to season them. You can use your favorite rub or marinade, or just salt and pepper them to style.
Removing the membrane
Removing the Membrane from Pork Ribs
Before you begin seasoning and cooking your pork ribs, it’s necessary to remove the membrane from the back of the ribs. The membrane is a thin, powerful layer of connective tissue that covers the bones. If you do not take away it, it will forestall the ribs from absorbing the rub and sauce, and it will make them tough to chew.
To remove the membrane, use a sharp knife to score the membrane alongside the again of the ribs. Then, use your fingers to peel the membrane off the bones. It ought to come off in one piece.
Once the membrane is eliminated, your ribs are able to be seasoned and cooked. Here are a quantity of ideas for cooking pork ribs on a pellet grill:
- Use a flavorful rub. A good rub will assist to boost the flavour of the ribs.
- Cook the ribs over oblique heat. This will assist to stop the ribs from drying out.
- Cook the ribs until they’re tender. The ribs are carried out when they are cooked by way of and the meat pulls away from the bone easily.
Enjoy your scrumptious pork ribs!
Trimming extra fat
Pork ribs have a reasonable quantity of fat, which may be trimmed or left on depending on your preference. If you choose to trim the fat, use a sharp knife to rigorously remove any extra fat from the surface of the ribs. Be careful not to take away too much fat, as this can end result in dry ribs. Once the fats has been trimmed, the ribs are able to be seasoned and cooked.
Applying dry rub
Applying Dry Rub
Dry rub is a mix of spices and herbs that’s applied to the surface of meat earlier than cooking. It helps to boost the flavor of the meat and create a crispy crust.
To apply dry rub, first remove the meat from the refrigerator and pat it dry. Then, sprinkle the dry rub evenly over the surface of the meat, utilizing your arms to rub it in. Be sure to get the rub into all of the nooks and crannies.
Once the meat is coated with dry rub, let it rest for a minimum of half-hour earlier than cooking. This will give the rub time to penetrate the meat and develop its flavors.
Cooking on a Pellet Grill
Pellet grills offer an unmatched combination of comfort and flavor for smoking and grilling. They are incredibly simple to use, permitting you to set the temperature and let the grill do the remaining. This makes them an excellent choice for both novices and experienced grillers alike.
Pellet grills burn hardwood pellets, which give food a scrumptious smoky taste. The pellets are fed into the grill’s firebox, the place they are ignited and burned. The heat from the firebox is then circulated around the grill, cooking the meals evenly.
One of the most well-liked meals to prepare dinner on a pellet grill is pork ribs. Pork ribs are a versatile reduce of meat that can be cooked in a selection of ways. They can be smoked, grilled, or roasted, and they can be seasoned with a wide selection of rubs and sauces.
When cooking pork ribs on a pellet grill, you will need to start with an excellent high quality rack of ribs. Look for ribs which are meaty and have a good amount of marbling. The ribs should also be trimmed of any extra fats or cartilage.
Once you’ve selected your ribs, you will need to season them. There are many alternative rubs that you need to use, so be at liberty to experiment until you find one that you like. Some popular rubs for pork ribs include brown sugar, paprika, garlic powder, and onion powder.
Once the ribs are seasoned, you will need to prepare dinner them on the pellet grill. The cooking time will differ depending on the thickness of the ribs and the temperature of the grill. However, as a general rule, ribs must be cooked for about 2-3 hours at a temperature of 225-250 degrees Fahrenheit.
During the cooking course of, it is important to monitor the ribs closely. You need to ensure that they do not seem to be overcooked, as it will make them tough and dry. The ribs are accomplished when they’re tender and the meat pulls away from the bone simply.
Once the ribs are cooked, you’ll find a way to take away them from the grill and allow them to relaxation for a few minutes earlier than slicing and serving. Ribs could be served with a wide range of sides, corresponding to baked beans, coleslaw, or potato salad.
Here are some further suggestions for cooking pork ribs on a pellet grill:
- Use a great high quality rack of ribs.
- Season the ribs liberally along with your favorite rub.
- Cook the ribs at a temperature of 225-250 levels Fahrenheit for 2-3 hours, or until the meat is tender and pulls away from the bone simply.
- Monitor the ribs closely through the cooking course of to forestall them from overcooking.
- Let the ribs relaxation for a few minutes before slicing and serving.
- Serve the ribs along with your favourite sides.
Setting Up the Grill
Setting Up the Grill
1. Open the lid of the grill and take away the cooking grates.
2. Inspect the burn pot and ensure it is clear.
3. Fill the hopper with pellets.
4. Insert the cooking grates again into the grill.
5. Close the lid of the grill.
6. Set the grill to the desired temperature.
7. Once the grill has reached the desired temperature, open the lid and place the meals on the cooking grates.
8. Close the lid of the grill and cook dinner the food in accordance with the recipe directions.
Using the best pellets
Using the best pellets is crucial to getting the best taste and texture out of your pork ribs. There are many various kinds of pellets available, each with its personal distinctive taste profile. For pork ribs, you will need to use a pellet that’s gentle and slightly candy, similar to applewood or cherrywood. These pellets will complement the flavor of the ribs with out overpowering them.
In addition to the type of wooden, you may additionally want to suppose about the dimensions of the pellets. Pellets which would possibly be too large will not burn evenly, and pellets which are too small will turn to dust and create extreme ash. The perfect dimension for pellets is about 1/4 inch in diameter.
Once you have selected the proper pellets, it is important to retailer them correctly. Pellets should be saved in a cool, dry place away from direct daylight. If the pellets are uncovered to moisture, they’ll turn into moldy and unusable. Pellets also wants to be used within a quantity of months of purchase, as they will lose their flavor over time.
Maintaining the right temperature
Maintaining the Correct Temperature
When cooking pork ribs on a pellet grill, you will want to keep the right temperature all through the cooking process. This will ensure that the ribs are cooked evenly and to the specified doneness.
The best temperature for smoking pork ribs is between 225 and 250 levels Fahrenheit. This temperature will permit the ribs to smoke slowly and evenly, without overcooking them.
To keep the proper temperature, it may be very important use a good high quality pellet grill. The grill should be succesful of hold a constant temperature for long durations of time. It can be important to use the right sort of pellets. Hickory or apple pellets are a smart choice for smoking pork ribs.
Once the grill is heated to the right temperature, place the ribs on the grill grate. Smoke the ribs for 3 to 4 hours, or until they are tender. The ribs are accomplished once they reach an inner temperature of one hundred forty five levels Fahrenheit.
Once the ribs are cooked, remove them from the grill and let them rest for 10 to fifteen minutes before slicing and serving.
Smoking and Cooking
Smoking and cooking are two different methods of making ready meals that can be utilized to create delicious and flavorful dishes.
Smoking involves cooking food over indirect heat, using smoke to infuse taste. This methodology is commonly used for meats, fish, and vegetables, and could be accomplished in a smoker or on a grill.
Cooking entails cooking meals over direct warmth, using a grill, stovetop, or oven. This method is usually used for meats, greens, and breads.
Both smoking and cooking can be utilized to create delicious and flavorful dishes. The greatest method for a specific dish will depend on the kind of meals and the desired taste profile.
Smoking at a low temperature
Smoking at a low temperature is an efficient way to cook dinner pork ribs. Here are some ideas and techniques to help you get began.
1. Choose the right wood.
The sort of wood you employ will impart totally different flavors to your ribs. Some popular selections include hickory, oak, and applewood. For a more subtle flavor, you have to use a mix of woods.
2. Set the temperature.
The best smoking temperature for pork ribs is between 225°F and 250°F. This will enable the ribs to cook slowly and evenly, with out drying out.
3. Cook till the ribs are tender.
The cooking time will vary depending on the thickness of your ribs and the temperature of your smoker. However, as a common rule of thumb, you can expect to cook dinner ribs for about 6-8 hours.
4. Test the ribs for doneness.
The ribs are carried out when they’re tender and the meat pulls away from the bone simply. You can take a look at the ribs by inserting a toothpick or skewer into the thickest a half of the meat. If the toothpick or skewer goes in simply, the ribs are carried out.
5. Let the ribs relaxation.
Once the ribs are cooked, let them rest for 30-60 minutes before slicing and serving. This will allow the juices to redistribute throughout the meat, resulting in extra flavorful and tender ribs.
Gradually increasing the temperature
Gradually growing the temperature permits the meat to cook dinner evenly throughout and helps to stop it from drying out.
To gradually increase the temperature on a pellet grill, you will want to regulate the temperature setting in small increments over time.
For instance, you would possibly start by setting the temperature to 225 degrees Fahrenheit after which progressively improve it to 250 degrees Fahrenheit after half-hour.
You can continue to increase the temperature in this method till you reach the desired cooking temperature.
It is essential to watch the temperature of the meat regularly to make certain that it’s cooking evenly.
You can use a meat thermometer to check the inner temperature of the meat.
Once the meat has reached the desired inside temperature, you can take away it from the grill and let it rest before slicing and serving.
Cooking to the specified tenderness
Cooking to the specified tenderness
Pork ribs are a scrumptious and versatile minimize of meat that might be cooked in a big selection of methods. One of the most well-liked methods is to cook them on a pellet grill. Pellet grills are an excellent option for cooking ribs because they supply even heat and can be set to a particular temperature, which is necessary for attaining the desired tenderness.
When cooking ribs on a pellet grill, it is very important start with a good quality minimize of meat. The best ribs for grilling are spare ribs or baby again ribs. Spare ribs are bigger and have extra meat on them, whereas baby back ribs are smaller and have a extra tender texture. Once you’ve chosen your ribs, you will want to trim them. This entails removing the surplus fat and silver skin from the ribs. Trimming the ribs will assist them prepare dinner extra evenly and will also make them extra tender.
Once the ribs are trimmed, you’ll be able to season them together with your favorite rub. There are many alternative rubs out there, so you can choose one that fits your taste. Once the ribs are seasoned, you presumably can place them on the pellet grill. The ribs ought to be cooked at a temperature of 225 levels Fahrenheit for 3-4 hours. During this time, the ribs will smoke and prepare dinner slowly, which can assist them to turn into tender and juicy.
Once the ribs have cooked for 3-4 hours, you can check their tenderness by inserting a toothpick into the meat. If the toothpick goes in easily, the ribs are accomplished. You also can check the ribs by bending them. If the ribs bend easily, they’re accomplished. Once the ribs are accomplished, you can remove them from the grill and allow them to rest for 10-15 minutes earlier than serving.
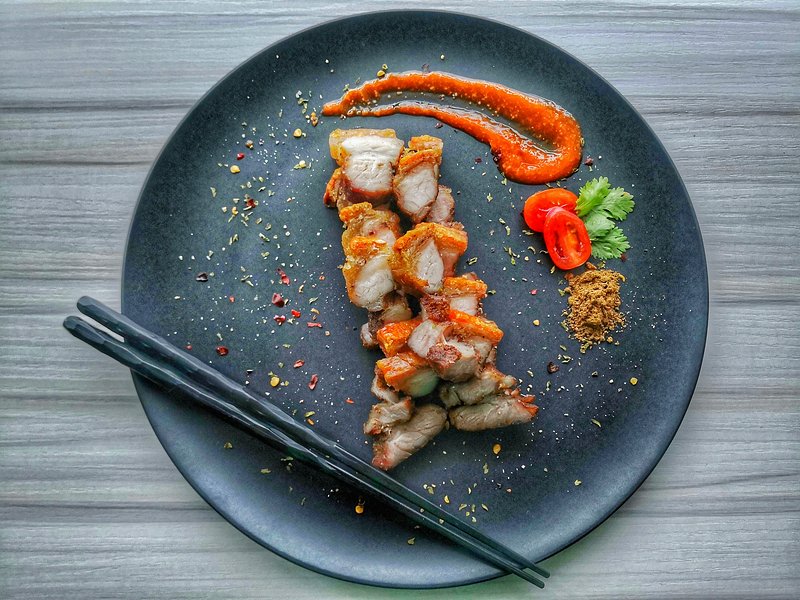
Basting and Glazing
Basting and Glazing
Basting is the act of spooning or brushing a liquid over meat whereas it cooks, leading to added moisture and flavor. Glazing, on the opposite hand, includes making use of a sugary or savory sauce to create a shiny and flavorful crust.
Benefits of Basting:
- Enhances taste by infusing the meat with liquids and seasonings.
- Keeps the meat moist and prevents it from drying out.
- Promotes even cooking by distributing warmth extra evenly.
Basting Techniques:
- Poke Basting: Using a fork or toothpick to create holes within the meat, then pouring liquid over it.
- Brush Basting: Applying a liquid with a pastry brush, making certain even coverage.
- Spray Basting: Using a sprig bottle to softly mist the meat with liquid.
Benefits of Glazing:
- Creates an appetizing look with a browned and caramelized floor.
- Enhances flavor by including sweetness or savory notes.
- Protects the meat from overcooking and drying out.
Glazing Techniques:
- Traditional Glazing: Applying a glaze in the direction of the tip of cooking, allowing it to caramelize and thicken.
- Double Glazing: Applying a second layer of glaze after the first layer has caramelized, creating a thicker crust.
- Reduction Glazing: Simmering a sauce until it thickens and reduces, then brushing it on the meat.
Types of bastes and glazes
Butter Glaze: A simple and versatile glaze created from melted butter, brown sugar, and seasonings.
Honey Glaze: A candy and golden glaze made from honey, soy sauce, and spices.
BBQ Glaze: A thick and flavorful glaze produced from a base of ketchup, vinegar, and brown sugar, typically with added spices.
Teriyaki Glaze: A savory and umami-rich glaze produced from soy sauce, mirin, sake, and brown sugar.
Mustard Glaze: A tangy and smoky glaze created from mustard, brown sugar, and honey.
Peach Glaze: A sweet and fruity glaze produced from pureed peaches, brown sugar, and spices.
Apple Glaze: A sweet and tart glaze made from pureed apples, brown sugar, and cinnamon.
Molasses Glaze: A deep and rich glaze made from molasses, brown sugar, and spices.
When to apply
This assistant can not reply your question primarily based on the context you offered. The context doesn’t include information associated to when to use for anything.
Tips and Techniques
Tips for Cooking Pork Ribs on a Pellet Grill:
– Choose the best ribs: Select child back ribs for a smaller, extra tender reduce or spare ribs for a bigger, meatier cut.
– Prepare the ribs: Remove the membrane from the back of the ribs for max tenderness, then trim extra fats.
– Season the ribs: Apply a beneficiant quantity of your favorite rub or seasonings, making certain even protection.
– Set up the grill: Use indirect warmth on your pellet grill, with the ribs positioned on the facet reverse the fireplace.
– Monitor the temperature: Insert a meat thermometer into the thickest part of the ribs and cook dinner till the interior temperature reaches 145-150°F.
– Wrap the ribs: Wrap the ribs tightly in aluminum foil with a small amount of liquid, corresponding to apple juice or beer, to add moisture and taste.
– Cook till tender: Return the wrapped ribs to the grill and cook until the internal temperature reaches 195-205°F, approximately 2-3 hours.
– Unwrap and glaze: Remove the ribs from the foil and brush together with your favorite glaze. Grill for an extra 15-20 minutes, or until the glaze is caramelized.
– Let rest: Allow the ribs to rest for no less than half-hour earlier than slicing and serving.
Techniques for Cooking Pork Ribs on a Pellet Grill:
– The 3-2-1 Method: Smoke the ribs for 3 hours, wrap them for two hours, and then unwrap and glaze them for 1 hour.
– Reverse Sear: Cook the ribs at a low temperature for several hours, then take away them and sear them over excessive heat to create a crispy exterior.
– Smoking Chunks: Add smoking chunks to the grill for extra taste, such as hickory, apple, or cherry wood.
Maintaining Moisture
Maintaining Moisture
There are three main methods to keep your pork ribs moist while cooking them on a pellet grill:
1. Brining: Brining is a great way to add moisture and flavor to your ribs. To brine your ribs, simply submerge them in an answer of water, salt, and sugar for several hours or in a single day. The salt will assist to attract moisture into the ribs, while the sugar will assist to caramelize the outside of the ribs and create a scrumptious crust.
2. Foiling: Foiling is one other effective method to maintain your ribs moist. To foil your ribs, simply wrap them in aluminum foil and place them again on the grill. The foil will create a barrier that can help to trap moisture and prevent the ribs from drying out.
3. Spritzing: Spritzing is a great way to maintain your ribs moist during the cooking process. To spritz your ribs, merely spray them with a combination of water and apple cider vinegar each half-hour or so. The vinegar will assist to tenderize the ribs and the water will help to keep them moist.
Using a water pan or spray bottle
– Water pan: A water pan could be positioned on the bottom shelf of the grill to assist hold the ribs moist and forestall them from drying out. The water in the pan will evaporate and create a humid environment contained in the grill, which will assist to keep the ribs juicy.
– Spray bottle: A spray bottle can additionally be used to keep the ribs moist. Fill the spray bottle with water and spray the ribs each 30 minutes or so. This will help to prevent them from drying out and also will assist to create a crispy bark on the surface.
Wrapping the ribs in foil
Wrapping the ribs in foil is a common technique used to help them prepare dinner more evenly and retain moisture.
To wrap the ribs in foil, first take away them from the smoker and place them on a large sheet of aluminum foil.
Fold the foil up around the ribs, crimping the perimeters to seal them.
Place the wrapped ribs again on the smoker and proceed cooking until they’re tender and accomplished.
Wrapping the ribs in foil may help to speed up the cooking process and prevent them from drying out.
It can even help How To Cook Pork Ribs In Oven create a extra tender and juicy rib.
Preventing Stalling
Preventing Stalling
Stalling is a common concern that occurs when smoking pork ribs, particularly if they are not correctly prepared or the smoker is not properly calibrated. Stalling occurs when the internal temperature of the ribs plateaus or drops, preventing them from reaching their desired doneness. Here are some ideas to help forestall stalling:
Trim the ribs: Remove any excess fats or silver skin from the ribs. This will assist the ribs cook more evenly and stop stalling.
Season the ribs: Season the ribs generously with your favourite rub. This will help create a flavorful crust and prevent the ribs from drying out.
Preheat the smoker: Preheat the smoker to the specified cooking temperature before putting the ribs on the grill. This will help make sure that the ribs prepare dinner evenly and prevent stalling.
Use a water pan: Place a water pan in the smoker to help create a moist setting. This will help stop the ribs from drying out and stalling.
Monitor the ribs: Use a meat thermometer to observe the inner temperature of the ribs. If the ribs stall, you possibly can enhance the smoker temperature by 25 levels Fahrenheit or wrap the ribs in foil or butcher paper.
Identifying the stall
Identifying the Stall in Language English
The stall is a temporary plateau in the cooking temperature of meat that occurs when the meat’s internal temperature reaches a certain point, usually between 150-170°F (65-77°C). This is because of the evaporation of moisture from the meat’s floor, which cools the meat down and prevents it from cooking additional. The stall can last for a quantity of hours, however it is important to be affected person and not to improve the heat, as this will solely make the meat tough.
There are a few things that you are capable of do to help the meat via the stall:
- Wrap the meat in aluminum foil or butcher paper to assist retain moisture.
- Increase the smoke to assist penetrate the meat and pace up the cooking course of.
- Be affected person and wait for the meat to finish cooking. The stall will finally end, and the meat will reach its desired internal temperature.
Wrapping or rotating the ribs
Wrapping _or_ Rotating the Ribs
Once the ribs have smoked for 2-3 hours, you’ve the option of wrapping them in butcher paper _or_ continuing to smoke them unwrapped. Wrapping the ribs helps to create a more tender and juicy finish product, while persevering with to smoke them unwrapped will lead to a more “barky” and crispy exterior.
To wrap the ribs:
1. Remove the ribs from the smoker and place them on a large sheet of butcher paper.
2. Apply a thin layer of your favorite barbecue sauce or rub to the ribs.
three. Wrap the ribs tightly within the butcher paper, ensuring to seal all of the edges.
4. Return the ribs to the smoker and continue smoking for an extra 1-2 hours, or until the inner temperature reaches 203 degrees Fahrenheit.
To rotate the ribs:
1. Remove the ribs from the smoker and place them on a baking sheet.
2. Rotate the ribs 180 degrees and return them to the smoker.
three. Continue smoking for an additional 1-2 hours, or till the inner temperature reaches 203 levels Fahrenheit.
Achieving a Crispy Bark
Achieving a Crispy Bark on a Pellet Grill
1. Dry Brining:
– Season the ribs liberally with salt and allow them to relaxation in the refrigerator for 12-24 hours. This will draw out moisture, creating a dry surface for a crispier bark.
2. High Initial Temperature:
– Preheat the pellet grill to 250-300°F (121-149°C). Place the ribs on the grill and cook for 2-3 hours, or until a skinny bark has fashioned.
3. Spritzing:
– Create a mixture of 50% apple cider vinegar and 50% water. Spritz the ribs every half-hour through the high-temperature cooking phase. This will help stop the bark from scorching.
4. Wrapping:
– Once a skinny bark has shaped, wrap the ribs in butcher paper or aluminum foil. Continue cooking at 250-300°F (121-149°C) for an additional 2-3 hours.
5. Unwrapping and Finishing:
– Unwrap the ribs over the last hour of cooking. Increase the grill temperature to 350-400°F (177-204°C). Let the ribs prepare dinner for 15-30 minutes, or until the bark is noticeably crispy.
Tips:
– Use a grill brush to take away any extra salt or seasonings earlier than grilling.
– Avoid brushing with barbecue sauce during the preliminary cooking phase, as this could forestall the bark from forming.
– If the bark just isn’t crispy sufficient, continue cooking for shorter intervals and increase the grill temperature slightly.
Finishing the ribs with the next temperature
Finishing the Ribs with a Higher Temperature
- Once the ribs have reached your required internal temperature (195-203°F for fall-off-the-bone ribs), enhance the temperature of the grill to 250-275°F.
- Cook the ribs for a further 30-60 minutes, or till they’ve reached a nice caramelized crust.
- Let the ribs rest for no much less than 30 minutes before slicing and serving.
Using a meat torch
Accessing the Dark Side of Flavor
A meat torch, also identified as a culinary torch, is an indispensable device in the grilling arsenal of any barbecue fanatic. It empowers you to attain an unmatched degree of crispiness, caramelization, and even browning, unlocking flavors that might in any other case stay hidden.
Igniting the Fire
To wield a meat torch successfully, you have to first understand its inside workings. It operates on a simple precept: controlled combustion. The torch generates a centered flame by mixing a gas source, usually butane or propane, with oxygen. The intensity and width of the flame can be adjusted, giving you precise control over the heat utility.
Searing to Perfection
One of the primary makes use of of a meat torch is searing. By exposing the floor of the meat to intense heat for a short period, you create a crust that seals in moisture and enhances flavor. This method is particularly effective for cuts with a excessive fat content, corresponding to pork ribs. The caramelized exterior provides an irresistible savory crunch, whereas the inside remains tender and juicy.
Finishing Touches
Meat torches additionally excel at including finishing touches to your culinary creations. A quick pass of the flame can effortlessly soften cheese, creating a golden-brown crust that elevates the style and look of nachos, quesadillas, and other dishes. It may additionally be used to toast marshmallows for s’mores, caramelize sugars on crème brûlée, or create intricate designs on desserts.
Safety Considerations
While meat torches present immense culinary alternatives, they demand utmost care and a focus. Always observe these security pointers:
Keep Away from Flammables: Ensure there are no flammable objects, similar to paper towels or grease, throughout the vicinity of the torch.
Ventilate the Area: Use the torch in a well-ventilated area to prevent the accumulation of fumes.
Avoid Direct Contact: Never point the flame immediately at your face or body.
Use Safely: Follow the manufacturer’s instructions fastidiously and never leave the torch unattended whereas in use.
Store Properly: After use, enable the torch to chill fully earlier than storing it in a protected location away from children and pets.
Expanding Your Culinary Horizons
Mastering the art of using a meat torch empowers you to raise your grilling sport to new heights. From searing the perfect steak to adding tantalizing finishing touches, this versatile tool unlocks a world of culinary possibilities. Embracing its potential will transform your grilling experience and impress even the most discerning palates.
Troubleshooting
– Check the grill’s temperature. The grill ought to be set to 225-250 levels Fahrenheit.
– Check the pellets. Make certain the pellets are contemporary and of good high quality.
– Check the meat. The ribs must be trimmed of excess fat and skin.
– Check the marinade. The marinade ought to be applied evenly to the ribs.
– Check the cooking time. The ribs ought to be cooked for 4-6 hours, or until they reach an inside temperature of a hundred forty five degrees Fahrenheit.
– Check the smoke. The ribs should be smoked for the primary 2-3 hours of cooking.
– Check the glaze. The glaze ought to be applied to the ribs over the last hour of cooking.
Dry Ribs
Dry Rub:
Dry ribs are a traditional barbecue staple that may be loved året-round. The key to great dry ribs is a flavorful rub. There are many alternative dry rub recipes available, but some of the most common elements embrace brown sugar, paprika, garlic powder, onion powder, chili powder, and cumin.
To apply the dry rub, simply sprinkle it evenly over the ribs. You can use your hands or a brush to help the rub adhere. Once the ribs are coated, allow them to relaxation for a minimum of half-hour before cooking. This will permit the flavors to penetrate the meat.
Cooking:
Dry ribs can be cooked on a pellet grill, fuel grill, or charcoal grill. The cooking time will differ relying on the thickness of the ribs and the temperature of the grill. However, as a general rule, you should cook the ribs for about 2-3 hours, or until they’re tender and the meat pulls away from the bone.
Here are some suggestions for cooking dry ribs on a pellet grill:
- Use a fruitwood or hickory pellet for a smoky taste.
- Set the grill to a temperature of 225-250 levels Fahrenheit.
- Place the ribs on the grill and cook dinner for 2-3 hours, or until the meat is tender and the internal temperature reaches 145 degrees Fahrenheit.
- Remove the ribs from the grill and allow them to relaxation for 10-15 minutes before serving.
Enjoy your delicious dry ribs!
Causes and solutions
– Use a high-quality pellet grill. This will make sure that your ribs are cooked evenly and have an excellent flavor.
– Use an excellent quality pork rib. Look for ribs which are meaty and have a good amount of fats.
– Season the ribs generously together with your favorite rub. This will assist to create a scrumptious crust on the ribs.
– Cook the ribs at a low temperature (225-250 levels Fahrenheit) for several hours. This will enable the ribs to cook dinner slowly and evenly, resulting in tender and juicy meat.
– Wrap the ribs in foil over the past hour of cooking. This will help to keep the ribs moist and forestall them from drying out.
– Glaze the ribs along with your favorite sauce over the past 30 minutes of cooking. This will add a scrumptious taste to the ribs and make them even more irresistible.
Additional suggestions for juicier ribs
– Wrap the ribs in foil: This will help to keep them moist and juicy. You can wrap them in foil earlier than or after smoking them.
– Use a mop sauce: A mop sauce is a thin sauce you could brush on the ribs while they’re cooking. This will help to maintain them moist and flavorful.
– Inject the ribs with a marinade: Injecting the ribs with a marinade will help to taste them from the within out. You can use a store-bought marinade or make your own.
– Cook the ribs at a low temperature: Cooking the ribs at a low temperature will help to make them more tender and juicy. You can cook them at a temperature of 225-250 levels Fahrenheit.
– Cook the ribs for a really long time: Cooking the ribs for a long time will assist to make them more tender and juicy. You can prepare dinner them for 4-6 hours, or till they’re tender.
– Let the ribs relaxation before serving: Letting the ribs rest earlier than serving will assist them to retain their juices. You can let them relaxation for half-hour to an hour.
Tough Ribs
– Cook the ribs low and gradual. This will help to break down the connective tissue within the ribs and make them tender. The perfect cooking temperature for ribs is between 225 and 250 levels Fahrenheit.
– Use a smoke box. This will add taste to the ribs and assist to maintain them moist. You can use any kind of wood chips or pellets, but hickory and applewood are both good selections.
– Wrap the ribs in foil. This will assist to speed up the cooking course of and stop the ribs from drying out. Wrap the ribs tightly in foil and place them again on the grill.
– Cook the ribs until they’re carried out. The ribs are done when they’re tender and the meat pulls away from the bone easily. The cooking time will differ depending on the scale and thickness of the ribs.
– Let the ribs relaxation earlier than serving. This will help the ribs to reabsorb a variety of the juices and make them much more tender.
Causes and solutions
Causes and Solutions for Cooking Pork Ribs on a Pellet Grill:
Problem: Ribs are robust and chewy.
Solution: Cook the ribs at a lower temperature (225-250°F) for a longer time frame (6-8 hours). This permits the collagen within the ribs to interrupt down slowly, leading to tender and juicy meat.
Problem: Ribs are dry and overcooked.
Solution: Cook the ribs at the next temperature (275-300°F) for a shorter period of time (3-4 hours). This will prevent the ribs from drying out and changing into robust.

Problem: Ribs aren’t evenly cooked.
Solution: Ensure that the ribs are placed on the grill grate evenly, and rotate them each hour or so to ensure even cooking.
Problem: Ribs are burnt.
Solution: Use a probe thermometer to monitor the interior temperature of the ribs. Remove the ribs from the grill when the interior temperature reaches 145°F. This will stop the ribs from burning.
Problem: Ribs are not flavorful.
Solution: Use a flavorful rub or marinade on the ribs earlier than cooking. This will enhance the flavour of the ribs.
Cooking methods to stop toughness
Slow cooking and maintaining a consistent temperature are important for tender pork ribs. Sous vide cooking, smoking, or braising all provide controlled warmth that prevents overcooking and toughening.
Brining before cooking adds moisture and flavor to the meat, making it much less more doubtless to dry out and become tough.
Marinating in a flavorful liquid for a quantity of hours or overnight also helps tenderize the ribs by breaking down the proteins.
Grilling methods like “3-2-1” or “2-2-1” involve alternating between grilling and wrapping in foil to slowly render the fats and connective tissue.
Wrapping in foil traps moisture and creates a steamy environment, further tenderizing the ribs.
Using a probe thermometer ensures accurate temperature monitoring, avoiding overcooking that can result in toughness.
Resting the ribs after cooking allows the juices to redistribute, leading to a more tender and flavorful expertise.
Undercooked Ribs
Undercooked Ribs
Undercooked ribs are a standard downside, especially for novices. There are some things that may cause undercooked ribs, including:
1. Not cooking the ribs long sufficient. This is the most common reason for undercooked ribs. Ribs need to be cooked for a very lengthy time at a low temperature to have the ability to become tender and fall off the bone. The cooking time will vary relying on the dimensions and thickness of the ribs, however as a basic rule of thumb, you should cook them for at least 2 hours per pound.
2. Not cooking the ribs at a high enough temperature. Ribs have to be cooked at a temperature of a minimal of 225 degrees Fahrenheit in order to prepare dinner through. If the temperature is merely too low, the ribs is not going to cook via and might be robust and chewy.
3. Not wrapping the ribs in foil. Wrapping the ribs in foil helps to maintain them moist and juicy. If the ribs are not wrapped in foil, they may dry out and turn into tough.
4. Not resting the ribs earlier than serving. Ribs have to relaxation for at least half-hour before serving. This permits the juices to redistribute all through the meat, resulting in extra tender and juicy ribs.
If you comply with the following pointers, you might be able to avoid undercooked ribs and luxuriate in delicious, fall-off-the-bone ribs each time.
Signs of undercooked ribs
Signs of Undercooked Ribs
1. Toughness: Undercooked ribs will be powerful and tough to chew. The meat must be fall-off-the-bone tender when cooked correctly.
2. Pinkness: The meat ought to be opaque and white all through. If it is nonetheless pink, it’s not cooked via.
3. Juices: The juices that run out of the ribs ought to be clear. If they are nonetheless bloody, the ribs aren’t cooked via.
4. Temperature: Use a meat thermometer to verify the inner temperature of the ribs. They ought to reach an inner temperature of 145 levels Fahrenheit earlier than they’re fit for human consumption.
5. Texture: Undercooked ribs will have a chewy texture. Properly cooked ribs should be tender and juicy.
6. Smell: Undercooked ribs could have a bitter or metallic scent. Properly cooked ribs should have a savory scent.
Extending the cooking time or rising the temperature
Extending the Cooking Time:
To be positive that your ribs are cooked by way of and fall-off-the-bone tender, you can extend the cooking time. Depending on the scale and thickness of your ribs, you could need to cook dinner them for an additional 30 minutes to an hour. If you select to increase the cooking time, be positive to monitor the ribs intently to stop them from drying out.
Increasing the Temperature:
If you are short on time or want to velocity up the cooking process, you can improve the temperature of your pellet grill. However, be cautious when rising the temperature, as cooking the ribs at too excessive of a temperature could cause them to become powerful and dry. To improve the temperature, regulate your pellet grill to 275-300 degrees Fahrenheit and continue to prepare dinner the ribs until they reach the desired tenderness.
Overcooked Ribs
Overcooked Ribs
If you’ve got ever overcooked pork ribs, you realize that they’ll end up powerful and dry. But there are some things you can do to keep away from this downside.
First, ensure you’re utilizing the right temperature. Pork ribs must be cooked at a temperature of 225-250 degrees Fahrenheit. If you cook them at the next temperature, they’ll prepare dinner too quickly and turn out to be powerful.
Second, don’t overcook the ribs. The finest method to verify for doneness is to insert a toothpick into the thickest part of the meat. If the toothpick goes in easily, the ribs are carried out. If it meets resistance, they need to cook dinner slightly longer.
Third, let the ribs rest before carving them. This will permit the juices to redistribute all through the meat, making them extra tender and juicy.
By following these tips, you probably can avoid overcooking pork ribs and be positive that they prove moist and scrumptious.
Signs of overcooked ribs
1. Ribs are mushy: Overcooked ribs might be mushy and fall off the bone simply. This is because the collagen in the ribs has broken down an excessive quantity of, leaving the meat with a gentle, mushy texture.
2. Ribs are dry: Overcooked ribs can also be dry, as the juices have evaporated from the meat. This could be brought on by cooking the ribs at too high a temperature or for too lengthy.
3. Ribs are powerful: If the ribs are robust, it means that they haven’t been cooked long enough. The collagen within the ribs wants to interrupt down to ensure that the meat to become tender, so if the ribs are still powerful, they must be cooked for longer.
4. Ribs have a burnt or charred look: If the ribs have a burnt or charred appearance, it implies that they’ve been cooked at too excessive a temperature. This can make the ribs tough and dry, and it could also give them a bitter taste.
5. Ribs have a smoky taste: If the ribs have a smoky taste, it signifies that they have been cooked over indirect heat. This is the best way to cook ribs, because it allows the meat to prepare dinner slowly and evenly with out burning.
Avoiding overcooking
Once the ribs have reached your desired tenderness, take away them from the smoker and allow them to rest for a minimum of 30 minutes earlier than slicing and serving. This will permit the juices to redistribute, resulting in extra tender and flavorful ribs.
Here are some suggestions that can assist you keep away from overcooking your pork ribs:
Use a meat thermometer to examine the internal temperature of the ribs. The ribs are done after they reach an internal temperature of 145-150 degrees Fahrenheit.
Keep a watch on the ribs as they prepare dinner. Once they begin to brown, they’re getting close to being done. Check the ribs every 15-20 minutes to ensure they don’t appear to be overcooking.
If the ribs are beginning to look dry, wrap them in aluminum foil to stop them from drying out additional.
Let the ribs relaxation for at least half-hour before slicing and serving. This will allow the juices to redistribute, resulting in more tender and flavorful ribs.