
A Step-by-Step Guide To Making Floating Islands At Home
Gathering Ingredients and Equipment
Gathering Ingredients and Equipment:
Before embarking on your floating island adventure, guarantee you’ve all the necessary ingredients and equipment readily available. This will streamline the process and forestall any mid-recipe scrambling.
Equipment:
Large saucepan: For gently simmering the custard.
Whisk: For whipping the egg whites to stiff peaks.
Mixing bowls (at least two): One for the custard, one for the egg whites.
Slotted spoon or spatula: For gently inserting the meringue islands into the custard.
Small saucepan or double boiler (optional): For melting the butter within the caramel sauce (if using).
Baking sheet or plate: For resting the finished dessert.
Blender (optional): For a brilliant clean custard.
Essential Ingredients:
Eggs: High-quality, fresh eggs are crucial. The yolks will contribute richness to the custard, and the whites will create light and airy meringue islands. Separate the eggs fastidiously to avoid any yolk contamination within the egg whites, as this can hinder the whipping course of. Aim for 6-8 massive eggs relying on the dimensions of your dessert.
Milk: Whole milk is most well-liked for its richness and creaminess. It adds a luxurious mouthfeel to the custard. You also can experiment with half-and-half or cream for an even richer custard. Approximately 2 cups are typically used.
Sugar: Granulated sugar is utilized in two parts: one to sweeten the custard and one other to whip the egg whites into stiff peaks. The quantity is decided by your most popular sweetness stage, typically ranging from ¾ cup to 1 cup complete.
Vanilla Extract: A teaspoon or two provides a heat, delicate flavor that complements the richness of the custard. Pure vanilla extract is really helpful for the most effective taste.
Salt: A pinch of salt enhances the sweetness of the custard and balances the flavors. It also helps stabilize the egg whites when whipping.
Optional Ingredients: For added complexity and flavor, you can embrace:
Caramel Sauce: A classic pairing, adding a wealthy and candy counterpoint to the delicate custard and meringue.
Chocolate shavings or cocoa powder: For a decadent touch.
Lemon zest or other flavorings: To add a unique twist.
Remember to check your pantry and refrigerator before you begin to ensure you have all the mandatory elements available. This will make the cooking course of smoother and more pleasant.
Proper ingredient preparation, similar to separating the eggs rigorously and measuring elements precisely, will directly influence the ultimate outcome. Take your time with these initial steps for greatest outcomes.
Before embarking in your floating island adventure, meticulously gather all necessary elements and gear. This preparation will guarantee a smooth and profitable cooking experience.
Begin with the components: you will need an excellent high quality vanilla extract, a beneficiant amount of granulated sugar, a selection of massive, fresh eggs, separating the yolks from the whites carefully, complete milk, and a pinch of salt.
For the custard base, you would possibly go for heavy cream or crème anglaise, depending in your preferred texture and richness. Don’t overlook a touch of vanilla extract or other flavoring to raise the dessert.
Now, let’s tackle the tools. Having the proper tools is crucial. You will completely want a number of mixing bowls – at least three, preferably stainless-steel or glass for optimal whipping.
A whisk is crucial for incorporating air into the egg whites, creating that light and ethereal meringue essential for floating islands. A hand mixer or stand mixer can significantly pace up the whisking course of, however a robust arm and a great whisk will suffice for these who favor a more hands-on approach.
A giant saucepan is critical for making the custard; its dimension ought to be appropriate for the amount of custard you propose to prepare. A thermometer is recommended to make sure correct temperature control during custard preparation, preventing overcooking or undercooking.
For creating the right floating islands, a fine-mesh sieve could be helpful to pressure the custard, removing any lumps or imperfections. A slotted spoon or spider is good for gently inserting the meringue islands into the simmering custard.
You’ll additionally want serving dishes. Small ramekins or particular person dessert bowls are lovely for presentation. And don’t forget serving spoons for portioning out your culinary creation.
Optional equipment but highly beneficial consists of parchment paper for easier dealing with of the meringue and a rubber spatula for scraping down the edges of bowls whereas mixing. A pastry bag or ziplock bag with a nook snipped off can present extra control when piping the meringue.
Finally, consider a cooling rack to permit the finished floating islands to cool to room temperature, preventing condensation.
Thorough preparation with the correct components and equipment will make the process significantly simpler and enhance the ultimate end result, leaving you with pleasant, light, and airy floating islands.
Preparing the Meringue
Begin with impeccably clean, grease-free equipment. Even a tiny speck of yolk can forestall your egg whites from whipping correctly.
Separate your eggs fastidiously, making certain no yolk contaminates the whites. It’s simpler to do that over a separate bowl, permitting you to catch any stray yolk.
Add a pinch of cream of tartar or lemon juice to the egg whites. This acts as a stabilizer, helping to create a firmer, extra steady meringue.
Begin whipping the egg whites on a low speed with an electric mixer. This incorporates air progressively and prevents the whites from splashing.
As the whites start to foam, gradually improve the speed of the mixer to medium.
Continue whipping on medium velocity until soft peaks type. Soft peaks will droop slightly whenever you lift the whisk.
Once soft peaks form, gradually add granulated sugar, one tablespoon at a time, ensuring each addition is absolutely included before including extra.
Increase the mixer velocity to excessive and continue whipping until stiff, glossy peaks kind. Stiff peaks maintain their form with out drooping when the whisk is lifted.
The meringue ought to be clean, shiny, and have a firm consistency. It ought to be in a position to maintain its form without collapsing.
Be careful not to overwhip the meringue, as this could lead to dryness and a grainy texture.
Once the meringue reaches stiff, glossy peaks, instantly use it. Over-whipped meringue will lose its quantity and turn out to be difficult to work with.
If you have to pause for a moment, cover the bowl loosely with plastic wrap to prevent the meringue from drying out.
The success of your Floating Islands hinges upon the right whipping of your egg whites. Take your time, be patient, and watch the transformation from liquid to a light and airy marvel.
The texture ought to be gentle and airy, not dense or heavy. A correctly whipped meringue shall be cloud-like and simply spoonable.
Room temperature egg whites whip up extra simply and obtain larger quantity than chilly egg whites.
If using a stand mixer, use the whisk attachment for optimal outcomes. For a hand mixer, be positive to use a high-quality mixer with robust beaters.
Avoid adding any fat to the egg whites, as this will hinder their capability to whip correctly.
Remember, follow makes good. The extra you make meringues, the better you’ll turn out to be at judging the consistency and reaching the right peak.
Once the meringue is ready, proceed fastidiously to the next stage of your Floating Islands recipe, gently incorporating the meringue into your chosen custard base.
Begin with impeccably clear, grease-free equipment. Any trace of fats will forestall the egg whites from whipping correctly.
Separate your eggs carefully, ensuring no yolk contaminates the whites. Even a tiny speck of yolk can hinder the meringue’s volume.
Place the egg whites in a scrupulously clean, preferably chrome steel, bowl. The bowl ought to be massive enough to permit for ample whipping quantity.
Using a stand mixer or hand mixer, start whipping the egg whites on a low pace. This gently incorporates air into the whites with out splattering.
As the whites start to foam, steadily improve the velocity to medium. Observe the texture; they should be frothy and barely opaque.
Once the whites are frothy, begin including the granulated sugar, one tablespoon at a time. Do not rush this course of.
Continue whipping on medium speed, guaranteeing each addition of sugar is absolutely incorporated before adding more. The meringue ought to turn into progressively stiffer.
The crucial element is gradual addition of sugar. This allows the sugar crystals to dissolve fully, resulting in a glossy, easy, and steady meringue.
Adding sugar too shortly can result in a grainy or crystalline meringue that is much less steady and prone to weeping.
As the sugar dissolves, the meringue will gradually turn into stiffer and glossier. Soft peaks will type, then stiff peaks.
You’ll know the meringue is ready when stiff, glossy peaks form and maintain their shape when the beaters are lifted.
A well-made meringue might be stiff sufficient to hold its form but nonetheless barely malleable, not dry or brittle.
Avoid over-whipping. Over-whipping may end up in a dry, crumbly meringue which is undesirable for floating islands.
Once the meringue reaches the specified consistency, instantly proceed to the next step in your recipe. Do not let the meringue sit for prolonged periods.
The texture of the final meringue must be easy, shiny, and cloud-like; it ought to hold its shape with out being overly stiff or brittle.
If utilizing a stand mixer, make positive the bowl is securely connected and that the mixer is on a stable floor.
For hand mixing, guarantee you are utilizing a clear and powerful whisk. This is a labour-intensive technique, but efficient.
Remember, persistence and a steady hand are crucial for reaching an ideal meringue. Gradual sugar addition is vital to its success.
Properly made meringue is the muse for pleasant floating islands, ensuring a light and ethereal texture.
The outcome must be a visually stunning and deliciously light dessert component, able to be gently poached.
Making perfect floating islands hinges on mastering the meringue, particularly reaching those elusive stiff peaks.
Begin with impeccably clear, dry gear. Even a hint of fats or moisture can prevent correct whipping.
Use room temperature egg whites. Cold egg whites whip less successfully, and heat ones might not hold their quantity.
Separate your eggs carefully, ensuring no yolk contaminates the whites. A single yolk droplet is sufficient to damage the meringue.
Add a pinch of cream of tartar or lemon juice to the egg whites. This stabilizes the proteins, resulting in a firmer, more steady meringue.
Begin whipping with a hand mixer or stand mixer on a low speed, progressively rising the velocity because the whites turn into frothy.
As the whites start to thicken, you may discover soft peaks forming whenever you raise the beaters. This is a good sign, but you’re not there but.
Continue whipping, rising the velocity to medium-high. The whites will turn into shiny and much more voluminous.
The key to stiff peaks is persistence. Keep whipping until the meringue holds its form. This means whenever you raise the beaters, the peaks stand tall and hold their form without drooping considerably.
A properly whipped meringue should be stiff sufficient to carry its kind and have a glossy sheen. It shouldn’t be dry or crumbly.
Test for stiff peaks by lifting the beaters and turning them the incorrect means up. The meringue should retain its form and not slide off the beaters.
Once you obtain stiff peaks, keep away from over-whipping. Over-whipping can make the meringue dry and grainy.
If you are making floating islands, fastidiously fold the meringue into your custard base, gently but totally making certain it is evenly combined.
Immediately place your floating islands within the oven to bake, guaranteeing the meringue stays mild and fluffy.
Here’s a abstract of key steps:
- Use clear, dry equipment.
- Use room-temperature egg whites.
- Add cream of tartar or lemon juice.
- Whip on low speed, gradually growing to medium-high.
- Whip until stiff peaks kind and maintain their shape.
- Avoid over-whipping.
Following these steps will make sure you create a flawless meringue, the foundation for perfectly gentle and ethereal floating islands.
Baking the Meringues
Begin by ensuring your mixing bowls and utensils are impeccably clean and free from any grease, as even a trace of fat can prevent the egg whites from whipping properly.
Separate your eggs rigorously, making certain no yolk contaminates the whites. A single speck of yolk can hinder the meringue’s capacity to achieve stiff peaks.
Once separated, place the egg whites in a clear, dry bowl. The bowl should be massive sufficient to permit for ample whipping house.
Before starting to whip, allow the egg whites to return to room temperature. Cold egg whites won’t whip as effectively, resulting in a much less secure meringue.
Start whipping the egg whites on low pace with an electric mixer, steadily increasing the pace because the whites start to foam. This gentle start incorporates air extra successfully.
As the egg whites thicken, steadily add the granulated sugar, one tablespoon at a time. Do not add it all at once, as this can hinder the quantity of the meringue.
Continue whipping till stiff, glossy peaks form. The meringue ought to be thick enough to carry its form when the beaters are lifted. Over-whipping may end up in a dry, crumbly meringue.
Preheat your oven to a low temperature, typically round 200°F (93°C). A low temperature is crucial for gently drying the meringues without browning them.
Line a baking sheet with parchment paper. This prevents sticking and makes cleanup much easier.
For floating islands, use a spoon or piping bag to gently dollop mounds of meringue onto the ready baking sheet, leaving ample house between every one.
For a extra rustic look, you’ll be able to simply drop spoonfuls of meringue onto the baking sheet. For a extra refined presentation, use a piping bag with a spherical tip for even-sized meringues.
Bake the meringues for about 1-1.5 hours, or till they are dry and firm to the contact. Avoid opening the oven door regularly, as this will cause the meringues to break down.
Once baked, flip off the oven and depart the meringues inside with the door barely ajar to chill steadily. This sluggish cooling course of helps stop cracking.
After the meringues have fully cooled, fastidiously peel them from the parchment paper. They must be crisp and have a fragile, ethereal texture.
Store the cooled meringues in an airtight container at room temperature to maintain their crispness. They can be saved for several days if saved correctly.
Consider using a silicone baking mat as an alternative of parchment paper for even simpler cleanup and removal of the delicate meringues.
Experiment with including flavorings to your meringue batter, such as vanilla extract, almond extract, or cocoa powder for a personalized treat.
Remember, patience is vital when making meringues. Take your time with the whipping course of and baking time for optimum outcomes.
The success of your meringues lies in the precision of the method and the eye to detail throughout the entire process. Happy baking!
First, put together your meringue. This includes whipping egg whites until stiff peaks form, gradually adding sugar to attain a shiny, secure consistency.
The key to successful meringues is making certain your bowl and whisk are completely clear and free from any grease; even a hint of fat can forestall the whites from whipping correctly.
Begin whipping the egg whites on medium velocity, gradually growing to high as they start to foam. Once soft peaks form, start including the sugar, a tablespoon at a time, ensuring every addition is fully incorporated before including extra.
Continue whipping till stiff, glossy peaks form. The meringue ought to be agency enough to hold its shape when you raise the whisk.
For piping, switch the meringue to a piping bag fitted with a desired tip. A round tip (e.g., Wilton 1A) works properly for traditional floating islands, producing easy, dome-shaped meringues.
Pipe the meringue onto a baking sheet lined with parchment paper. Keep the mounds small and evenly sized for consistent cooking.
Alternatively, for shaping by hand, use two spoons to rigorously dollop spoonfuls of meringue onto the ready baking sheet. Aim for consistent configurations and dimensions.
Leave some area between each meringue to permit for enlargement during baking. Overcrowding can lead to uneven baking and sticking.
Once formed, create a slight indentation on the top of every meringue using the again of a spoon. This helps create a barely concave shape, excellent for holding the custard later.
For a country look, you’ll have the ability to depart the meringues un-piped and easily drop spoonfuls onto the baking sheet. This will lead to a more uneven texture.
Before baking, preheat your oven to a low temperature (around 200°F or 95°C). A low temperature ensures the meringues dry out gently, stopping cracking and making certain a delicate texture.
Bake the meringues for a long period – typically 1-2 hours or till they are dry and agency to the contact. The time will rely on your oven and the scale of your meringues.
Avoid opening the oven door during baking to take care of a stable temperature. Opening the door may cause the meringues to collapse.
Once baked, turn off the oven and depart the meringues inside with the door barely ajar to chill progressively. This prevents sudden temperature adjustments that can trigger cracking.
Once fully cool, carefully remove the meringues from the baking sheet. They should be crisp and dry on the skin, with a slightly chewy inside.
Handle the meringues gently to avoid breaking them. They are delicate after baking.
Store the baked meringues in an hermetic container at room temperature until ready to assemble your floating islands.
- Use recent, high-quality eggs.
- Ensure your tools is clear and grease-free.
- Whip the egg whites till stiff, glossy peaks kind.
- Pipe or spoon the meringue onto a parchment-lined baking sheet.
- Bake at a low temperature for a long period.
- Let the meringues cool progressively in the oven.
- Store in an hermetic container.
Creating excellent meringues for floating islands requires precision and endurance. The secret is a slow and regular bake that enables the whites to set gently without browning excessively.
Begin by guaranteeing your egg whites are at room temperature. This helps them whip to a stiffer, extra steady peak. Any hint of yolk will inhibit the whipping process, so separate them rigorously.
Whip the whites with a stand mixer or hand mixer till delicate peaks kind. Gradually add granulated sugar, continuing to whip until stiff, glossy peaks are achieved. The mixture must be thick and maintain its form.
Preheat your oven to a low temperature, sometimes between 200°F (93°C) and 250°F (121°C). A lower temperature is crucial; a high temperature will trigger the meringues to brown too shortly and crack.
Pipe or spoon the meringue mixture onto a baking sheet lined with parchment paper. Make small mounds, about 1-2 inches in diameter for floating islands. Leave some house between each mound to allow for enlargement.
The baking time will range relying on the dimensions of your meringues and your oven, however count on it to take anywhere from forty five minutes to an hour and a half. Check them regularly after the first hour.
The meringues are accomplished when they’re dry to the contact and maintain their shape firmly. They must be matte white or very lightly golden, and never browned across the edges. If they start to brown an extreme amount of, reduce the oven temperature barely.
Once baked, turn off the oven and depart the meringues inside with the door slightly ajar to permit them to cool slowly and completely. This gradual cooling prevents cracking.
After cooling, gently switch the meringues to a wire rack to chill completely. Handle them fastidiously as they are delicate at this stage.
For floating islands, rigorously nestle the cooled meringues right into a pool of warm crème anglaise or custard. The distinction of the crisp meringue and the creamy custard is what makes this dessert so interesting.
Remember, consistency is essential. The temperature and baking time are crucial factors influencing the feel and look of your meringues. Don’t rush the process; endurance yields good floating islands.
Experiment with completely different oven temperatures and baking instances to search out what works best for your oven. Taking notes on your results will help you refine your technique for future batches.
Using a thermometer to monitor your oven temperature is very beneficial, making certain accuracy and consistency in baking.
With slightly follow, you’ll find a way to produce flawless meringues for pleasant floating islands every time. Enjoy the method and the scrumptious results!
Making the Crème Anglaise
Begin by combining the milk and cream in a heavy-bottomed saucepan. A saucepan with a thick base ensures even heating and prevents scorching.
The amount of milk and cream will depend in your recipe; a typical ratio might be equal parts, however some recipes favor a higher proportion of cream for richness.
Place the saucepan over medium-low heat. High heat will trigger the milk to scald and probably burn, ruining your custard base.
Stir the combination gently and frequently to forestall sticking and ensure even heating. A whisk or a wood spoon works properly.
Watch for indicators of warmth. The combination should gradually warmth, not boil rapidly. You can use a thermometer to watch the temperature, aiming for round 170-180°F (77-82°C) for a crème anglaise.
Avoid letting the mixture boil. Boiling will create a grainy texture in your custard. The objective is a delicate simmer, not a rolling boil.
As the combination warms, you may discover the steam rising. This signifies the warmth is transferring successfully.
Be attentive to the sides and backside of the pan. Any residue accumulating there must be gently stirred into the main combination.
Continue stirring until the mixture is heat to the contact, and feels slightly thickened. This should not take longer than 10-15 minutes, but timing depends on the amount and heat.
Once the desired temperature is reached, instantly remove the saucepan from the warmth. This prevents additional cooking and potential scorching.
The heat of the pan will continue to cook the mixture barely even after removal from the heat; that is important for achieving the proper texture.
If using a thermometer, ensure to remove the saucepan before the temperature significantly exceeds the goal range to keep away from overcooking.
The heated milk and cream are actually prepared for the next step in making your crème anglaise, such as including egg yolks and sugar.
Remember, patience and delicate handling are essential in this stage to forestall burning and to make sure a clean, creamy custard.
The texture should be clean and velvety, without any lumps or grains. If lumps seem, whisk vigorously until they disappear.
Properly heating the milk and cream varieties the inspiration of a successful crème anglaise and, consequently, scrumptious floating islands.
Always use good high quality milk and cream for the most effective taste and texture in your last dessert.
Different recipes may name for variations in the heating course of, similar to including sugar at this stage or infusing the milk with vanilla beans. Adjust in accordance with your chosen recipe.
The heated milk and cream combination ought to be used promptly within the subsequent levels of crème anglaise preparation to make sure one of the best results.
This is the primary crucial step in creating a luscious crème anglaise, the inspiration of our floating islands.
Begin by separating your eggs carefully; ensure no trace of egg white contaminates the yolks, as this can lead to a grainy texture.
You’ll need a medium-sized bowl; stainless steel or glass are best selections, as they conduct heat evenly and are straightforward to scrub.
Place the egg yolks into this bowl. The number of yolks will rely on your recipe, but typically, two to 4 giant yolks will suffice for a average amount of crème anglaise.
Add the granulated sugar to the egg yolks. The ratio of sugar to yolks is often around 1:1 by weight (e.g., one hundred grams of sugar to one hundred grams of egg yolks). However, this could range relying on your taste choice; some recipes name for more or less sugar.
The quality of your sugar matters. Fine granulated sugar will dissolve extra simply, guaranteeing a smoother last product.
Now comes the whisking. This is the place persistence and approach are key. Using a whisk (a balloon whisk is ideal), begin whisking the egg yolks and sugar vigorously.
The aim is to create a pale, thick, and ribbon-like emulsion. The mixture should enhance considerably in quantity and become lighter in shade.
Your whisking should be consistent and energetic. Don’t rush; take your time to totally incorporate the sugar into the yolks. This process normally takes 5-7 minutes, depending on the quantity and the vigor of your whisking.
As you whisk, you will discover the combination gradually lighten and thicken. It should coat the again of the whisk; if you lift the whisk, the mixture should depart a visual trail that slowly flows again into the rest of the combination. This is the ribbon stage, indicating that the sugar has dissolved utterly and the yolks are properly emulsified.
If you carry the whisk and the mixture falls back in a thick ribbon, you’ve achieved the desired consistency. If it’s too skinny, proceed whisking. If it is too thick, you would possibly have over-whisked.
The success of your crème anglaise hinges on this step. A properly whisked egg yolk combination will create a easy, luxurious base in your Floating Islands. An improperly whisked mixture may end in a lumpy or grainy custard.
Once the ribbon stage is reached, set the mixture apart, prepared for the next step – gently heating the cream.
- Use a great quality whisk.
- Whisk until the mixture is pale and thick.
- Ensure that the sugar is absolutely dissolved.
- The mixture should depart a path when lifted on the whisk.
- Be patient, it takes time to attain the right consistency.
Begin by warming the milk. In a saucepan over medium-low warmth, gently warmth the milk until it is simply simmering – you want it heat, not boiling.
While the milk warms, prepare your egg yolks and sugar. In a separate bowl, whisk collectively the egg yolks and granulated sugar till the combination is pale, thick, and ribbons form if you carry the whisk.
Temper the eggs. Slowly drizzle a small quantity of the good and cozy milk into the egg yolk mixture, whisking constantly to stop the eggs from scrambling. This steadily raises the temperature of the eggs, preventing them from curdling when added to the hot milk.
Combine the mixtures. Once the tempered egg combination is slightly warmed, pour it into the saucepan with the remaining warm milk. Stir gently however constantly to ensure the custard does not stick with the underside or burn.
Cook the custard. Continue to prepare dinner over low warmth, stirring continually with a picket spoon or spatula, till the custard thickens enough to coat the back of the spoon. This usually takes about 5-7 minutes, however be patient; dashing this process risks curdling.
Check for doneness. To take a look at for doneness, run a finger throughout the back of the spoon; if the custard leaves a clean path, it is prepared. Alternatively, you’ll be able to check the temperature with a thermometer; the custard ought to reach 170°F (77°C).
Strain the custard (optional). For a smoother, lump-free crème anglaise, pressure the custard through a fine-mesh sieve into a clean bowl. This removes any cooked egg bits.
Cool the custard. Immediately place the bowl of custard in an ice tub (a bowl of ice water) to stop the cooking process and rapidly cool the custard. Stir sometimes to assist it cool evenly and stop a pores and skin from forming.
Add flavorings (optional). Once cooled, you can add flavorings like vanilla extract, lemon zest, or other extracts to your liking. Stir gently to incorporate.
Cover and refrigerate. Once the custard has reached room temperature, cover it with plastic wrap, urgent the plastic instantly onto the floor of the custard to stop a skin from forming. Refrigerate for no less than 2 hours, or ideally in a single day, to permit the flavors to meld and the custard to totally chill before utilizing in your Floating Islands.
Important Note: Do not boil the custard. Boiling will trigger it to curdle and turn into grainy. Low and gradual warmth, fixed stirring, and careful tempering are key to a smooth and creamy crème anglaise.
First, prepare your elements. You’ll want high-quality entire milk, egg yolks, granulated sugar, and vanilla extract. Ensure your eggs are fresh for optimal results.
In a medium saucepan, mix the milk and half of the sugar. Gently heat over medium-low warmth, stirring sometimes, until the sugar dissolves fully and the mixture is just simmering – don’t let it boil.
In a separate bowl, whisk the egg yolks and remaining sugar collectively till pale and thick. This step is crucial for emulsification and creating a easy, creamy custard.
Temper the egg yolks by slowly whisking a small quantity of the good and cozy milk into the egg yolk mixture. This prevents the yolks from curdling when added to the recent milk.
Gradually pour the tempered egg yolk combination into the saucepan with the remaining milk, whisking repeatedly to prevent lumps. Continue to whisk as the combination heats gently.
Cook the custard over low heat, stirring constantly with a picket spoon or spatula, till it thickens sufficient to coat the again of the spoon. This often takes several minutes and requires patience and constant stirring.
Remove the custard from the warmth instantly as quickly as it reaches the desired consistency. Overcooking will lead to a grainy texture.
Stir within the vanilla extract. The aromatic vanilla will enhance the overall taste profile of the crème anglaise.
Strain the custard via a fine-mesh sieve right into a clear bowl to take away any lumps or cooked egg bits. This step ensures a wonderfully smooth texture.
Immediately pour the strained custard into a shallow, wide container. This permits for quicker cooling and prevents pores and skin formation.
Press a sheet of plastic wrap directly onto the surface of the custard to forestall a pores and skin from forming. This ensures a smooth and shiny end.
Refrigerate the custard for no less than 2-3 hours, or ideally overnight, to allow it to fully chill and set. The longer it chills, the richer the flavour turns into.
Once chilled, the crème anglaise should have a thick, creamy consistency, excellent for use in desserts like Floating Islands. It might be barely pourable however maintain its form.
Before serving, gently whisk the chilled crème anglaise to ensure a easy consistency. Any slight separation that may have occurred during chilling will be simply remedied.
- Important Note: Constantly monitor the custard while cooking to stop scorching. Low and gradual is essential for a easy, lump-free end result.
- Tip: Using a double boiler can help to stop scorching because the custard cooks extra gently.
- Variation: For a richer custard, use heavy cream as an alternative of a few of the milk.
The completely cooled and smooth crème anglaise is now prepared for use as the base for your delectable Floating Islands.
Assembling the Floating Islands
First, let’s sort out the delicate task of assembling the floating islands themselves.
1. Begin by separating six large eggs, guaranteeing no yolk contaminates the whites. Place the whites in a scrupulously clean, grease-free bowl.
2. Using an electric mixer, beat the egg whites on medium speed until gentle peaks type. Gradually add 1/4 cup of granulated sugar, persevering with to beat till stiff, shiny peaks are achieved. This course of requires patience and cautious consideration to avoid over-beating.
3. In a separate bowl, gently whisk together two large egg yolks with 1/4 cup of granulated sugar until pale and thick. This will create the custard base that provides richness and taste to the islands.
4. Carefully fold a generous spoonful of the egg yolk combination into the whipped egg whites to lighten them. Gently fold in the rest, being certain not to deflate the egg whites. The combination should retain its ethereal texture.
5. Spoon the meringue mixture into six small, even mounds onto a parchment-lined baking sheet. For a extra dramatic effect, you can pipe the meringue utilizing a pastry bag and a large spherical tip.
6. Preheat your oven to 300°F (150°C). Bake for 25-30 minutes, or till the islands are lightly golden and agency to the touch. Resist the urge to open the oven door too frequently throughout baking.
7. Once baked, allow the islands to chill completely on a wire rack before dealing with. This prevents them from crumbling.
Now, let’s put together the luscious serving bowls:
1. For the basic crème anglaise, combine 2 cups of heavy cream, 1/2 cup of granulated sugar, and 1/4 cup of milk in a medium saucepan.
2. Heat the combination over medium warmth, stirring continually, till the sugar dissolves completely. Do not enable the combination to boil.
3. In a separate bowl, whisk collectively 2 massive egg yolks. Temper the yolks by slowly whisking in a small amount of the warm cream combination. This prevents the eggs from scrambling.
4. Gradually pour the tempered egg yolk mixture into the saucepan with the remaining cream combination, stirring repeatedly. Cook over low warmth, stirring constantly, till the custard thickens enough to coat the again of a spoon. This takes about 3-5 minutes. Be cautious not to overheat or the custard will curdle.
5. Remove from heat and strain the custard through a fine-mesh sieve right into a bowl. This removes any lumps and ensures a clean, silky texture.
6. Allow the custard to cool slightly earlier than utilizing. Stir in 1 teaspoon of vanilla extract for an added touch of flavor.
7. Pour the crème anglaise into individual serving bowls, or a larger bowl if desired.
8. Gently place the cooled floating islands atop the crème anglaise.
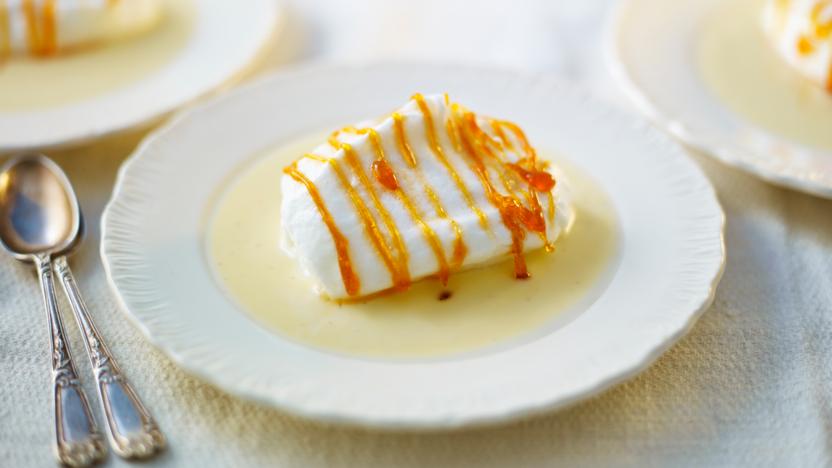
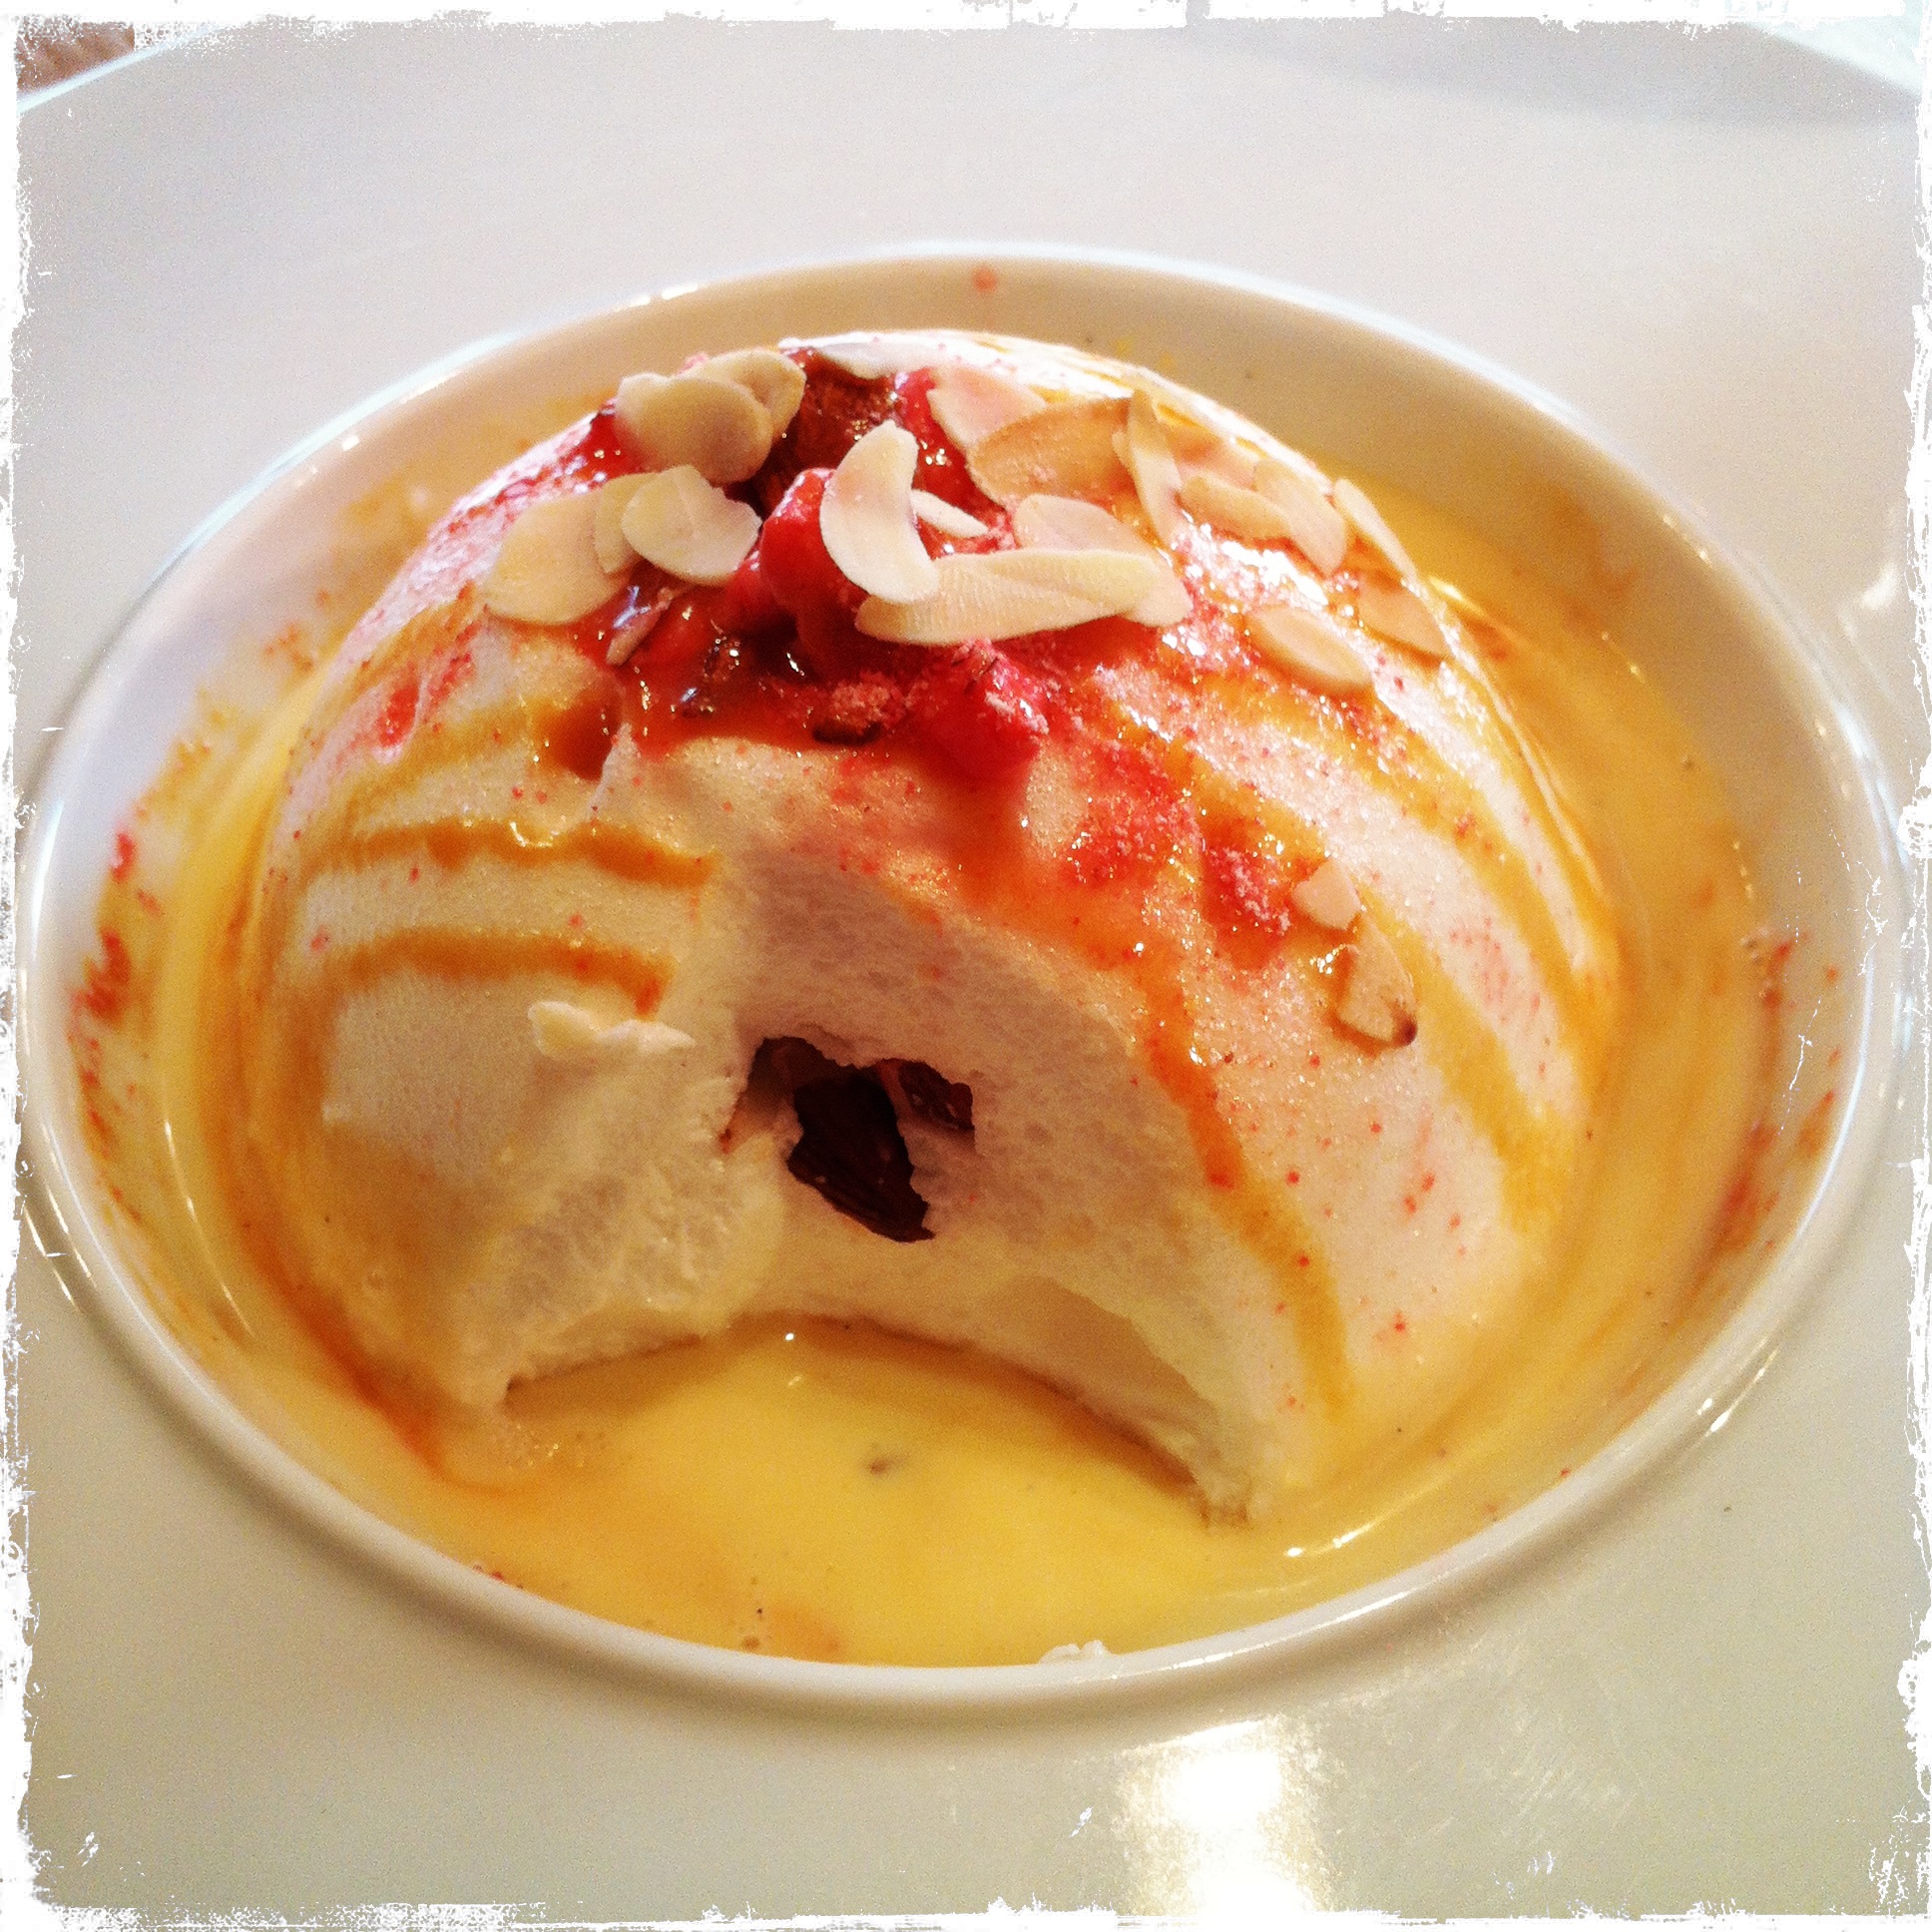
9. For an additional touch of elegance, you can dust the islands with powdered sugar or drizzle with a caramel sauce before serving.
Enjoy your beautiful homemade floating islands!
First, you will want to organize your meringue islands. Begin by separating six large egg whites from their yolks, guaranteeing no yolk contaminates the whites.
Beat the egg whites with an electric mixer till gentle peaks kind. Gradually add 1 cup of granulated sugar, beating constantly until stiff, glossy peaks type. This will take a number of minutes.
Preheat your oven to 300°F (150°C). Line a baking sheet with parchment paper.
Using a spoon or piping bag, create small mounds of meringue onto the prepared baking sheet, leaving ample space between every island.
Bake for 1 hour to 1 hour and 15 minutes, or till the meringues are dry and crisp on the outside but still slightly soft inside. Avoid over-baking, as this may end up in brittle islands.
Once baked, flip off the oven and depart the meringue islands inside with the door slightly ajar to chill fully. This sluggish cooling process helps stop cracking.
While the meringues are baking and cooling, put together the crème anglaise. In a medium saucepan, whisk collectively 2 cups of entire milk, half cup of granulated sugar, and a pinch of salt.
In a separate bowl, whisk together four massive egg yolks. Slowly temper the egg yolks by whisking in a small amount of the recent milk mixture, then progressively whisk the tempered yolks into the remaining milk combination.
Cook the custard over medium-low warmth, stirring continually with a picket spoon or spatula, until the combination thickens sufficient to coat the again of the spoon. This will take about 5-7 minutes. Do not boil.
Remove the custard from the heat and strain it via a fine-mesh sieve into a bowl to remove any lumps.
Press a chunk of plastic wrap immediately onto the floor of the custard to prevent a pores and skin from forming.
Allow the crème anglaise to chill completely, both at room temperature or by inserting the bowl in an ice bath.
Once both the meringue islands and the crème anglaise are fully cooled, you are able to assemble.
Carefully spoon or pipe the crème anglaise into individual serving dishes or bowls.
Gently place a meringue island on prime of every serving of crème anglaise.
You can garnish with contemporary berries, chocolate shavings, or a sprinkle of powdered sugar, if desired.
Serve immediately and revel in your do-it-yourself floating islands!
Tips for Success:
- Use contemporary, high-quality eggs for the most effective outcomes.
- Make sure your mixing bowls and beaters are utterly clear and grease-free earlier than whipping the egg whites.
- Don’t over-bake the meringues. They ought to be dry however not hard.
- Be patient and let the crème anglaise cool fully before assembling.
- Experiment with different flavorings in your crème anglaise, corresponding to vanilla extract, lemon zest, or a touch of espresso.
First, you’ll want to assemble your components: high-quality eggs, separated fastidiously, granulated sugar, and a pinch of cream of tartar.
Begin by preheating your oven to 300°F (150°C). This mild warmth is essential for creating completely set islands.
In a scrupulously clean, grease-free bowl, beat the egg whites till soft peaks form. This requires endurance and a gradual hand; a stand mixer may be invaluable here.
Gradually add the granulated sugar, a tablespoon at a time, continuing to beat until stiff, shiny peaks form. The combination ought to be thick sufficient to hold its shape if you lift the beaters.
Carefully fold within the cream of tartar; this helps stabilize the egg whites.
Spoon the meringue mixture right into a piping bag fitted with a big spherical tip (or use a spoon for a more rustic look). Pipe or spoon mounds of meringue onto a baking sheet lined with parchment paper, leaving ample house between every island.
Bake for 30-40 minutes, or till the meringues are firm and lightly golden. Resist the urge to open the oven door too early; this can cause the islands to collapse.
While the meringues are baking, put together your custard sauce. This sometimes includes whisking collectively egg yolks, sugar, and milk or cream, then gently cooking it over low warmth till thickened. Different recipes exist, and experimentation is encouraged!
Once the meringues are cooked, fastidiously switch them to a wire rack to cool fully. Do not rush this step; cooling is critical for his or her structural integrity.
To assemble the floating islands, gently spoon or ladle the cooled custard sauce onto serving plates or bowls.
Carefully place the cooled meringues on prime of the custard. A single meringue per serving is often perfect.
For an additional touch, think about garnishing your floating islands with fresh berries, a dusting of powdered sugar, Floating Islands recipe or a drizzle of caramel sauce.
Serve immediately and enjoy! The contrast between the crisp meringue and the creamy custard is solely delightful.
Tips for Success:
- Use fresh, high-quality eggs.
- Ensure your bowl and beaters are completely clean and grease-free.
- Don’t overbake the meringues; they should be firm but not browned.
- Let the meringues cool fully before serving to keep away from the custard from melting them.
- Experiment with different flavorings in your custard sauce.
With a little persistence and a spotlight to element, you probably can create beautiful and delicious floating islands at residence.
Begin with the meringue: Whisk 6 giant egg whites until soft peaks kind. Gradually add 1 cup of superfine sugar, whisking continuously till stiff, shiny peaks develop. A pinch of cream of tartar helps stabilize the meringue.
Carefully fold in 1 teaspoon of vanilla extract. The folding motion is essential – keep away from overmixing, which may deflate the meringue.
Preheat your oven to 300°F (150°C). Line a baking sheet with parchment paper.
Using two spoons, or a piping bag, create meringues in desired shapes and sizes onto the prepared baking sheet. Leave space between each for even cooking.
Bake for 1 hour and quarter-hour to 1 hour and half-hour, or until the meringues are crisp and dry. The baking time would possibly vary relying in your oven.
Once baked, turn off the oven and leave the meringues inside with the door slightly ajar to cool utterly. This gradual cooling prevents cracking.
While the meringues bake, put together the custard: In a saucepan, mix 2 cups of entire milk, ½ cup of sugar, and 2 large egg yolks.
Whisk the milk, sugar, and egg yolks together until nicely combined. Place the saucepan over medium heat, stirring continually until the combination thickens and coats the again of a spoon. Do not boil.
Remove from warmth and stir in 1 teaspoon of vanilla extract.
Strain the custard via a fine-mesh sieve to take away any lumps for a smoother texture.
To assemble, fastidiously pour the warm custard into particular person serving dishes or a large bowl.
Gently place the cooled meringues on high of the custard. The custard will slightly soften the bottom of the meringue.
Optional Garnishes: A dusting of powdered sugar adds a contact of class.
Fresh berries, corresponding to raspberries or strawberries, present a vibrant colour and contrasting tartness.
A drizzle of caramel sauce offers a wealthy, sweet complement to the meringues and custard.
A sprinkle of chopped nuts, like pistachios or almonds, adds textural interest and a delicate nutty taste.
A few sprigs of contemporary mint offer a refreshing herbaceous notice.
Chocolate shavings, both dark, milk, or white, can provide a decadent end.
Consider a light-weight dusting of cocoa powder for a extra sophisticated look.
For a truly luxurious contact, prime with a dollop of whipped cream. Choose a lightly sweetened variety to avoid overpowering the opposite flavors.
Let the Floating Islands rest for a few minutes before serving to permit the flavors to meld. Enjoy instantly for the best texture.
Storage: Leftovers can be refrigerated for as a lot as 2 days, but the meringues might soften barely.
Serving and Storage
Serving and Storage:
Floating islands are greatest served instantly after preparation, while the meringue remains gentle and ethereal, and the custard continues to be heat and creamy.
However, if you have to put together them forward of time, the meringue can be made a day in advance and saved in an hermetic container at room temperature. The custard may also be made ahead, but it’s finest saved refrigerated.
To assemble ahead, organize the cooled meringues on a serving platter and refrigerate. Just before serving, gently warm the custard (do not boil) and spoon it over the meringues.
Leftover floating islands should be refrigerated and consumed within 24 hours. The meringue could turn out to be slightly soft after refrigeration, however that is usually acceptable. Avoid freezing floating islands as the texture might be compromised.
Serving Suggestions:
The traditional approach to serve floating islands is solely as is – the creamy custard and Floating Islands Recipe light-weight meringue provide a pleasant distinction in textures and temperatures.
For an extra touch of class, mud the finished dish with powdered sugar or a light-weight sprinkling of cocoa powder.
A drizzle of your favourite liqueur, such as Grand Marnier or a berry liqueur, can add an grownup sophistication to the dessert.
Fresh berries, corresponding to raspberries, strawberries, or blueberries, not only add colour but also a burst of juicy sweetness that complements the rich custard and meringue superbly.
Berry Compote: Make a quick berry compote by simmering berries with a touch of sugar and lemon juice. Spoon this over the floating islands for an extra layer of taste.
Caramel Sauce: A rich caramel sauce offers a scrumptious distinction to the lightness of the meringue and custard. A simple do-it-yourself caramel or a store-bought version works well.
Chocolate Shavings: For chocolate lovers, a dusting of shaved darkish or milk chocolate enhances the wealthy flavours.
Mint Sprig Garnish: A recent sprig of mint provides a contact of visual attraction and a refreshing herbaceous notice.
Whipped Cream: For those who prefer an extra creamy factor, a dollop of lightly sweetened whipped cream may be added on top of each floating island.
Remember to consider the general balance of flavors and textures when selecting your serving recommendations. A easy presentation could be just as satisfying as a extra elaborate one.
No matter how you choose to serve them, homemade floating islands are positive to impress your guests with their delicate magnificence and exquisite taste.
Serving your floating islands is finest carried out immediately after preparation, allowing the meringue to retain its delicate texture and the custard its creamy richness.
For an attractive presentation, arrange the meringue islands on particular person dessert plates, nestled in a pool of the vanilla custard.
Garnish with fresh berries, a dusting of powdered sugar, or a sprig of mint for a sublime touch.
If serving is not immediately attainable, you presumably can retailer the components separately for optimal quality.
Storage Recommendations:
Meringue Islands: Store baked meringue islands in an airtight container at room temperature for up to 2 days. Avoid refrigeration, as this will cause them to soften and turn into sticky.
Custard: Store the prepared custard in an hermetic container within the refrigerator. It will keep for up to 3 days. Allow it to come to room temperature before serving to maintain its best taste and texture.
Assembled Dessert: While not ideal, you’ll find a way to assemble the floating islands and refrigerate them for as much as 4 hours before serving. However, the meringue may take up some moisture from the custard, slightly altering its texture. It’s highly beneficial to assemble and serve instantly for the most effective outcomes.
To forestall the meringue from becoming soggy, never store the assembled dessert for extended intervals.
If you are making the meringue and custard upfront, think about storing them separately and assembling the dish simply earlier than serving.
Proper storage ensures the fragile flavors and textures of this classic dessert are preserved, providing a delightful culinary expertise.
Avoid freezing either the meringue or the custard, as it will drastically alter their texture and style upon thawing.
For the freshest tasting floating islands, put together and function soon as attainable after baking the meringue and making ready the custard.
Proper handling and storage will ensure your floating islands are a culinary success, delighting your guests with their gentle and ethereal texture and creamy custard.
Remember that hermetic containers are essential to maintaining freshness and stopping undesirable moisture absorption, especially for the fragile meringue.
Room temperature storage is ideal for the meringue to protect its crispness, whereas refrigeration is critical for the custard to take care of its security and forestall bacterial growth.
Planning forward, making ready elements in advance if necessary, and understanding the optimal storage conditions for each element will lead to a flawless floating islands dessert.
Consider the variety of guests and plan your preparation and storage accordingly to ensure that your floating islands are loved at their peak.